A few weeks ago, I wrote about how to access the iPhone accelerometer using HTML5 and the PhoneGap API. In this post, I return to this topic and discuss a native Accelerometer app. Here is a screenshot of version 1.0: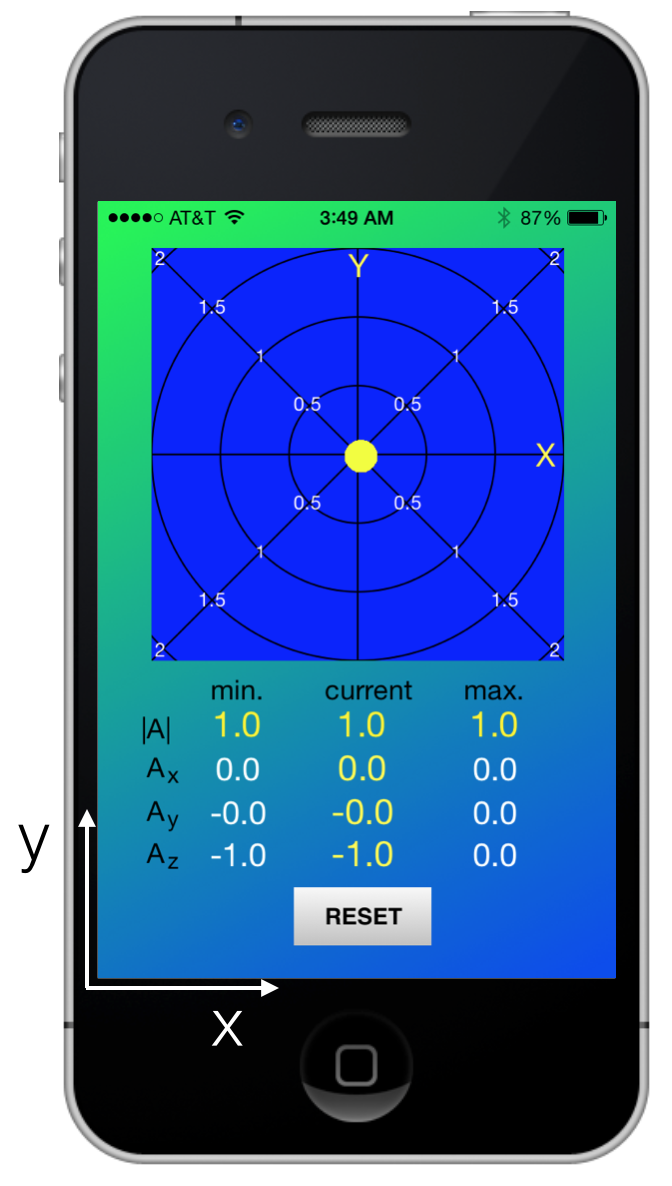
In the above picture, I’ve kept the iPhone on a table, with the x and y axes in the plane of the table. The z-axis points up towards you, normal to the iPhone screen. The acceleration due to gravity (in our non-inertial frame of reference on the earths surface) is negative one (in units of g = 9.8 [m/s2]), which means it is in the direction of the negative z-axis. The numbers show the acceleration magnitude and the {x,y,z} components, with the minimum and maximum values. Pressing the reset button erases the minimum and maximum values.
The polar grid is for displaying the instantaneous acceleration in the x-y plane. Because the acceleration is along z in this picture, the yellow ball is at the origin (zero x and y components). The circles correspond to different g values. If we place the iPhone on its edge in a vertical position on the table, we get the following result:
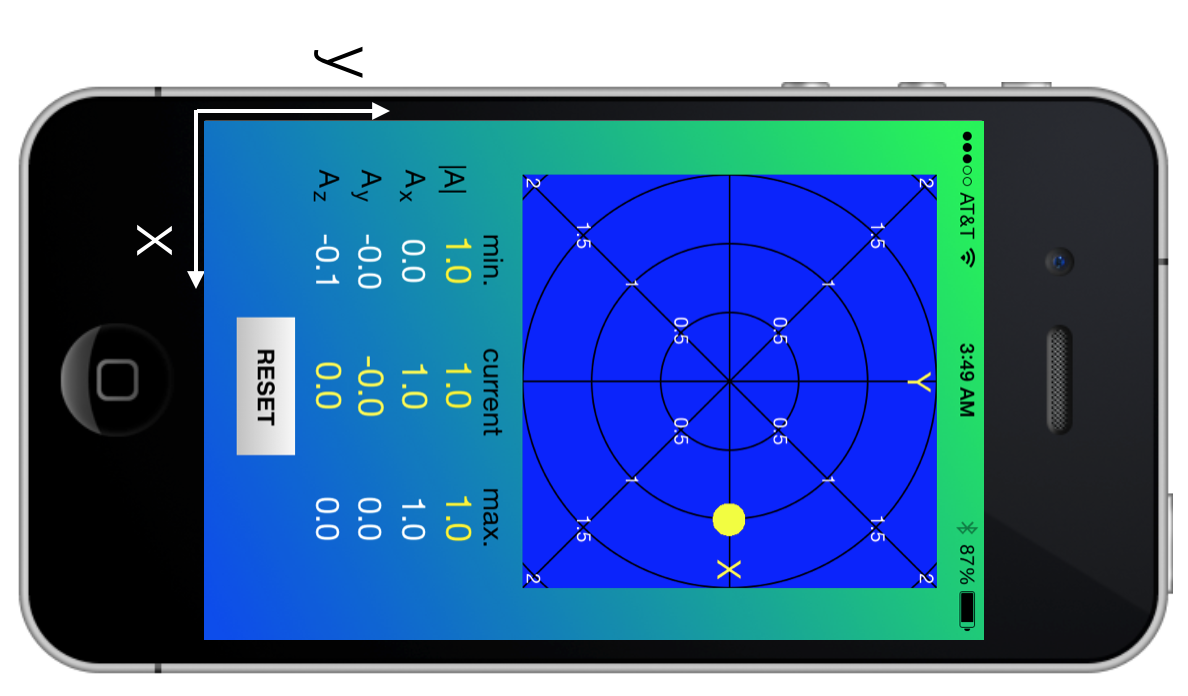
As you expected, the x-component is now 1.0 and the y and z components are zero. You can play with this app by downloading the source code from
https://github.com/jabhiji/ios-accelerometer.git
If you’ve been following my journey in iOS land, there were primarily two new things I learned while making this app:
- Using the CoreMotion Framework – this is where all the “motion sensing” classes live. You need to add this framework to your project and instantiate a CMMotionManager object to talk to the accelerometer.
#import <UIKit/UIKit.h>
#import <CoreMotion/CoreMotion.h>
#import "Model.h"
#import "Circles.h"

@interface ViewController : UIViewController

// labels
@property (strong, nonatomic) IBOutlet UILabel *minMag;
@property (strong, nonatomic) IBOutlet UILabel *magnitude;
@property (strong, nonatomic) IBOutlet UILabel *maxMag;
@property (strong, nonatomic) IBOutlet UILabel *accX;
@property (strong, nonatomic) IBOutlet UILabel *accY;
@property (strong, nonatomic) IBOutlet UILabel *accZ;
@property (strong, nonatomic) IBOutlet UILabel *minX;
@property (strong, nonatomic) IBOutlet UILabel *minY;
@property (strong, nonatomic) IBOutlet UILabel *minZ;
@property (strong, nonatomic) IBOutlet UILabel *maxX;
@property (strong, nonatomic) IBOutlet UILabel *maxY;
@property (strong, nonatomic) IBOutlet UILabel *maxZ;

// motion manager
@property (strong, nonatomic) CMMotionManager *motionManager;

// rolling ball model
@property (strong, nonatomic) Model *model;

// the view
@property (strong, nonatomic) IBOutlet Circles *myView;

// the ball images
@property (nonatomic, strong) UIImage* yellowball;
@property (nonatomic, strong) UIImageView* ballView;
- (IBAction)resetValues:(id)sender;

@end
The implementation file shows how to initialize this new object and use it to talk to the accelerometer:
#import "ViewController.h"

@interface ViewController ()

@end

@implementation ViewController

@synthesize minMag, magnitude, maxMag;
@synthesize minX, minY, minZ;
@synthesize accX, accY, accZ;
@synthesize maxX, maxY, maxZ;
@synthesize model;
@synthesize myView;
@synthesize motionManager;
@synthesize yellowball;
@synthesize ballView;

- (void)viewDidLoad
{
    [super viewDidLoad];
	// Do any additional setup after loading the view, typically from a nib.

    // ball image
    yellowball = [UIImage imageNamed:@"yellowBall.png"];

    // draw custom drawing inside the view (as background)
    [myView setNeedsDisplay];

    // crop anything that is outside the view
    myView.clipsToBounds = YES;

    // initialize model
    model = [[Model alloc] init];
    model.width  = self.myView.frame.size.width;
    model.height = self.myView.frame.size.height;
    [model setInitialBallPosition];

    // initialize UIIMageView object
    ballView = [[UIImageView alloc] init];
    ballView.image = yellowball;

    // initialize motion manager
    motionManager = [[CMMotionManager alloc] init];
    motionManager.accelerometerUpdateInterval = 1.0/60.0;

    if ([motionManager isAccelerometerAvailable]) {

        [self startGameLoop];

    } else {

        NSLog(@"No accelerometer! You may be running on the iOS simulator...");
    }

}

// get acceleration data and animate ball motion based on current acceleration
- (void) startGameLoop
{
    NSOperationQueue *queue = [[NSOperationQueue alloc] init];

    [motionManager startAccelerometerUpdatesToQueue:queue withHandler:^(CMAccelerometerData *accelerometerData, NSError *error) {
        dispatch_async(dispatch_get_main_queue(), ^{

            // acceleration components (X, Y and Z)
            model.accelerationX = accelerometerData.acceleration.x;
            model.accelerationY = accelerometerData.acceleration.y;
            model.accelerationZ = accelerometerData.acceleration.z;
.
.
.
.

@end
- Using the CoreGraphics API for custom drawing inside a UI View, starting with getting the current graphics context and learning the difference between points and pixels. This stuff is found in Circles.m, the implementation file for the Circles class.
#import "Circles.h"

@implementation Circles

- (id)initWithFrame:(CGRect)frame
{
    self = [super initWithFrame:frame];
    if (self) {
        // Initialization code
    }
    return self;
}

// Only override drawRect: if you perform custom drawing.
// An empty implementation adversely affects performance during animation.
- (void)drawRect:(CGRect)rect
{
    [self drawCircles];
}

// polar grid on which the instantaneous acceleration is displayed in real time
- (void) drawCircles
{
    // get the current context
    CGContextRef context = UIGraphicsGetCurrentContext();

    // context size in pixels
    size_t WIDTH = CGBitmapContextGetWidth(context);
    size_t HEIGHT = CGBitmapContextGetHeight(context);

    // for retina display, 1 point = 2 pixels
    // context size in screen points
    float width = WIDTH/2.0;
    float height = HEIGHT/2.0;

    // center coordinates
    float xCen = width/2.0;
    float yCen = height/2.0;
    float maxR = width/2.0;     // WIDTH = HEIGHT in this app
    float ONEGEE = 0.666*maxR;

    // big circle to fill corners
    CGContextBeginPath(context);
    CGContextAddArc(context, xCen, yCen, 3*ONEGEE, 0, 2*M_PI, YES);
    [[UIColor blueColor] setFill];
    [[UIColor blackColor] setStroke];
    CGContextDrawPath(context, kCGPathFillStroke);

    // outermost red circle (2g)
    CGContextBeginPath(context);
    CGContextAddArc(context, xCen, yCen, 2*ONEGEE, 0, 2*M_PI, YES);
    [[UIColor blueColor] setFill];
    [[UIColor blackColor] setStroke];
    CGContextDrawPath(context, kCGPathFillStroke);

    // blue circle (1g)
    CGContextBeginPath(context);
    CGContextAddArc(context, xCen, yCen, ONEGEE, 0, 2*M_PI, YES);
    [[UIColor blueColor] setFill];
    [[UIColor blackColor] setStroke];
    CGContextDrawPath(context, kCGPathFillStroke);

    // unfilled circles (0.5g)
    CGContextBeginPath(context);
    CGContextAddArc(context, xCen, yCen, 0.5*ONEGEE, 0, 2*M_PI, YES);
    [[UIColor blackColor] setStroke];
    CGContextDrawPath(context, kCGPathStroke);

    // unfilled circles (1.5g)
    CGContextBeginPath(context);
    CGContextAddArc(context, xCen, yCen, 1.5*ONEGEE, 0, 2*M_PI, YES);
    [[UIColor blackColor] setStroke];
    CGContextDrawPath(context, kCGPathStroke);

    // horizontal centerline
    CGContextBeginPath(context);
    CGContextMoveToPoint(context, 0, height/2);
    CGContextAddLineToPoint(context, width, height/2);
    [[UIColor blackColor] setStroke];
    CGContextDrawPath(context, kCGPathStroke);

    // vertical centerline
    CGContextBeginPath(context);
    CGContextMoveToPoint(context, width/2, 0);
    CGContextAddLineToPoint(context, width/2, height);
    [[UIColor blackColor] setStroke];
    CGContextDrawPath(context, kCGPathStroke);

    // diagonal 1
    CGContextBeginPath(context);
    CGContextMoveToPoint(context, 0, 0);
    CGContextAddLineToPoint(context, width, height);
    [[UIColor blackColor] setStroke];
    CGContextDrawPath(context, kCGPathStroke);

    // diagonal 2
    CGContextBeginPath(context);
    CGContextMoveToPoint(context, width, 0);
    CGContextAddLineToPoint(context, 0, height);
    [[UIColor blackColor] setStroke];
    CGContextDrawPath(context, kCGPathStroke);
}

@end
—-
Once your device has this app, there are some interesting experiments you can do to test how many g’s your body experiences while walking, running, walking up and down the stairs and so on and so forth. Here is a quick summary of the acceleration magnitude range in some random experiments:
- Standing still – 1g
- Normal walking – 0.7g to 1.8g
- Walking up the stairs – 0.4g to 2.0g
- Going downstairs – 0.1g to 3.3g
- Jumping up and down – 0g to 2.5g
- Vigorously shaking the phone – 0g to 3.5g
Finally, if you throw your iPhone in the air, it will temporarily experience “weightless” conditions (just like it does when you jump up and down) and the app will record the minimum acceleration magnitude to be zero. But the impulse when you throw it and catch it again could be up to 3.5g. The above set of results come with some caveats that you should keep in mind: (1) The data is obtained at 60 Hz. Thus, impulses imparted in a time interval less than 1/60th of a second may not be recorded accurately. (2) I was not able to get a reading more than 3.5g for the maximum acceleration. This might be the maximum limit of the hardware.
In summary, we learned how to write a native iOS app that queries the built-in accelerometer and displays the values on screen in real-time. In the next version of this app, I plan to add in another screen where we can plot the different accelerations as a single graph or multiple graphs, with time on the x-axis.