In a previous post, I talked about my first iOS game using PhoneGap, which I called HOLES. At that time, I did not know as much about Xcode and Objective-C as I do now. Because of this reason, I wrote that game using HTML5/JavaScript and used PhoneGap to port the game to iOS.
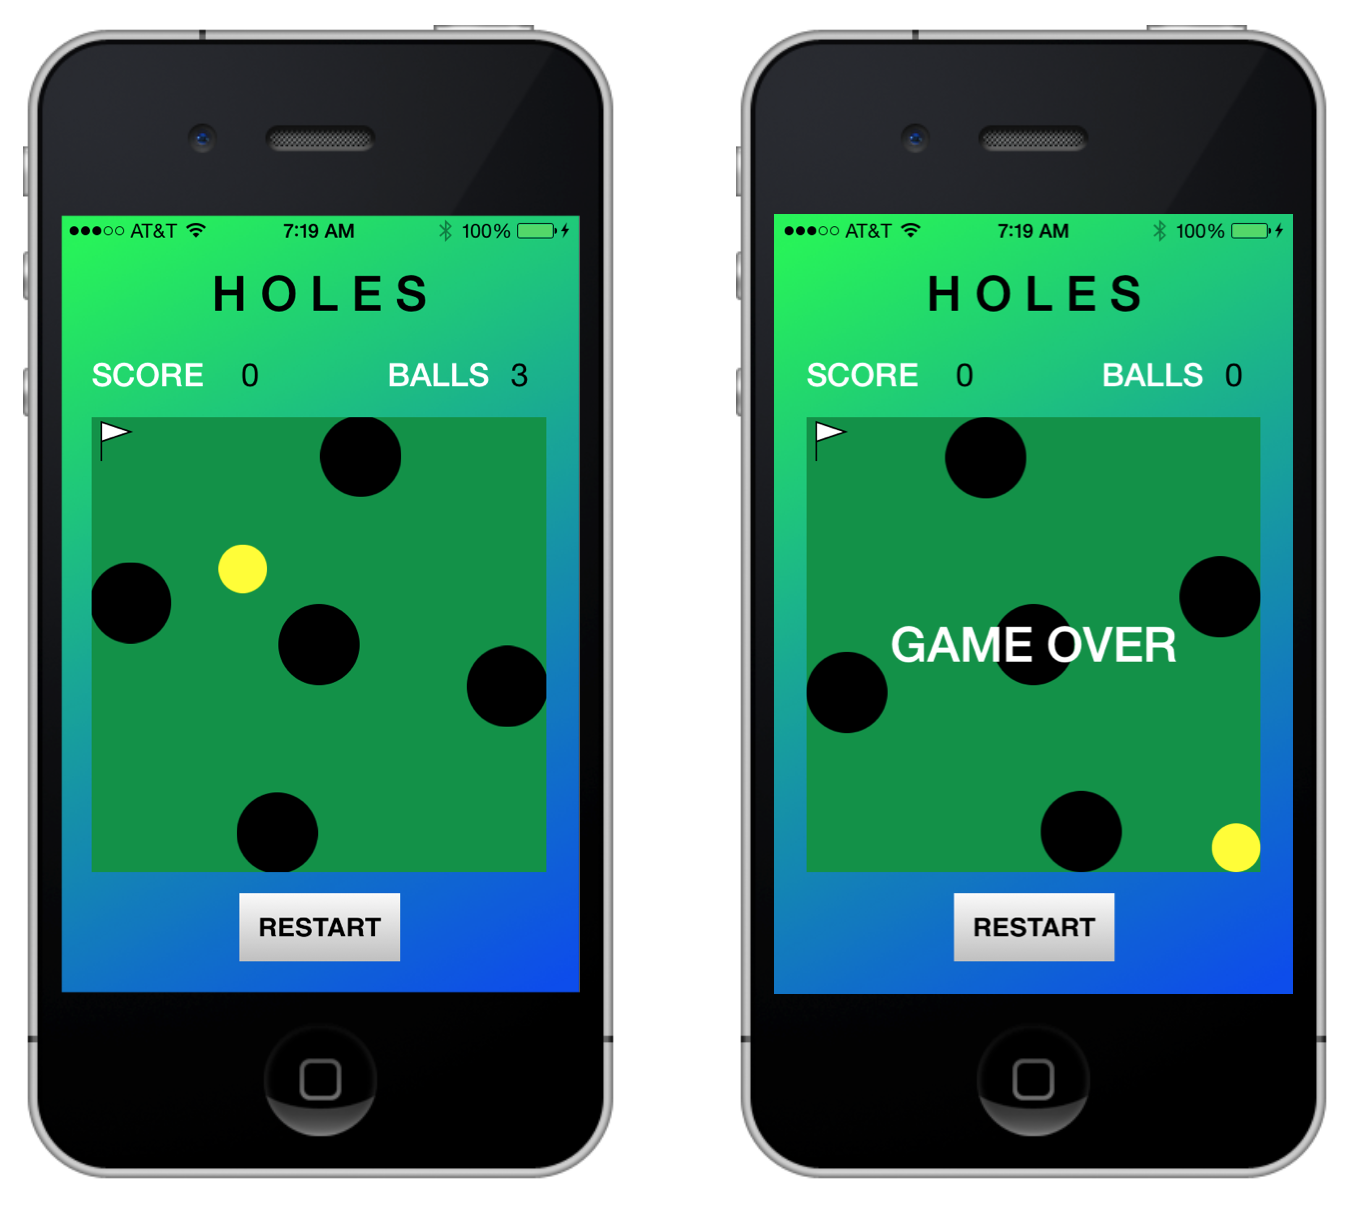
Now that Objective-C is becoming more and more easy to use, I decided to revisit the game and write a completely native version. Here are some screenshots from version 1.0:
I admit that it took me a lot more time to write this native iOS version compared to the HTML5 version, primarily because I am relatively new to Objective-C and to object oriented programming (OOP) in general. But it was well worth the effort because I learned several new things while working on this project and I believe the end result is an app that is more polished compared to the HTML5 version.
The entire project can be downloaded from my GitHub page using the following link:
https://github.com/jabhiji/ios-holes.git
What follows is a brief summary of the design – and some nuggets from Objective-C – that I hope will be helpful to the new game developer.
The Model
Think about what parameters we might need in the abstract model of our game. To begin with, we are using the accelerometer to control the movement of a ball on screen. So we need to know the ball radius and the location (x, y) on screen. We also need the acceleration and velocity components and need some logic to (1) update the ball position (2) check for collisions with the domain walls (3) rotate the hole pattern (4) check if the ball falls inside a hole (5) check if the ball reaches the flag and (6) update the score and number of balls remaining and (7) detect when the game ends and reinitialize all parameters when the user presses the RESTART button.
All this and more is done using the GameModel class and the interface for this class is copied below.
#import <Foundation/Foundation.h>

@interface GameModel : NSObject

// center of the ball
@property float x, y, R;

// ball velocity
@property float ux, uy;

// coefficient of restitution
@property float COR;

// ball acceleration
@property float ax, ay;

// view size in points
@property float width;
@property float height;

// game score
@property int score;

// balls remaining
@property int ballsLeft;

// holes
@property int numberOfHoles;
@property NSMutableArray* xBH;
@property NSMutableArray* yBH;
@property NSMutableArray* radiusBH;
@property int ballInsideHole;
@property float dtheta;

// methods
- (void) setInitialBallPosition;
- (void) updateBallPosition;
- (void) resetHoles;
- (void) updateHoles;
- (void) checkHoleCapture;

@end
As usual, the idea is to instantiate an object of this class in ViewController and use the above properties and methods to help the controller send the appropriate data to the view for displaying the ball and hole pattern on screen and figuring out how the scene changes with time.
This app makes heavy use of an Objective-C class called NSMutableArray, which is a convenient way to deal with an array of objects. The Apple Developer website sums this up perfectly:
The
NSMutableArrayclass declares the programmatic interface to objects that manage a modifiable array of objects. This class adds insertion and deletion operations to the basic array-handling behavior inherited fromNSArray.
In the GameModel class, we use NSMutableArray to create an array of x-coordinates, y-coordinates and radii of the black holes. This is how you allocate and initialize the array:
        numberOfHoles = 5;

        xBH = [[NSMutableArray alloc] initWithCapacity:numberOfHoles];
        yBH = [[NSMutableArray alloc] initWithCapacity:numberOfHoles];
        radiusBH = [[NSMutableArray alloc] initWithCapacity:numberOfHoles];

        [xBH addObject:@(0.2*width)];
        [yBH addObject:@(0.2*height)];
        [radiusBH addObject:@(25.0)];

        [xBH addObject:@(0.8*width)];
        [yBH addObject:@(0.2*height)];
        [radiusBH addObject:@(25.0)];

        [xBH addObject:@(0.5*width)];
        [yBH addObject:@(0.5*height)];
        [radiusBH addObject:@(25.0)];

        [xBH addObject:@(0.2*width)];
        [yBH addObject:@(0.8*height)];
        [radiusBH addObject:@(25.0)];

        [xBH addObject:@(0.8*width)];
        [yBH addObject:@(0.8*height)];
        [radiusBH addObject:@(25.0)];
If you wish to access the data (floating-point numbers) stored in this array, you can use the following:
        float xH = [[xBH objectAtIndex:i] floatValue];
        float yH = [[yBH objectAtIndex:i] floatValue];
        float rH = [[radiusBH objectAtIndex:i] floatValue];
In this case, we are using simple floating point numbers as the “objects” stored in this array, but the same idea works for storing an array of objects of any class. This is what makes NSMutableArray a powerful and useful tool.
Like “addObject”, another useful method in NSMutableArray is “insertObject:(object) atIndex:(integer)”. We use this to reset the hole coordinates in one of the our GameModel class methods:
- (void) resetHoles
{
    float xH, yH;

    xH = 0.2*width;
    yH = 0.2*height;
    [xBH insertObject:@(xH) atIndex:0];
    [yBH insertObject:@(yH) atIndex:0];

    xH = 0.8*width;
    yH = 0.2*height;
    [xBH insertObject:@(xH) atIndex:1];
    [yBH insertObject:@(yH) atIndex:1];

    xH = 0.5*width;
    yH = 0.5*height;
    [xBH insertObject:@(xH) atIndex:2];
    [yBH insertObject:@(yH) atIndex:2];

    xH = 0.2*width;
    yH = 0.8*height;
    [xBH insertObject:@(xH) atIndex:3];
    [yBH insertObject:@(yH) atIndex:3];

    xH = 0.8*width;
    yH = 0.8*height;
    [xBH insertObject:@(xH) atIndex:4];
    [yBH insertObject:@(yH) atIndex:4];
}
We use NSMutableArray again in the Controller to manage the task of displaying all 5 holes.
The View(s)
The main items we need to display on screen are: (1) the yellow ball (2) the flag and (3) the black holes. Because all these shapes are easy to construct from geometric primitives, I decided to use custom UIView-based drawings. I called these classes Ball, Flag and Holes and they all inherit from the same UIView class.
The yellow ball:
// Custom drawing: yellow ball
- (void)drawRect:(CGRect)rect
{
    // get the current context
    CGContextRef context = UIGraphicsGetCurrentContext();

    // context size in pixels
    size_t WIDTH = CGBitmapContextGetWidth(context);
    size_t HEIGHT = CGBitmapContextGetHeight(context);

    // for retina display, 1 point = 2 pixels
    // context size in screen points
    float width = WIDTH/2.0;
    float height = HEIGHT/2.0;

    // center coordinates
    float xCen = width/2.0;
    float yCen = height/2.0;
    float maxR = width/2.0;     // WIDTH = HEIGHT in this case

    // yellow circle
    CGContextBeginPath(context);
    CGContextAddArc(context, xCen, yCen, maxR, 0, 2*M_PI, YES);
    [[UIColor yellowColor] setFill];
    CGContextDrawPath(context, kCGPathFill);
}
The black hole:
// custom drawing of a black hole
- (void)drawRect:(CGRect)rect
{
    // get the current context
    CGContextRef context = UIGraphicsGetCurrentContext();

    // context size in pixels
    size_t WIDTH = CGBitmapContextGetWidth(context);
    size_t HEIGHT = CGBitmapContextGetHeight(context);

    // for retina display, 1 point = 2 pixels
    // context size in screen points
    float width = WIDTH/2.0;
    float height = HEIGHT/2.0;

    // center coordinates
    float xCen = width/2.0;
    float yCen = height/2.0;
    float maxR = width/2.0;     // WIDTH = HEIGHT in this case

    // black circle
    CGContextBeginPath(context);
    CGContextAddArc(context, xCen, yCen, maxR, 0, 2*M_PI, YES);
    [[UIColor blackColor] setFill];
    CGContextDrawPath(context, kCGPathFill);
}
The flag:
// custom drawing for the flag
- (void)drawRect:(CGRect)rect
{
    // get the current context
    CGContextRef context = UIGraphicsGetCurrentContext();

    // context size in pixels
    size_t WIDTH = CGBitmapContextGetWidth(context);
    size_t HEIGHT = CGBitmapContextGetHeight(context);

    // for retina display, 1 point = 2 pixels
    // context size in screen points
    float width = WIDTH/2.0;
    float height = HEIGHT/2.0;

    // flag
    CGContextBeginPath(context);
    CGContextMoveToPoint(context, 0.2*width, 0.9*height);
    CGContextAddLineToPoint(context, 0.2*width, 0.1*height);
    CGContextAddLineToPoint(context, 0.8*width, 0.3*height);
    CGContextAddLineToPoint(context, 0.2*width, 0.5*height);
    CGContextClosePath(context);
    [[UIColor whiteColor] setFill];
    [[UIColor blackColor] setStroke];
    CGContextDrawPath(context, kCGPathFillStroke);
}
In the ViewController, we can instantiate objects of class Ball, Holes and Flag and specify where we want to display them in the superview.
The Controller
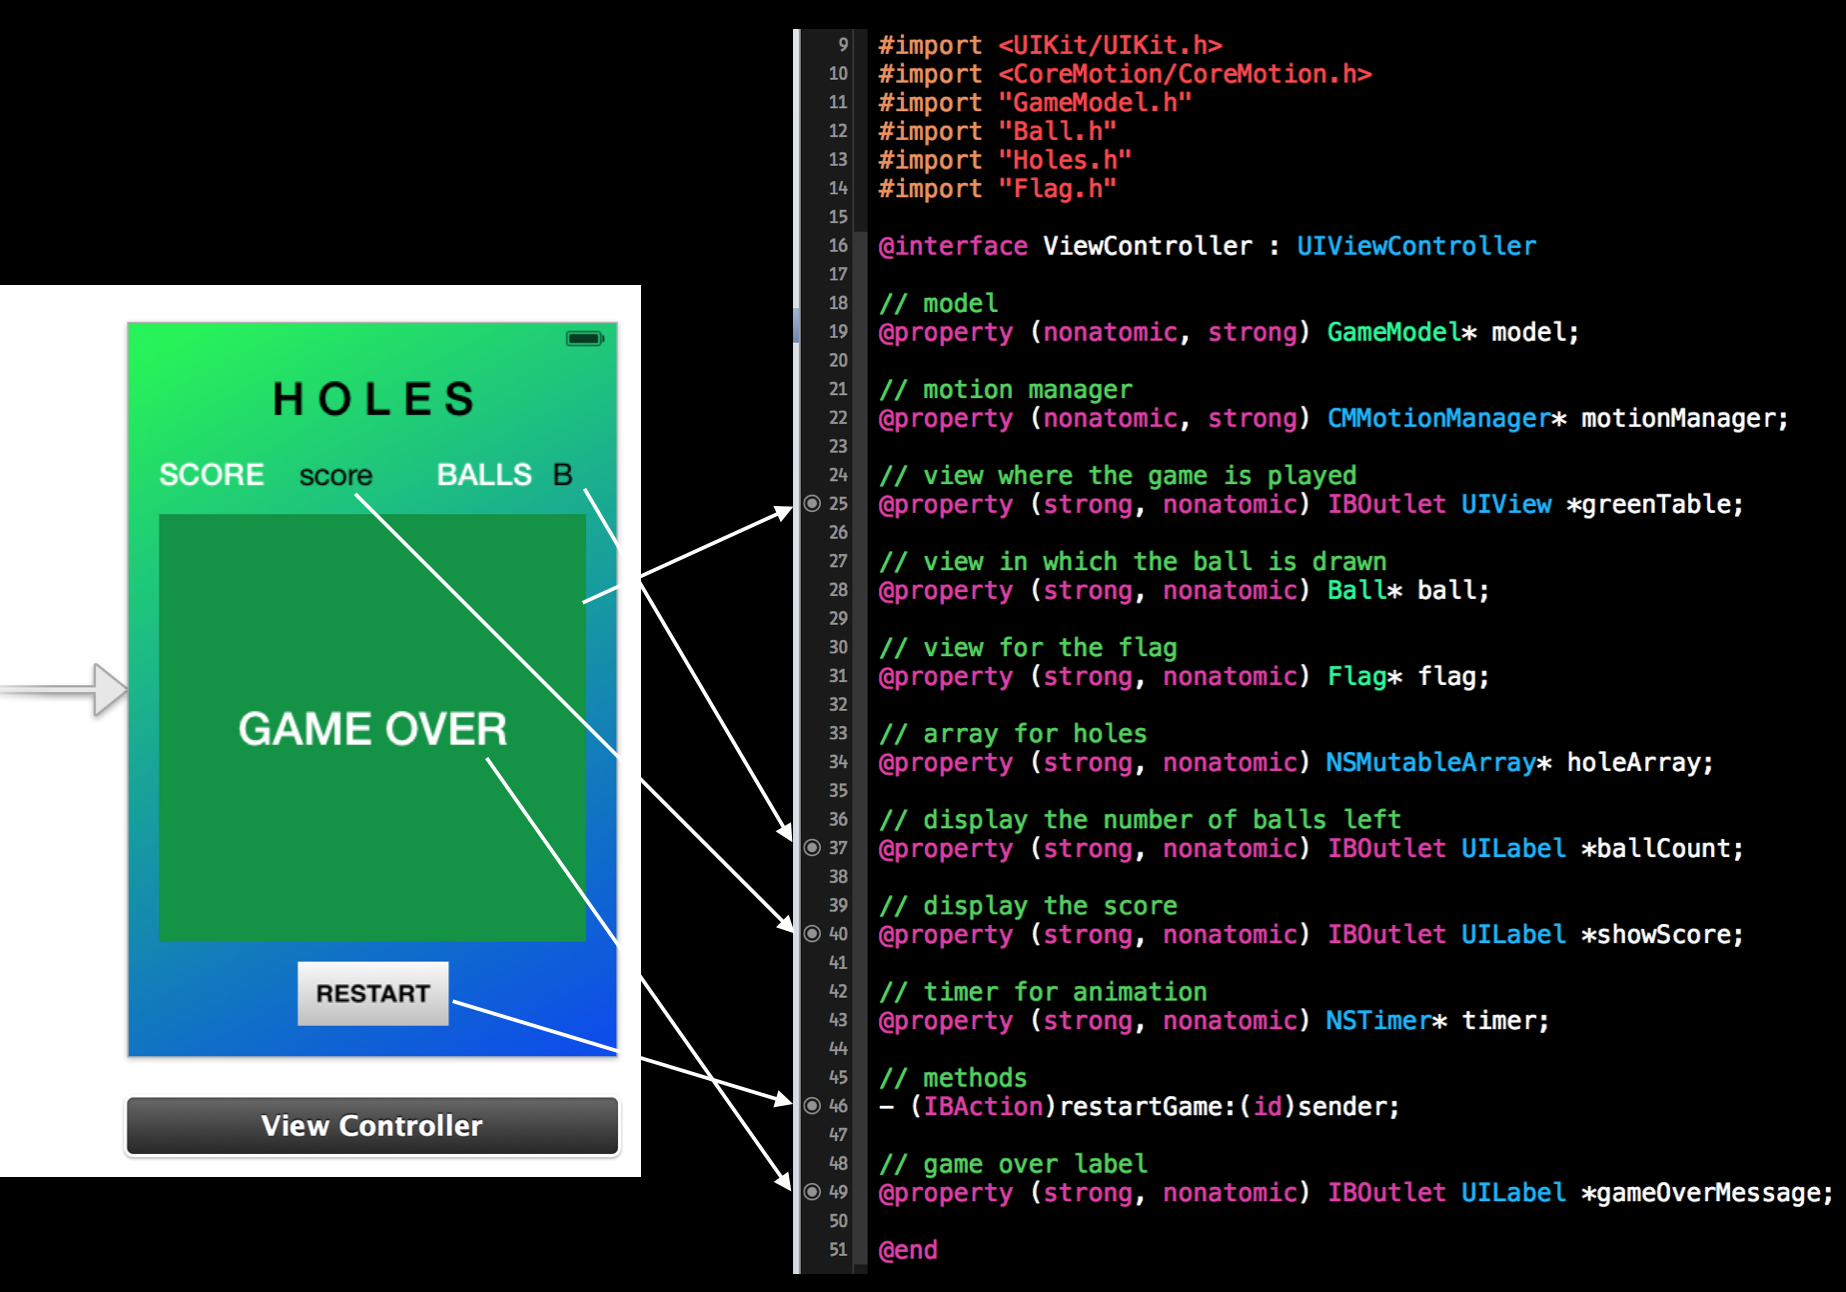
Because we need the accelerometer, we must add the CoreMotion framework to our project and include the corresponding header file in our interface. Here is the complete controller interface, with connections to the main storyboard:
In the implementation file (ViewController.m), we talk with the model and views to get the game going. The first step is to synthesize the properties we defined in the interface so Objective-C can provide us with the corresponding setter and getter methods for using these objects.
#import "ViewController.h"

@interface ViewController ()

@end

@implementation ViewController

@synthesize model;
@synthesize motionManager;
@synthesize greenTable;
@synthesize ball;
@synthesize flag;
@synthesize holeArray;
@synthesize ballCount, showScore;
@synthesize timer;
@synthesize gameOverMessage;

// flag to check whether ball reached the flag
int reachedFlag = 0;

- (void)viewDidLoad
{
    [super viewDidLoad];
	// Do any additional setup after loading the view, typically from a nib.

    // hide "GAME OVER" label
    gameOverMessage.hidden = YES;

    // initialize flag view
    CGRect flagRect = CGRectMake(0, 0, 30, 30);
    flag = [[Flag alloc] initWithFrame:flagRect];
    [flag setBackgroundColor:[UIColor clearColor]];
    [greenTable addSubview:flag];

    // clip things outside the view
    greenTable.clipsToBounds = YES;

    // initialize Ball object
    CGRect ballRect = CGRectMake(100, 100, 40, 40);
    ball = [[Ball alloc] initWithFrame:ballRect];
    [ball setBackgroundColor:[UIColor clearColor]];

    // initialize model
    model = [[GameModel alloc] init];
    model.width  = greenTable.frame.size.width;
    model.height = greenTable.frame.size.height;
    [model setInitialBallPosition];
    [model resetHoles];

    // initial score is zero
    showScore.text = [NSString stringWithFormat:@"%i",0];
    ballCount.text = [NSString stringWithFormat:@"%i",model.ballsLeft];

    // init holeArray
    holeArray = [[NSMutableArray alloc] initWithCapacity:model.numberOfHoles];

    // draw holes
    for (int i=0; i<model.numberOfHoles; i++) {
        float xH = [[model.xBH objectAtIndex:i] floatValue];
        float yH = [[model.yBH objectAtIndex:i] floatValue];
        float rH = [[model.radiusBH objectAtIndex:i] floatValue];
        CGRect holeRect = CGRectMake(xH-rH, yH-rH, 2*rH, 2*rH);
        Holes* holeView = [[Holes alloc] initWithFrame:holeRect];
        [holeArray addObject:holeView];
        [holeArray[i] setBackgroundColor:[UIColor clearColor]];
        [greenTable addSubview:holeArray[i]];
    }

    // initialize motion manager
    motionManager = [[CMMotionManager alloc] init];
    motionManager.accelerometerUpdateInterval = 1.0/60.0;

    if ([motionManager isAccelerometerAvailable]) {

        [self startGameLoop];

    } else {

        NSLog(@"No accelerometer! You may be running on the iOS simulator...");
    }

}
Some things you may want to pay close attention to in the above code are:
- Making the background transparent for UIView objects.
- Clipping things outside the view
- Creating an array of 5 objects of class “Holes” using NSMutableArray and displaying these objects.
- Starting the accelerometer and the NSTimer based game animation.
The rest of the ViewController code deals with the main game loop, where we update the model and draw the ball and holes at their updated locations and keep track of the score and how many balls we have left.
I used a simple UILabel for displaying the “GAME OVER” message when we no longer have any balls left. This label is hidden from view for most of the game with
    // hide "GAME OVER" label
    gameOverMessage.hidden = YES;
When all balls are gone, we simply un-hide this label and bring it to the “front” using
            // show "GAME OVER" label
            [greenTable bringSubviewToFront:gameOverMessage];
            gameOverMessage.hidden = NO;
If you’ve read this far, you now have a pretty good idea of the thought process and coding decisions that went into making this game work. I think I am enjoying Objective-C more and more with each new app I write.
Happy Gaming!