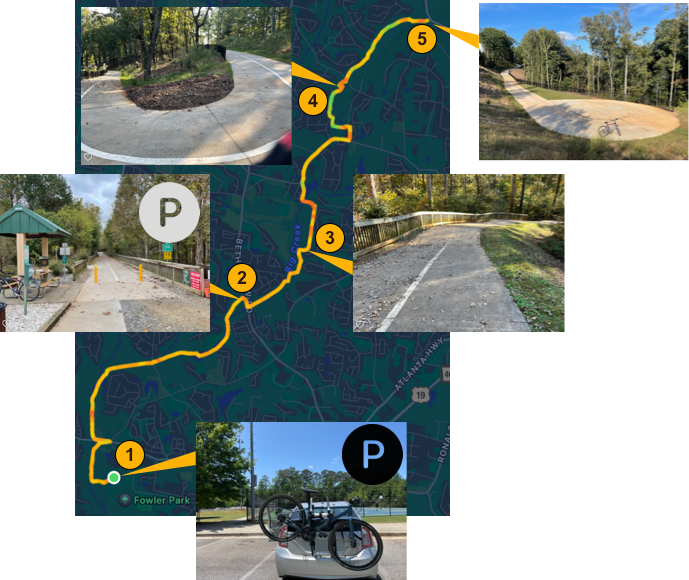
If you are looking for some good biking trails in the suburbs north of Atlanta for your road bike, one of the really good ones is the Big Creek Greenway. This is a super long (mix of paved + boardwalk) trail that runs from Roswell up to Alpharetta and then proceeds all the way to Canton Hwy in Cumming. My personal favorite part of the greenway for biking is the stretch between Fowler Park heading all the way north and back again. This specific portion is shown below with a few points of interest – including trail heads and parking areas.
(1) Fowler Park Parking Area
(2) Bethelview Rd. trail head (parking is available but a bit limited compared to Fowler Park)
(3) Steep inclines begin
(4) A very long steep climb
(5) Northernmost point on the trail
For a kid-friendly biking trip, I would recommend parking at Fowler Park (1) and heading north as shown above or heading south towards Halcyon. If you head north, you can bike up to the Bethelview Rd. trail head (2) and return to Fowler Park (1). Depending on how fast you are able to go this will be a round-trip between 30 mins to an hour.
But if you really want a nice workout, keep heading north past Bethelview Rd trail head. The part of the trail between (3) and (4) in the map above has a couple of steep inclines and is definitely not recommended for beginners (although you can always dismount and walk your bike up). Make sure your brakes are in good shape when riding down these inclines.
The northernmost point (5) is approximately an hour’s ride away from Fowler Park so a round trip such as the one above takes about 2 hours. The south side of the trail can get pretty crowded at times but the northernmost part is the opposite extreme and can feel very isolated.
One day – maybe this trail will be extended even further north – right up to Sawnee Mountain. But for now, that circle above near Canton Hwy is where the trail ends. Enjoy the ride!
Unlike iPhones or iPads, watchOS has a rather unique way users can interact with apps – using the Digital Crown. In this post, we will revisit our Fahrenheit to Centigrade app and create a version of it for the Apple Watch using SwiftUI and learn how to use a Picker View and how the Digital Crown can work automatically for a Picker View – that is without needing to write explicit code for it.
The primary mechanism for receiving user input here is the Picker which helps you select a temperature from a pre-defined range of temperature values from 0°F to 140°F. You can do this by scrolling through the values using the touch screen.
But more interestingly, you can do the same by rotating the Digital Crown. This automatically scrolls through the entire list without us needing to do anything special. This shouldn’t be surprising since the watch allows us to scroll using the Digital Crown for most scenarios. In an upcoming post, we will explore more custom UI elements where we will use special modifiers on our SwiftUI Views so that the Digital Crown can interact with them.
Board games have a rich tradition across various countries and cultures – games such as Chess and Go are hugely popular and are probably what you think of when you hear “strategy based board games”. But in ancient times, there were other games that kept people entertained for hours. In Egypt, one of the most popular 2-player board games was Senet – and it was played not just by Pharoahs and royalty but also by ordinary Egyptians.
In this post, we will explore a lesser known but immensely entertaining and simple board game called Tigers & Goats. This game has many incarnations and the original version comes to us from Nepal, where it is referred to as Bagh Chal. However, the variant I learned is from India and is commonly known by its Marathi name – Wagh-Shelya. I was introduced to Tigers & Goats by my grandmother – who taught me to play this on the chess board. Now, we have a modern version – an app – that we can play on an iPhone, iPad, Mac or Apple TV.
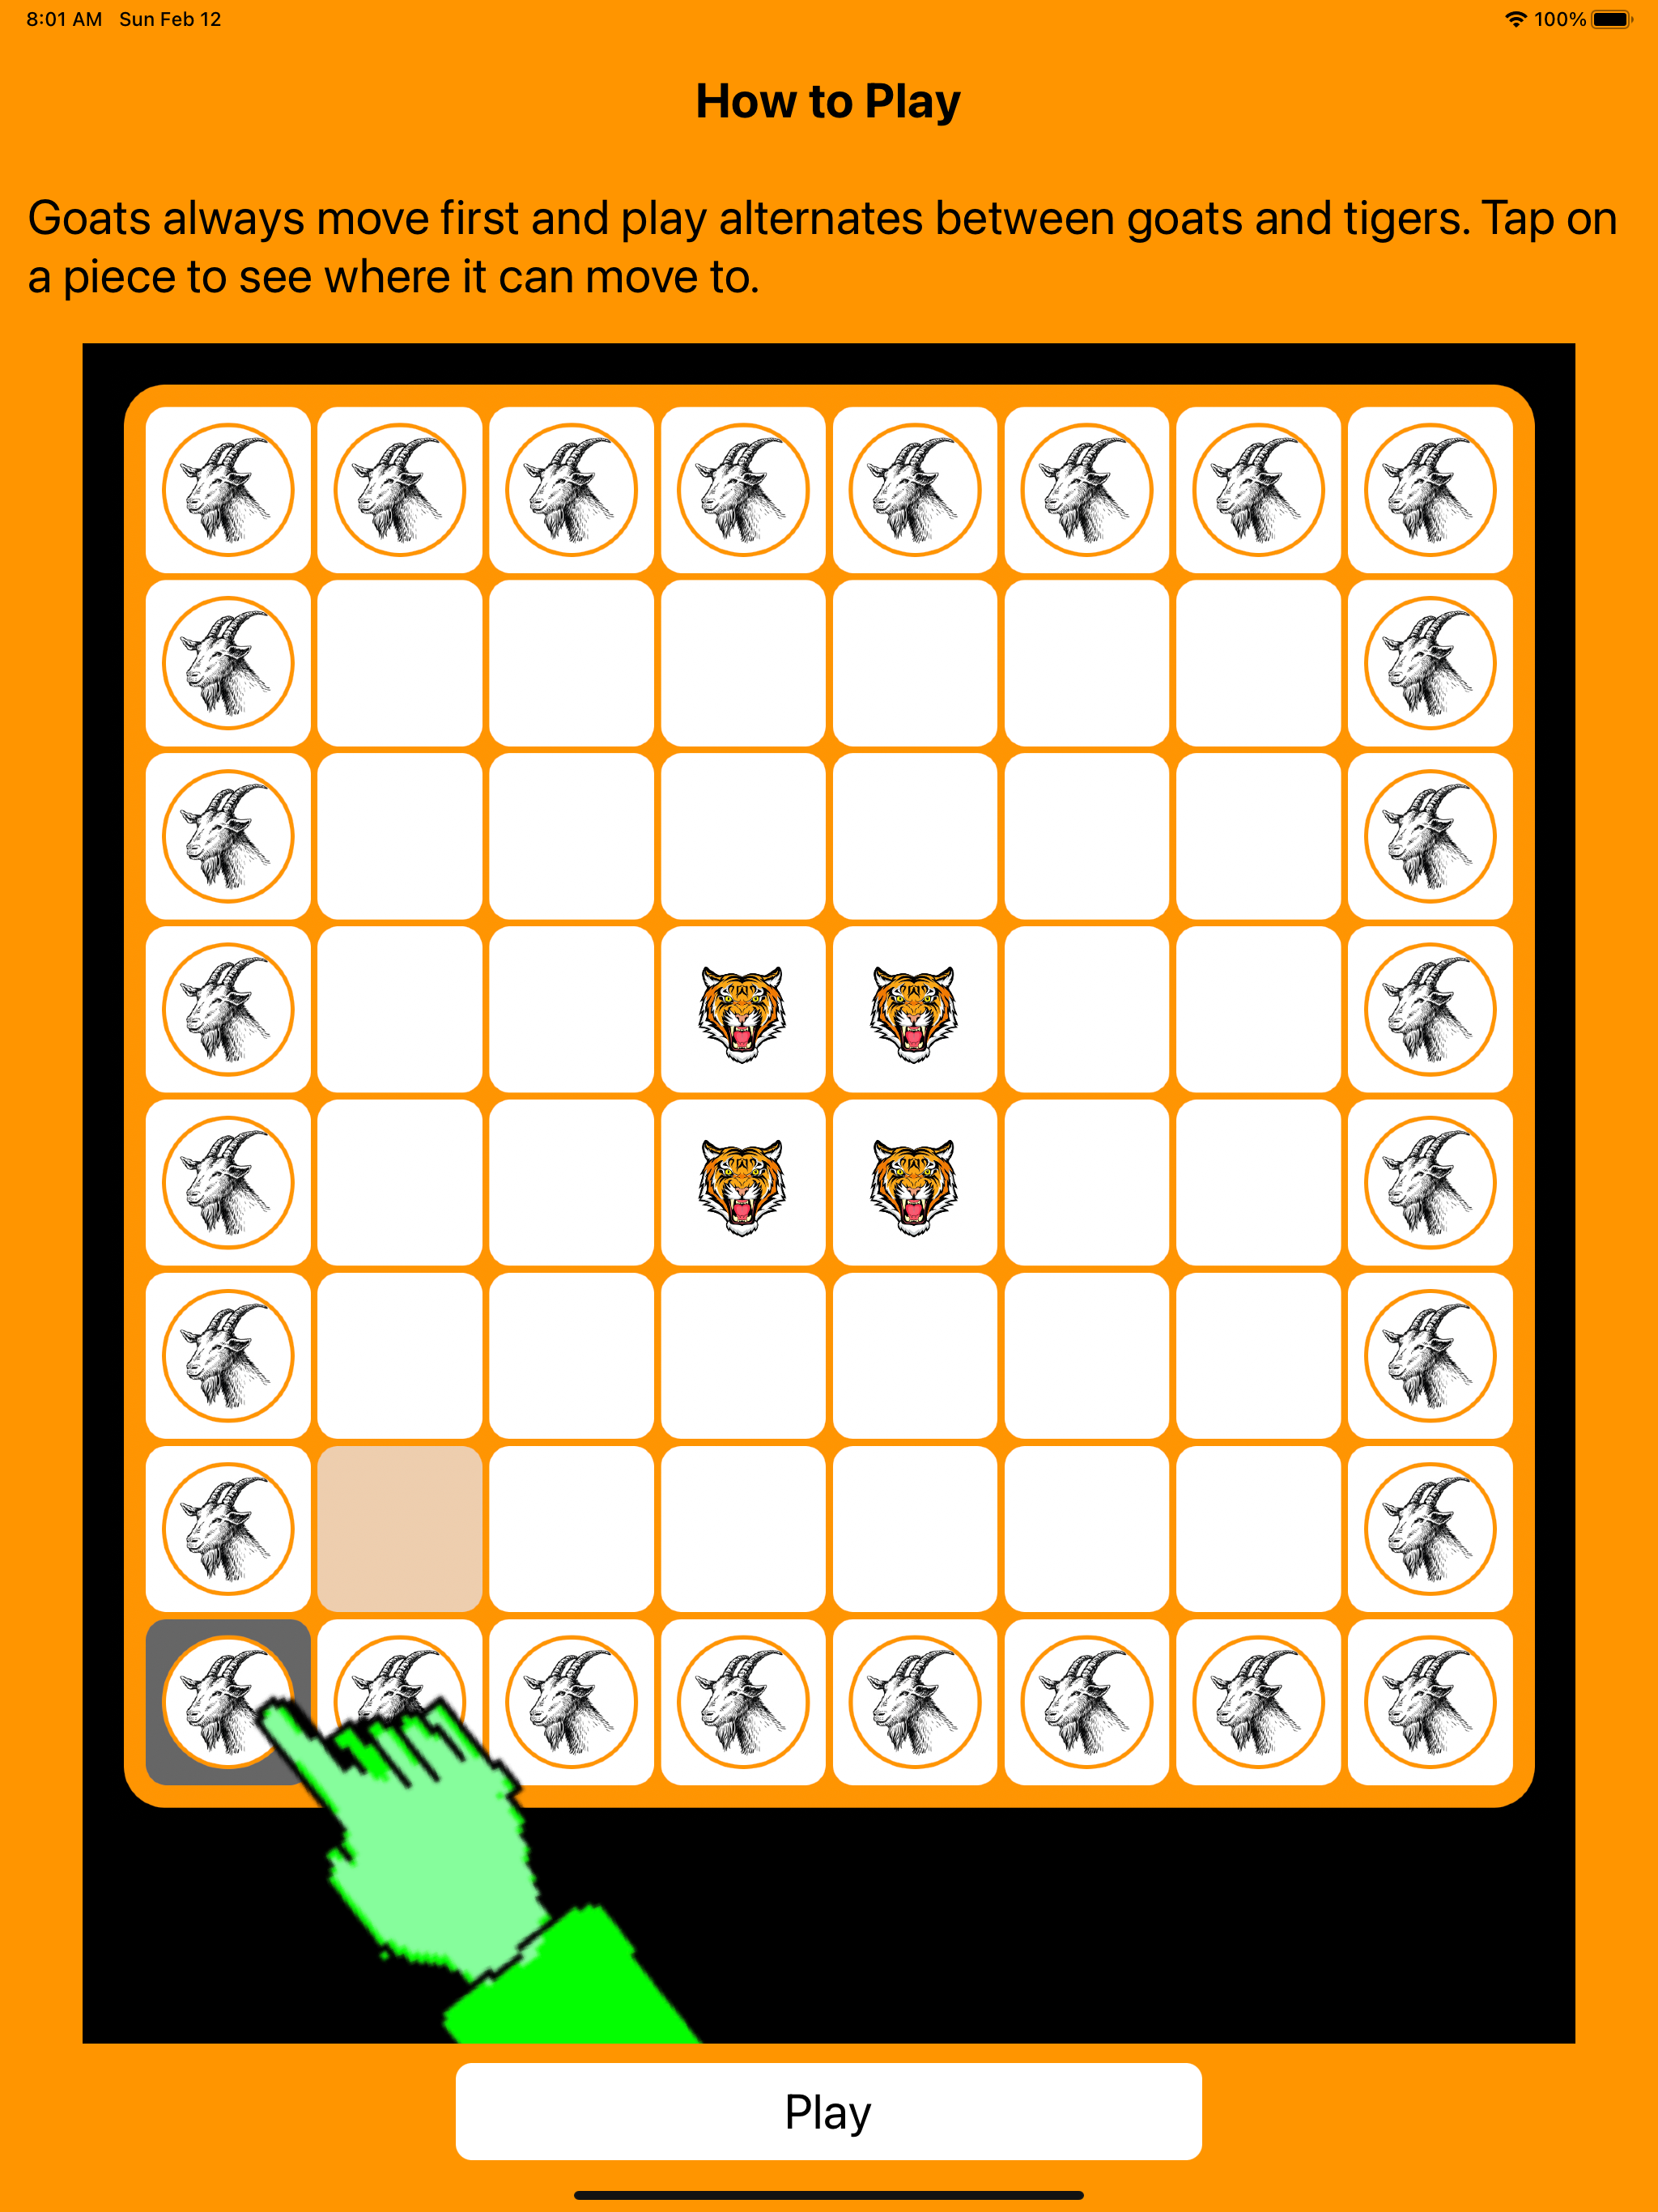
The rules are really simple – you start with an 8 x 8 board and arrange 28 goats around the perimeter. The four tigers are placed at the center of the board.
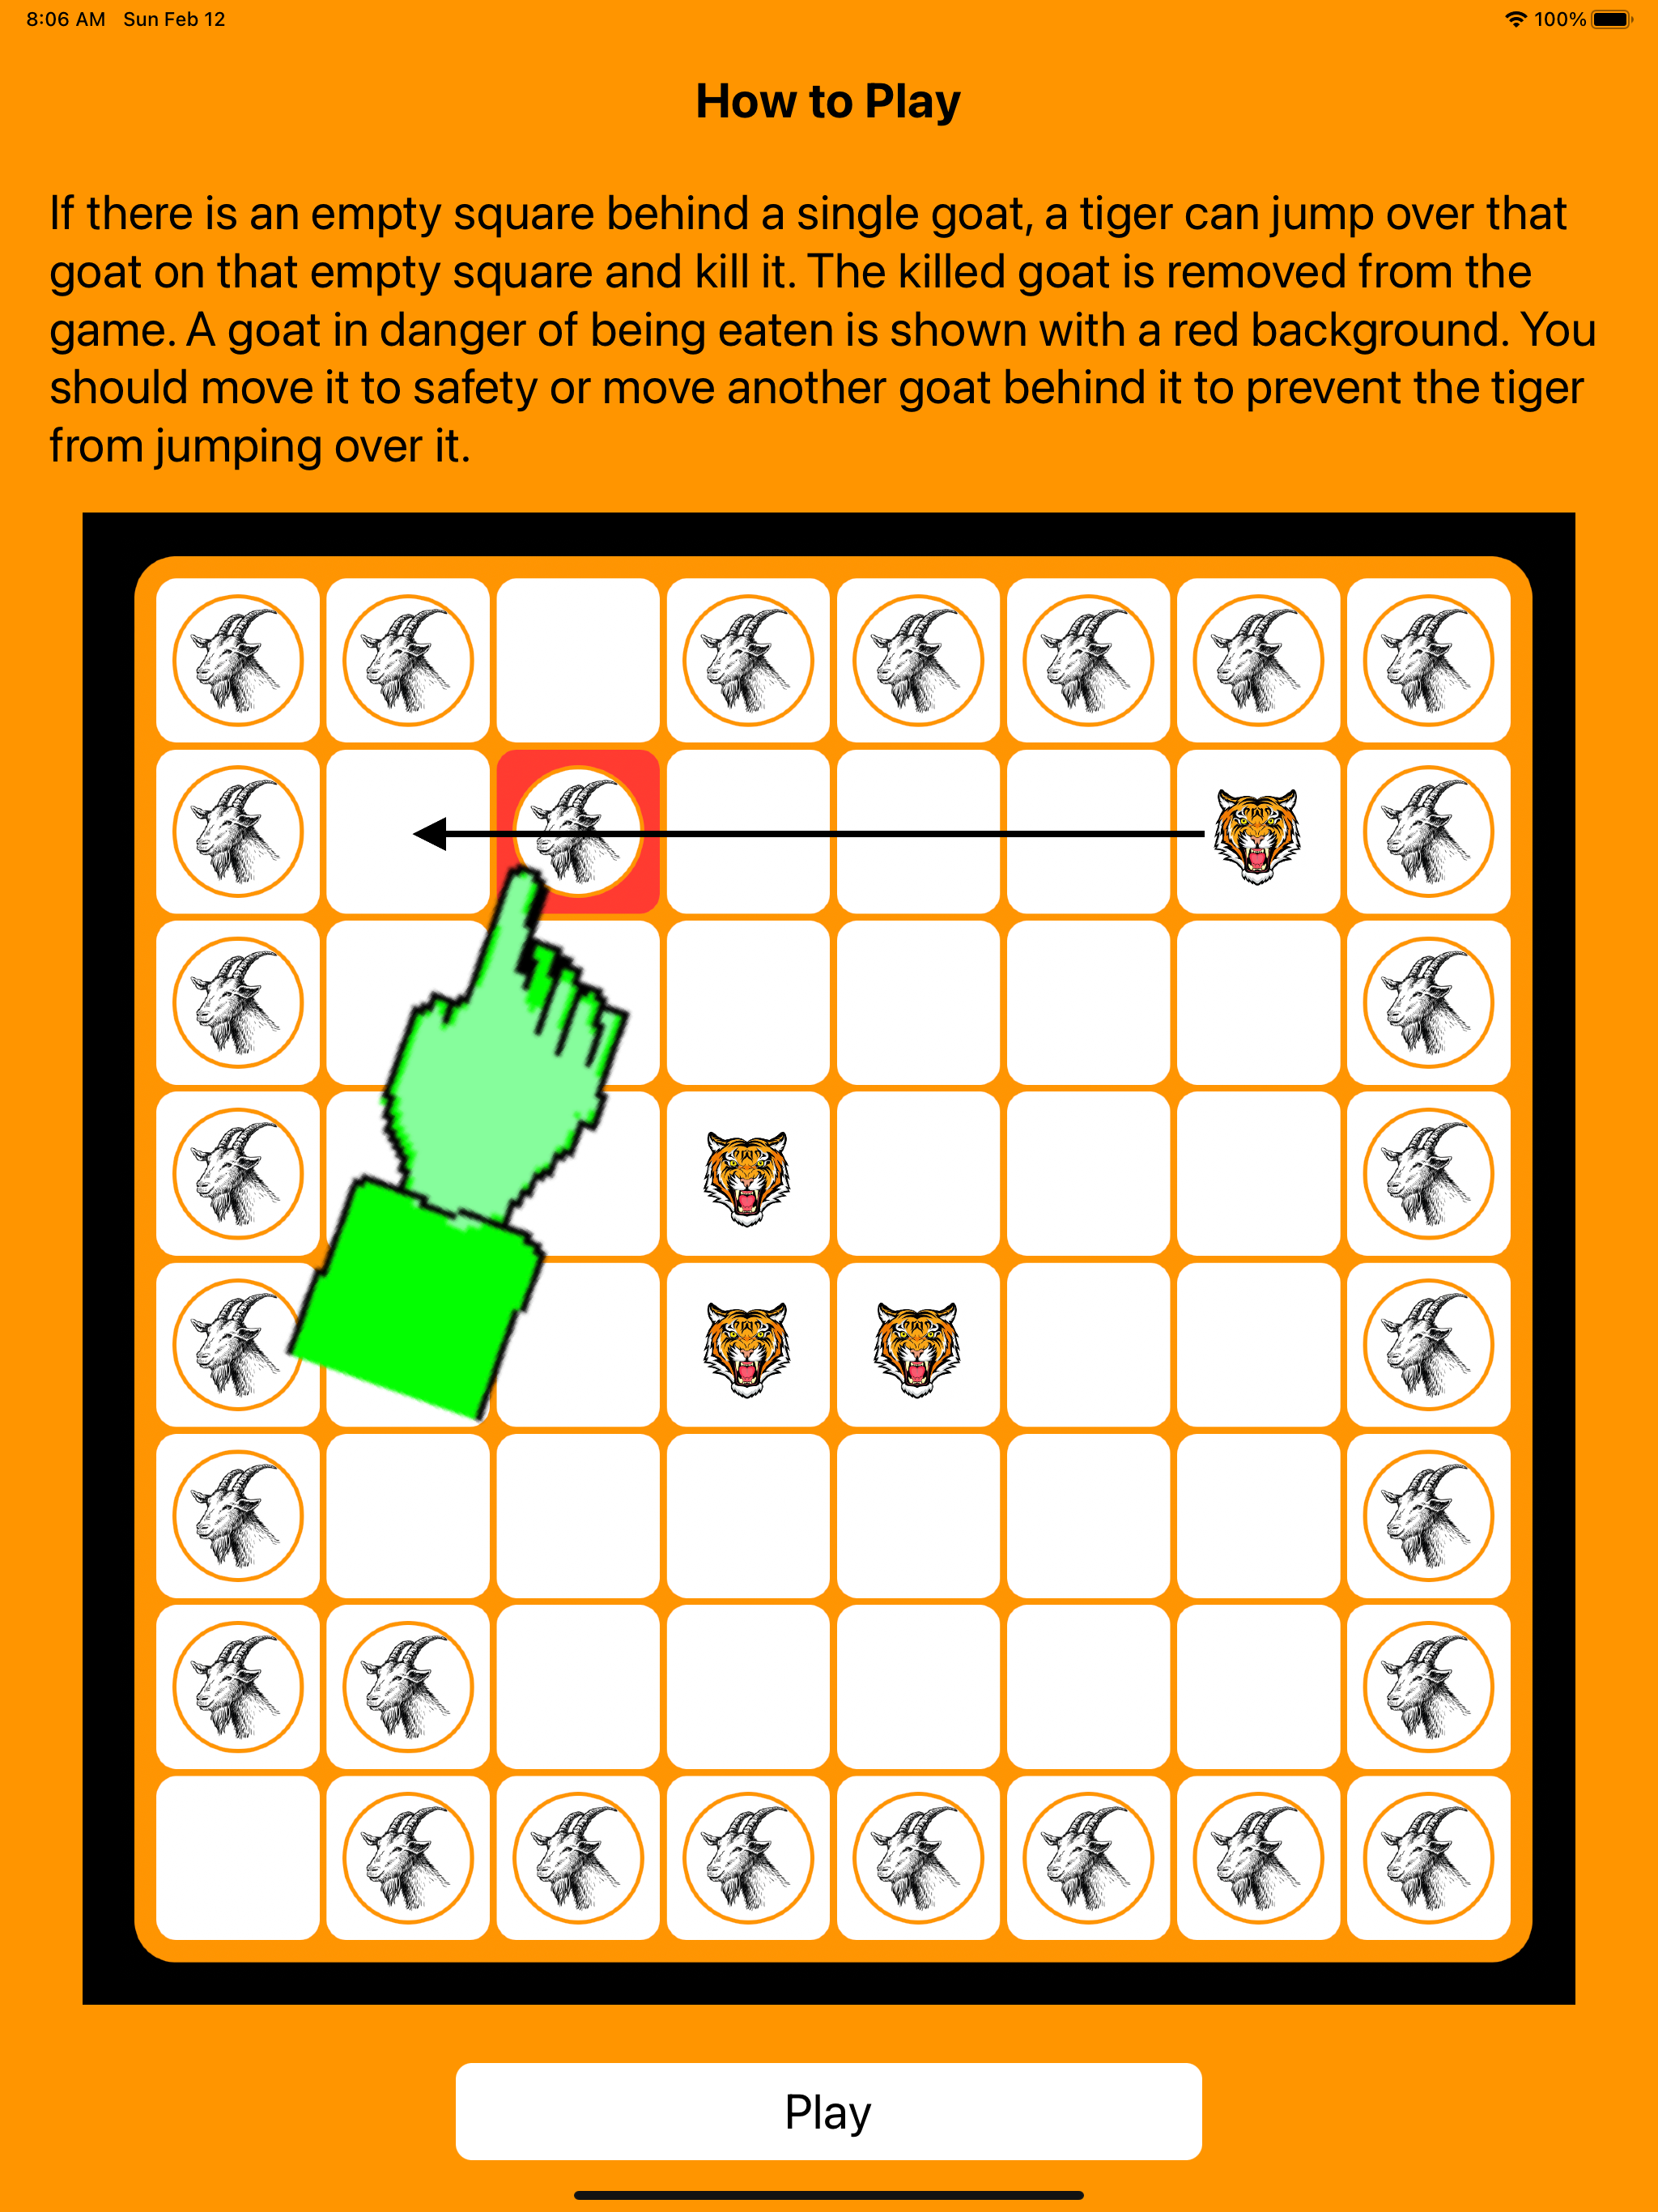
Goats always begin the game. They can move to an adjacent square in any direction as long as that square is empty. But be warned – the tigers can “eat” goats if they are not careful. In order for a tiger to be able to eat a goat, the goat should have an empty square behind it as shown below – either horizontally or vertically.
Tigers move in a fashion similar to how an elephant or rook moves in Chess – any number of squares horizontally or vertically. In addition, a tiger can “jump” over a goat and eat it. It is not mandatory for a tiger to kill a goat and it may choose not to depending on the situation in the game. The goats have to work together as a team to advance without being killed and eventually trap all 4 tigers so they cannot move at all. If this happens, the goats win.
The latest version of this game (version 2.7) can be played in 3 modes:
Practice
1-Player
2-Player
Practice mode lets you play both tigers and goats and helps you learn the game. One level up is 1-Player mode, where you take charge of goats and match wits against the computer, which plays tigers. Finally, 2-Player mode allows you to play with friends you invite using Apple’s Game Center.
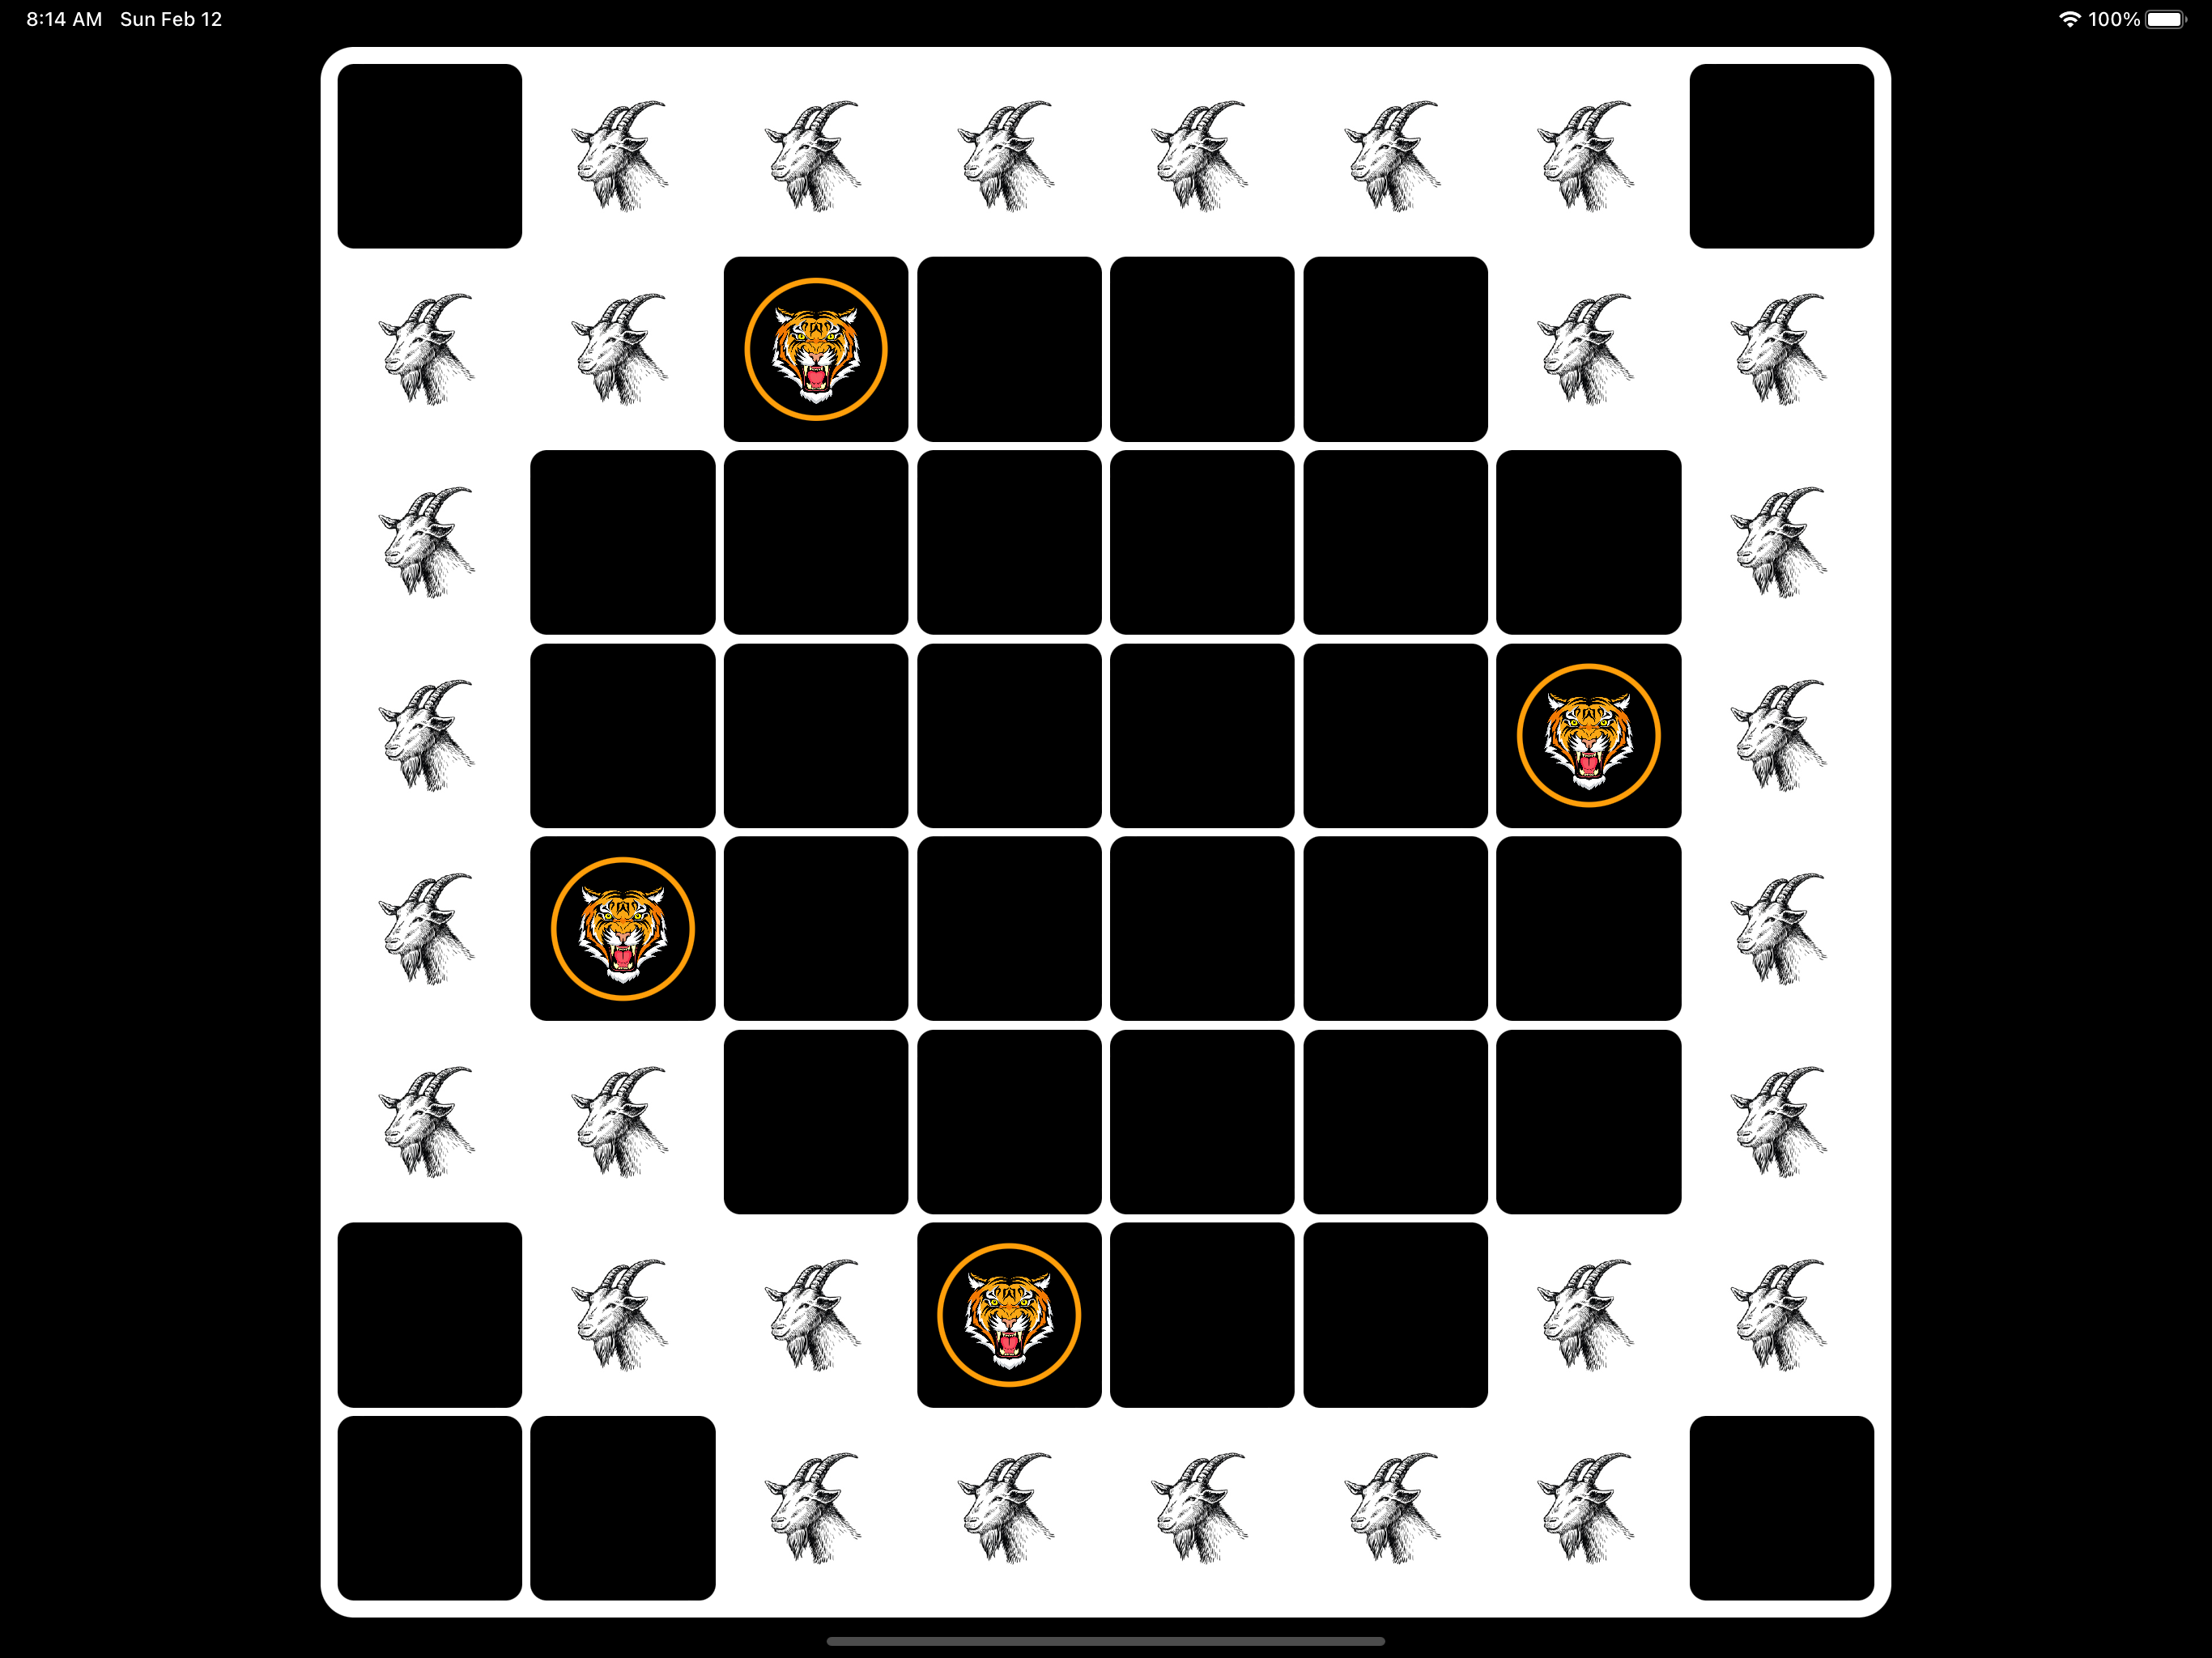
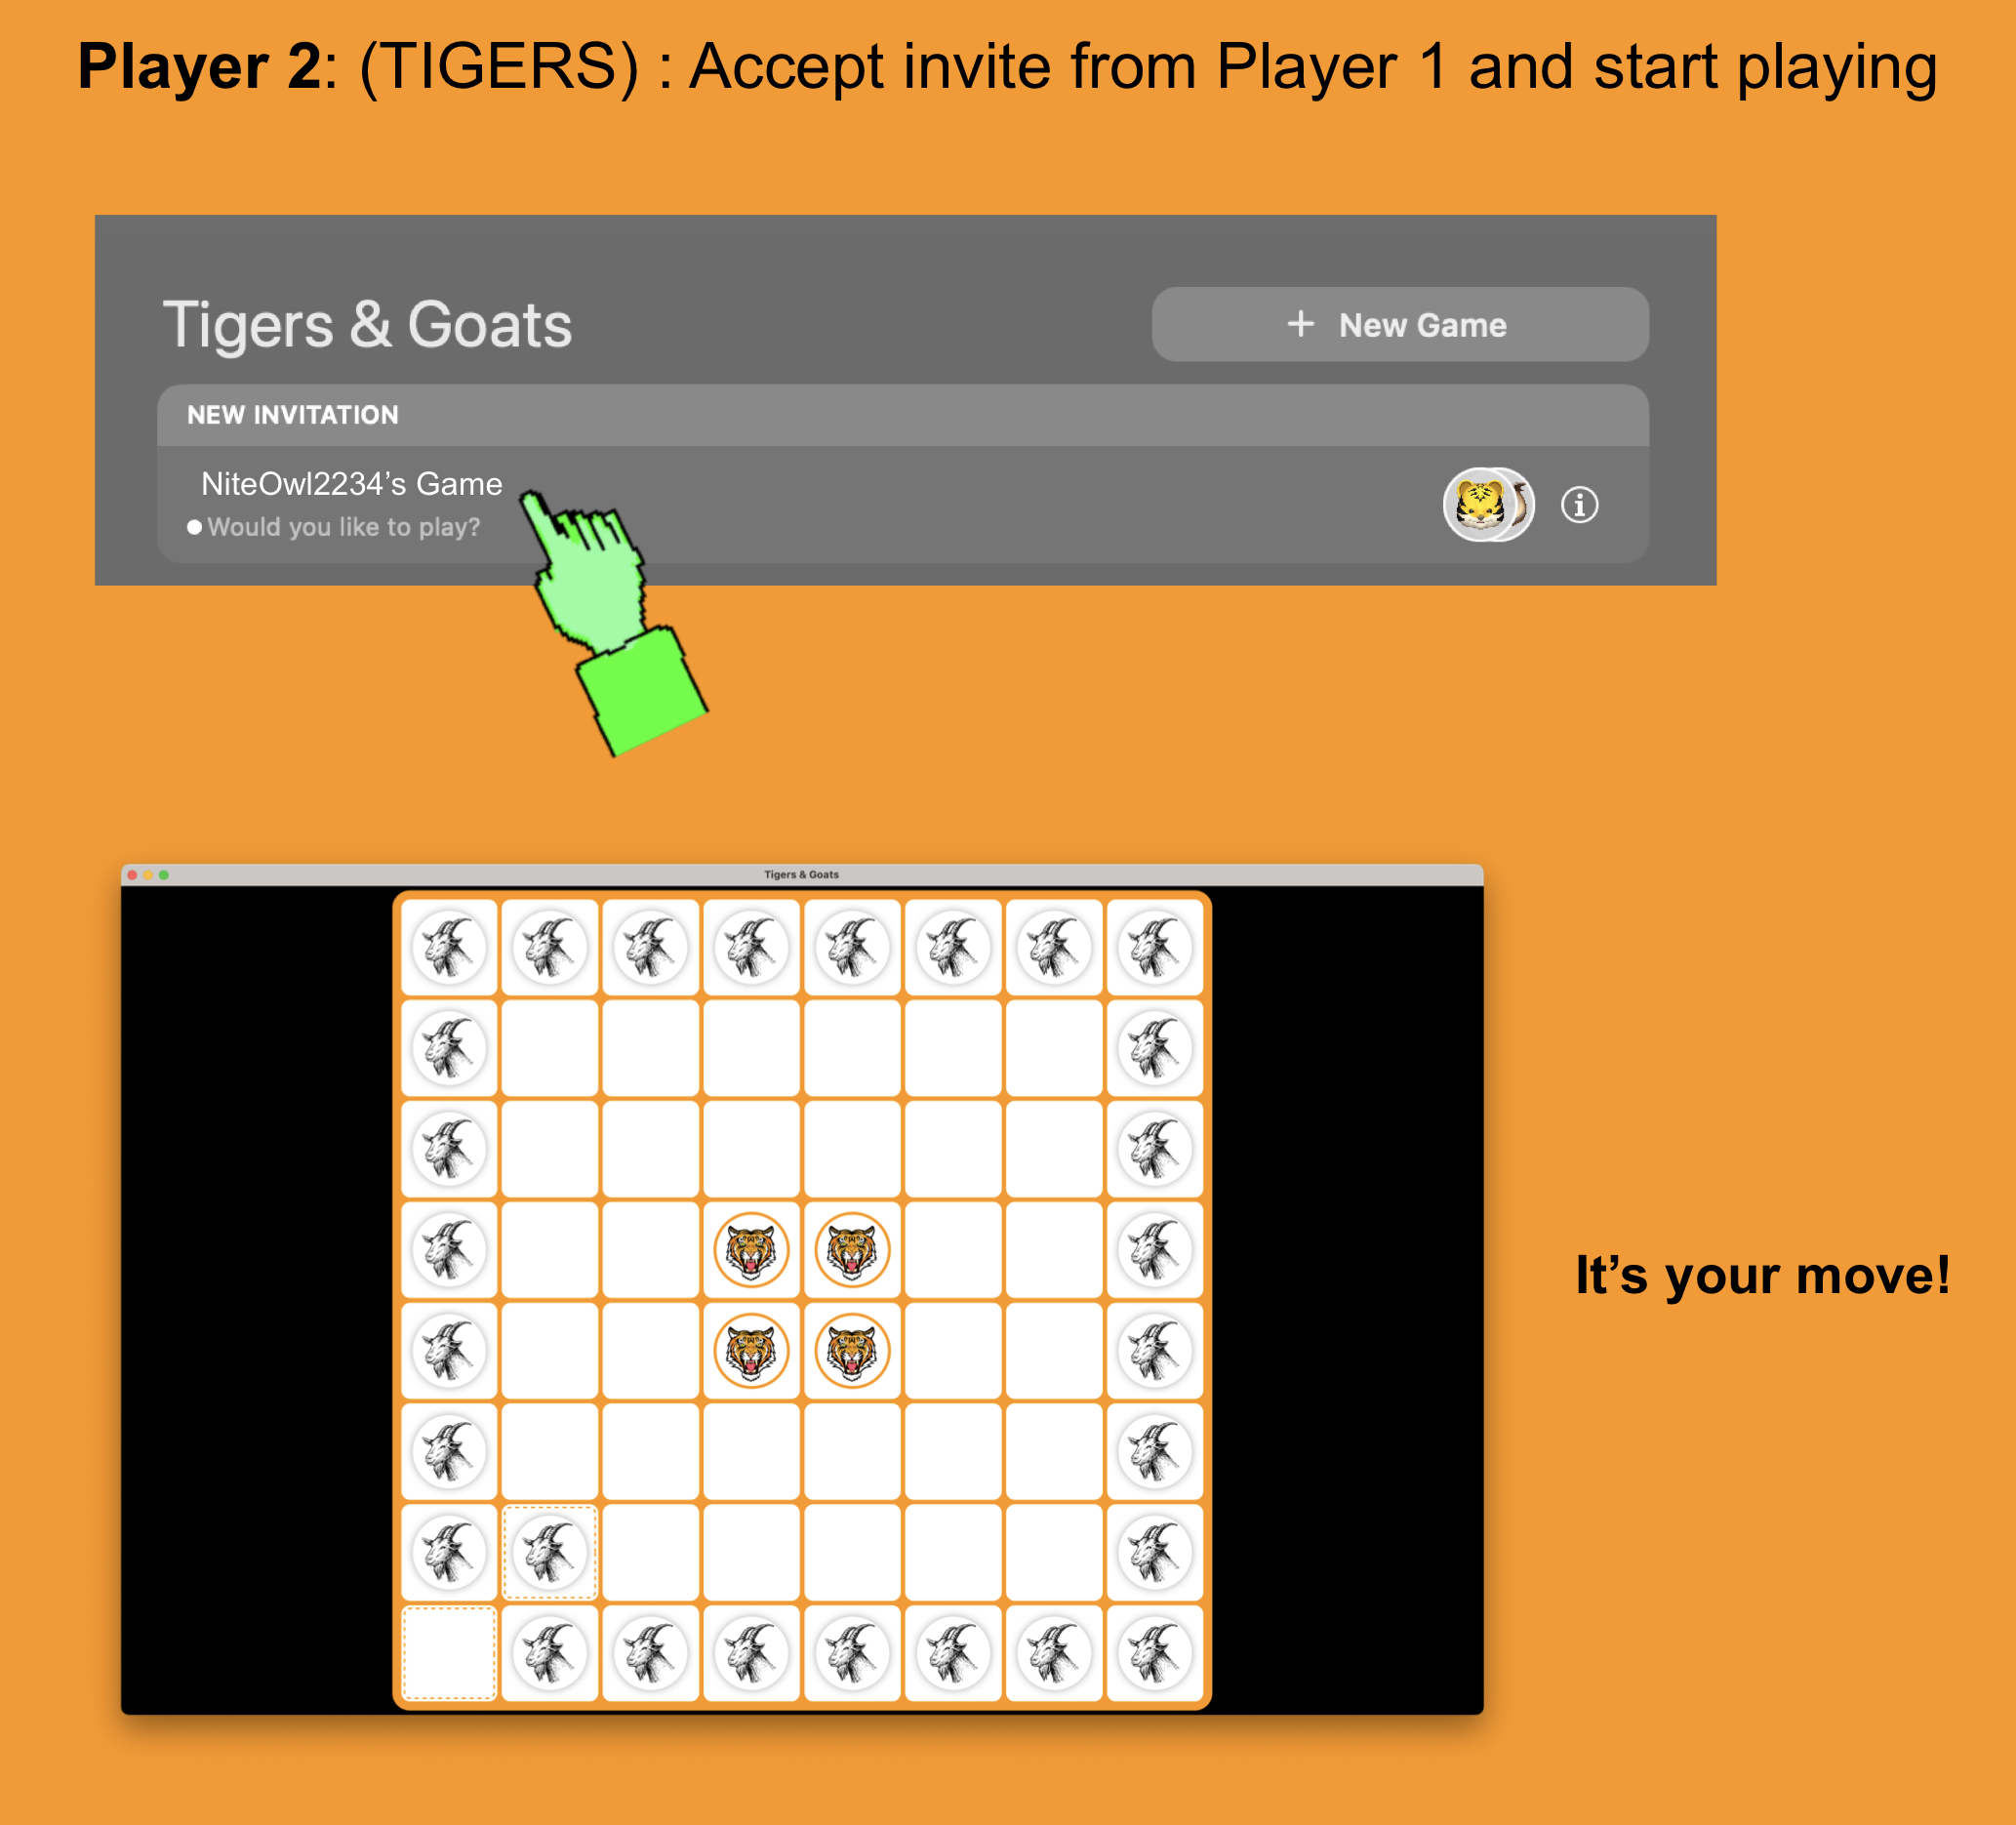
The screenshot below shows the initial stage of the game when both goats and tigers have made a few moves. It is now the tigers move (indicated by a orange circle around them) and as a player who plays tigers, your job is to occupy strategic locations on the board such that goats will find it really difficult to advance any further.
If you are playing goats, you will now need to think of clever ways to advance without getting killed. This may seem hard but is not impossible. In fact, most of the fun while playing this game comes from exploring various strategies to advance (from the goats perspective) and of making this impossible (from the tigers perspective). The simple rules make this very easy to understand and play even for kids. And the endless possibilities can keep us adults (and the little kid inside each and every one of us) entertained for hours.
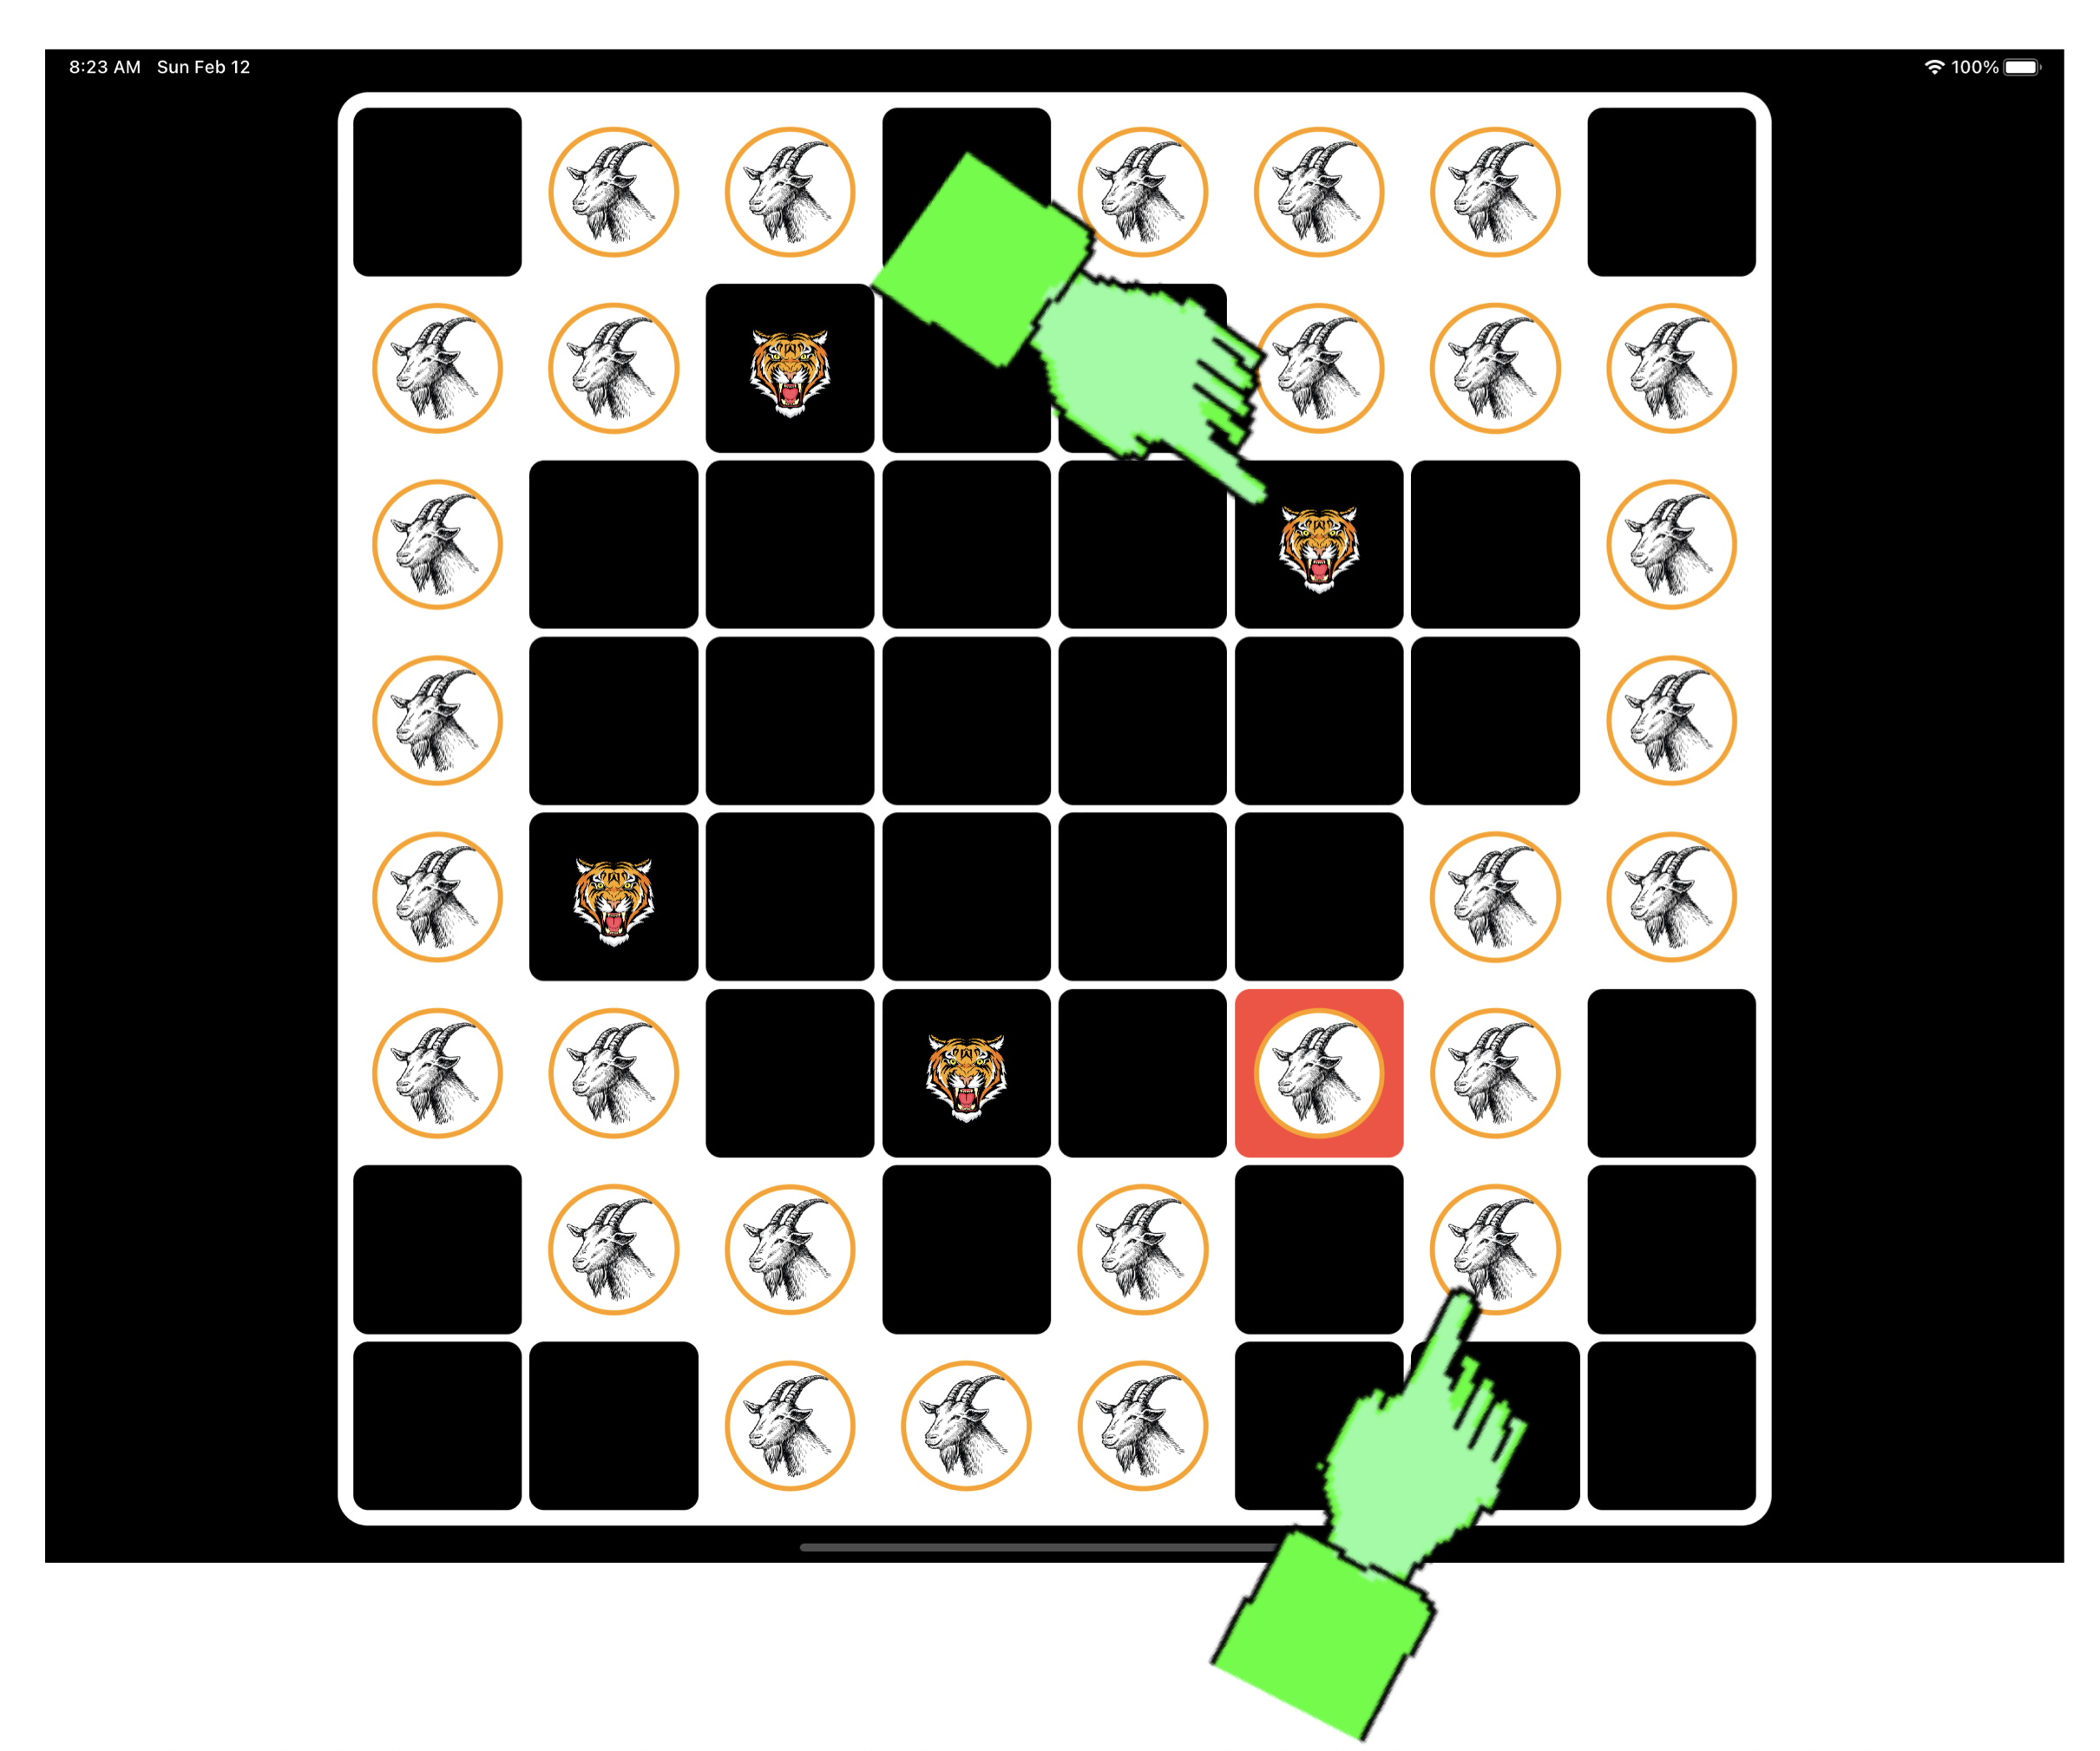
In the app, if a goat is in danger of being eaten because a tiger moved in for the kill, the square on which it is located gets highlighted in red. You should move this goat to safety either by retreating or moving another goat behind it so the tiger can’t kill it. For example, the tiger pointed out in the situation below has moved in for the kill, but we can move the goat indicated by the other finger to the left, thereby making the goat safe from the tiger.
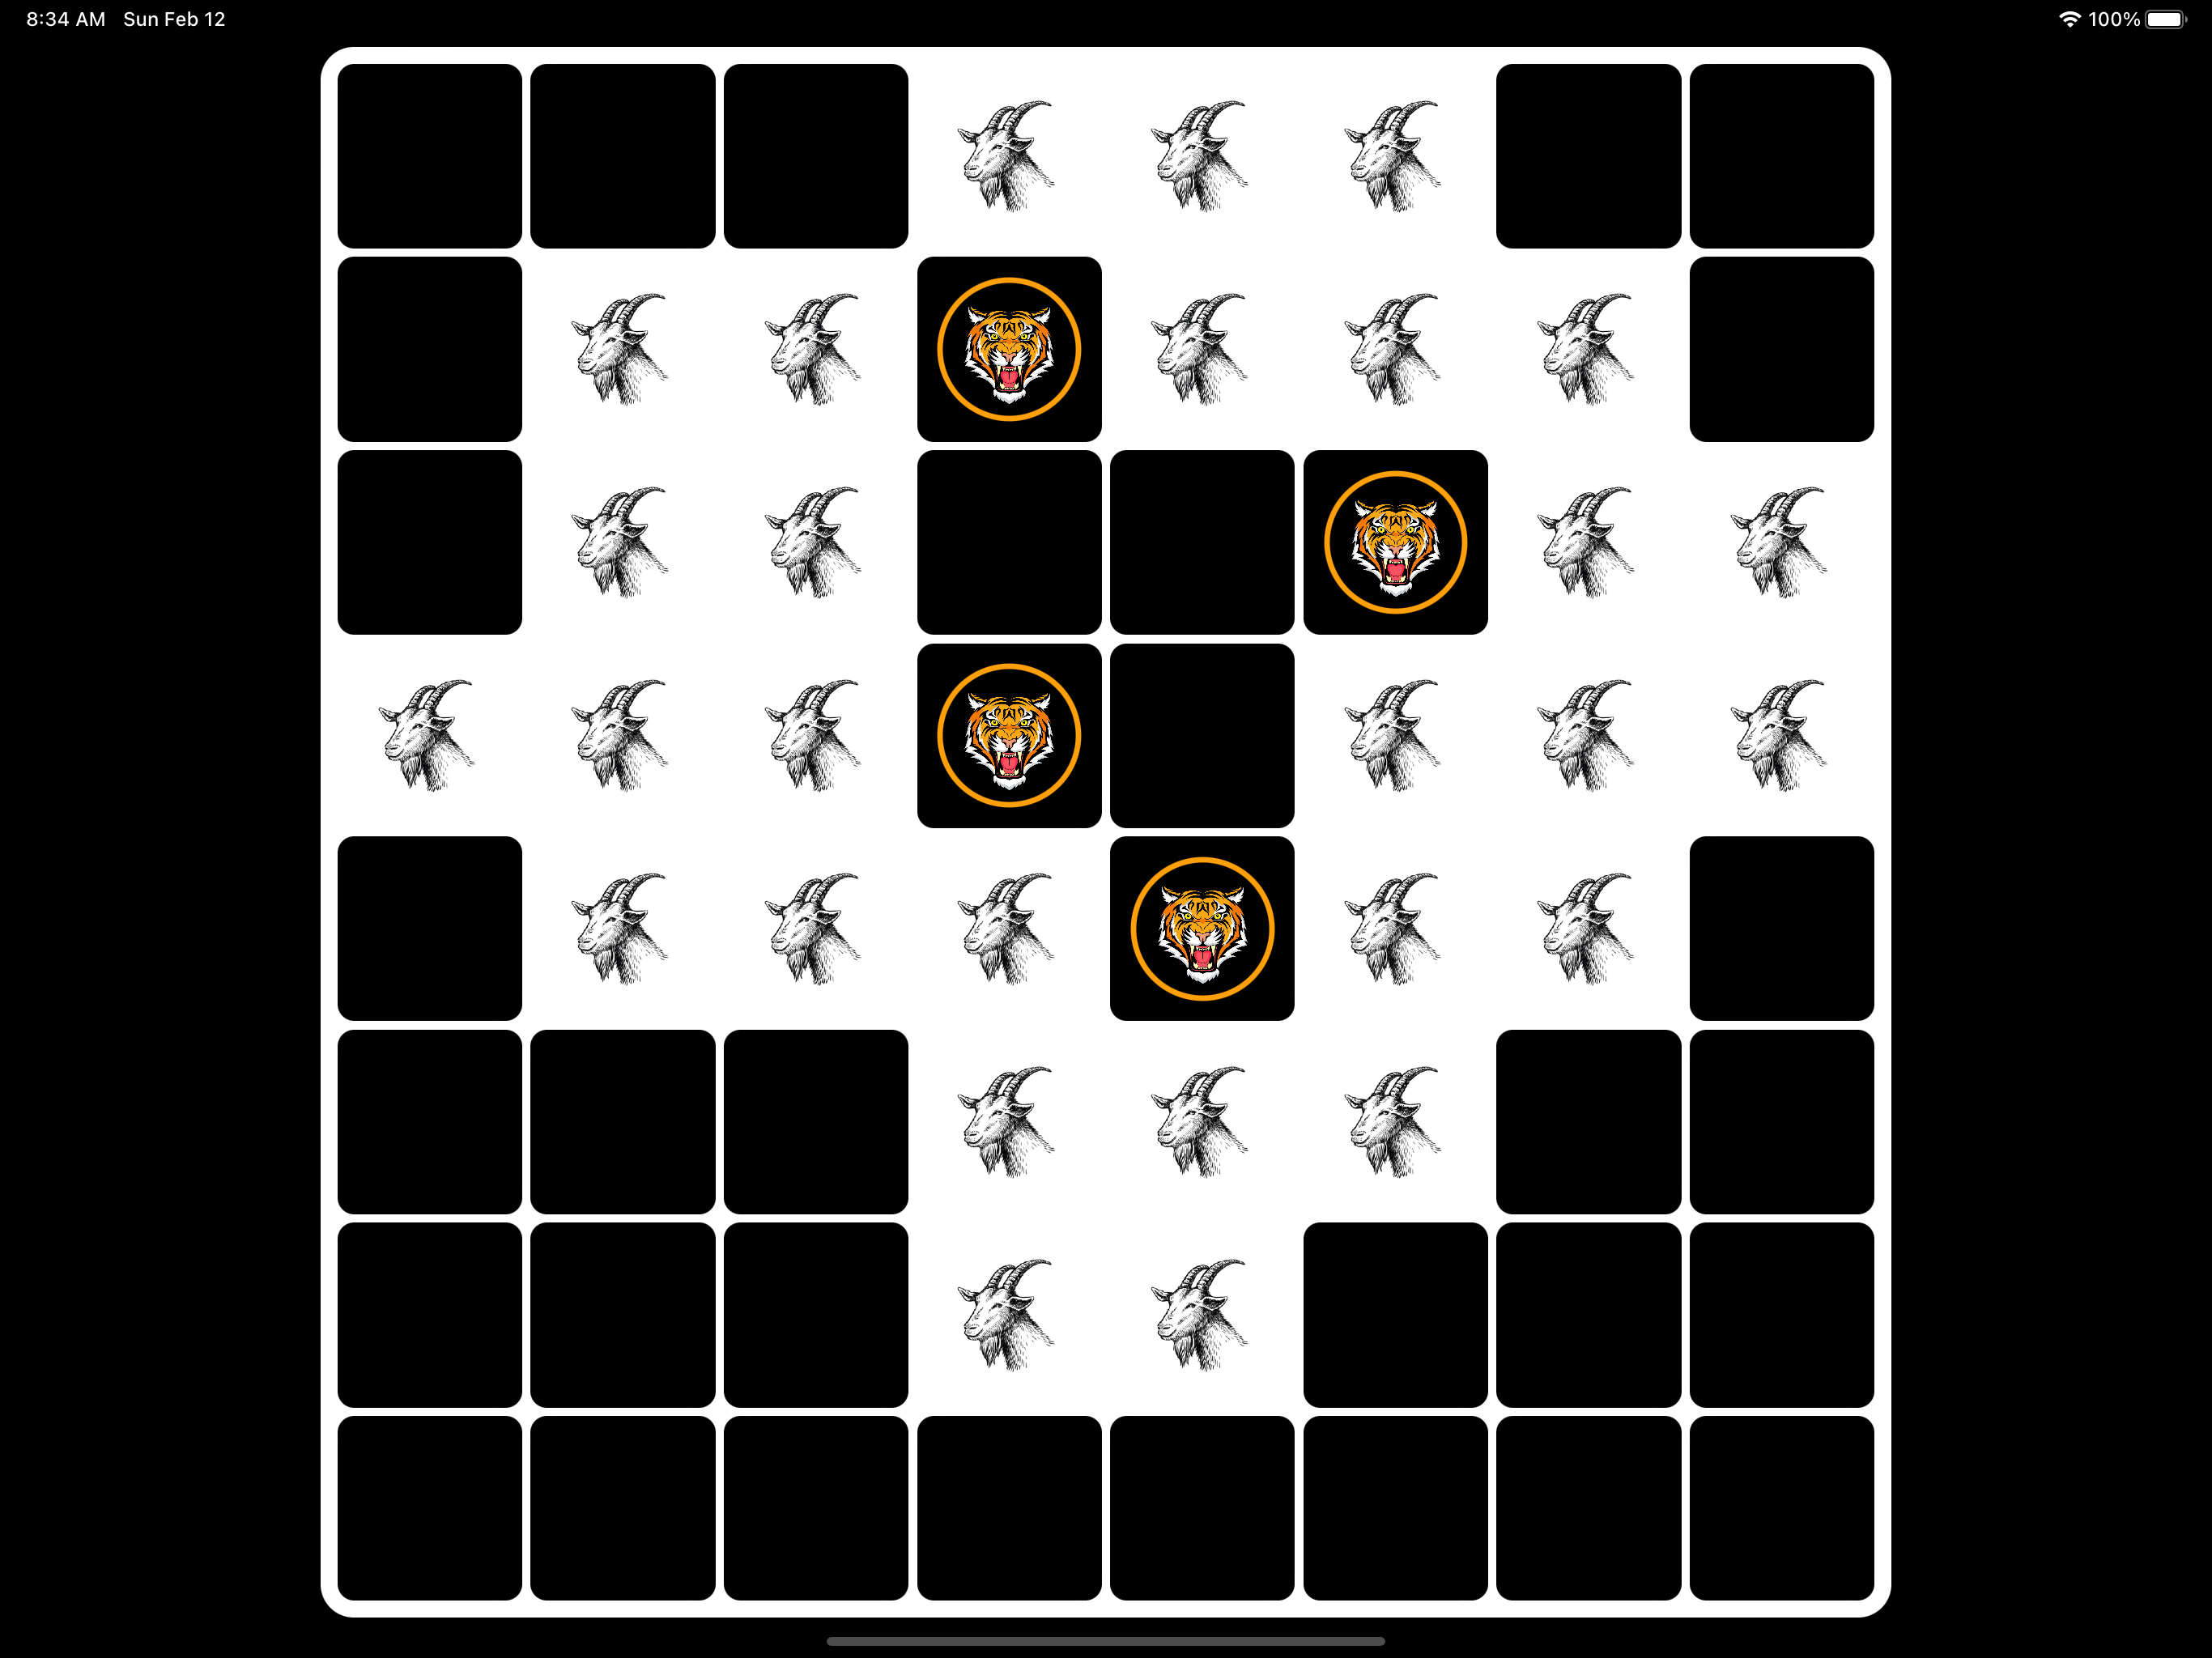
If the goats move carelessly and get eaten, it will get harder and harder for them to trap tigers. If 4 goats are eaten it is next to impossible for goats to trap tigers and so in this situation, tigers win. On the other hand, if goats manage to keep advancing and trap all tigers, goats win! Here is an example of how all tigers are now in big trouble and likely to get trapped by goats soon.
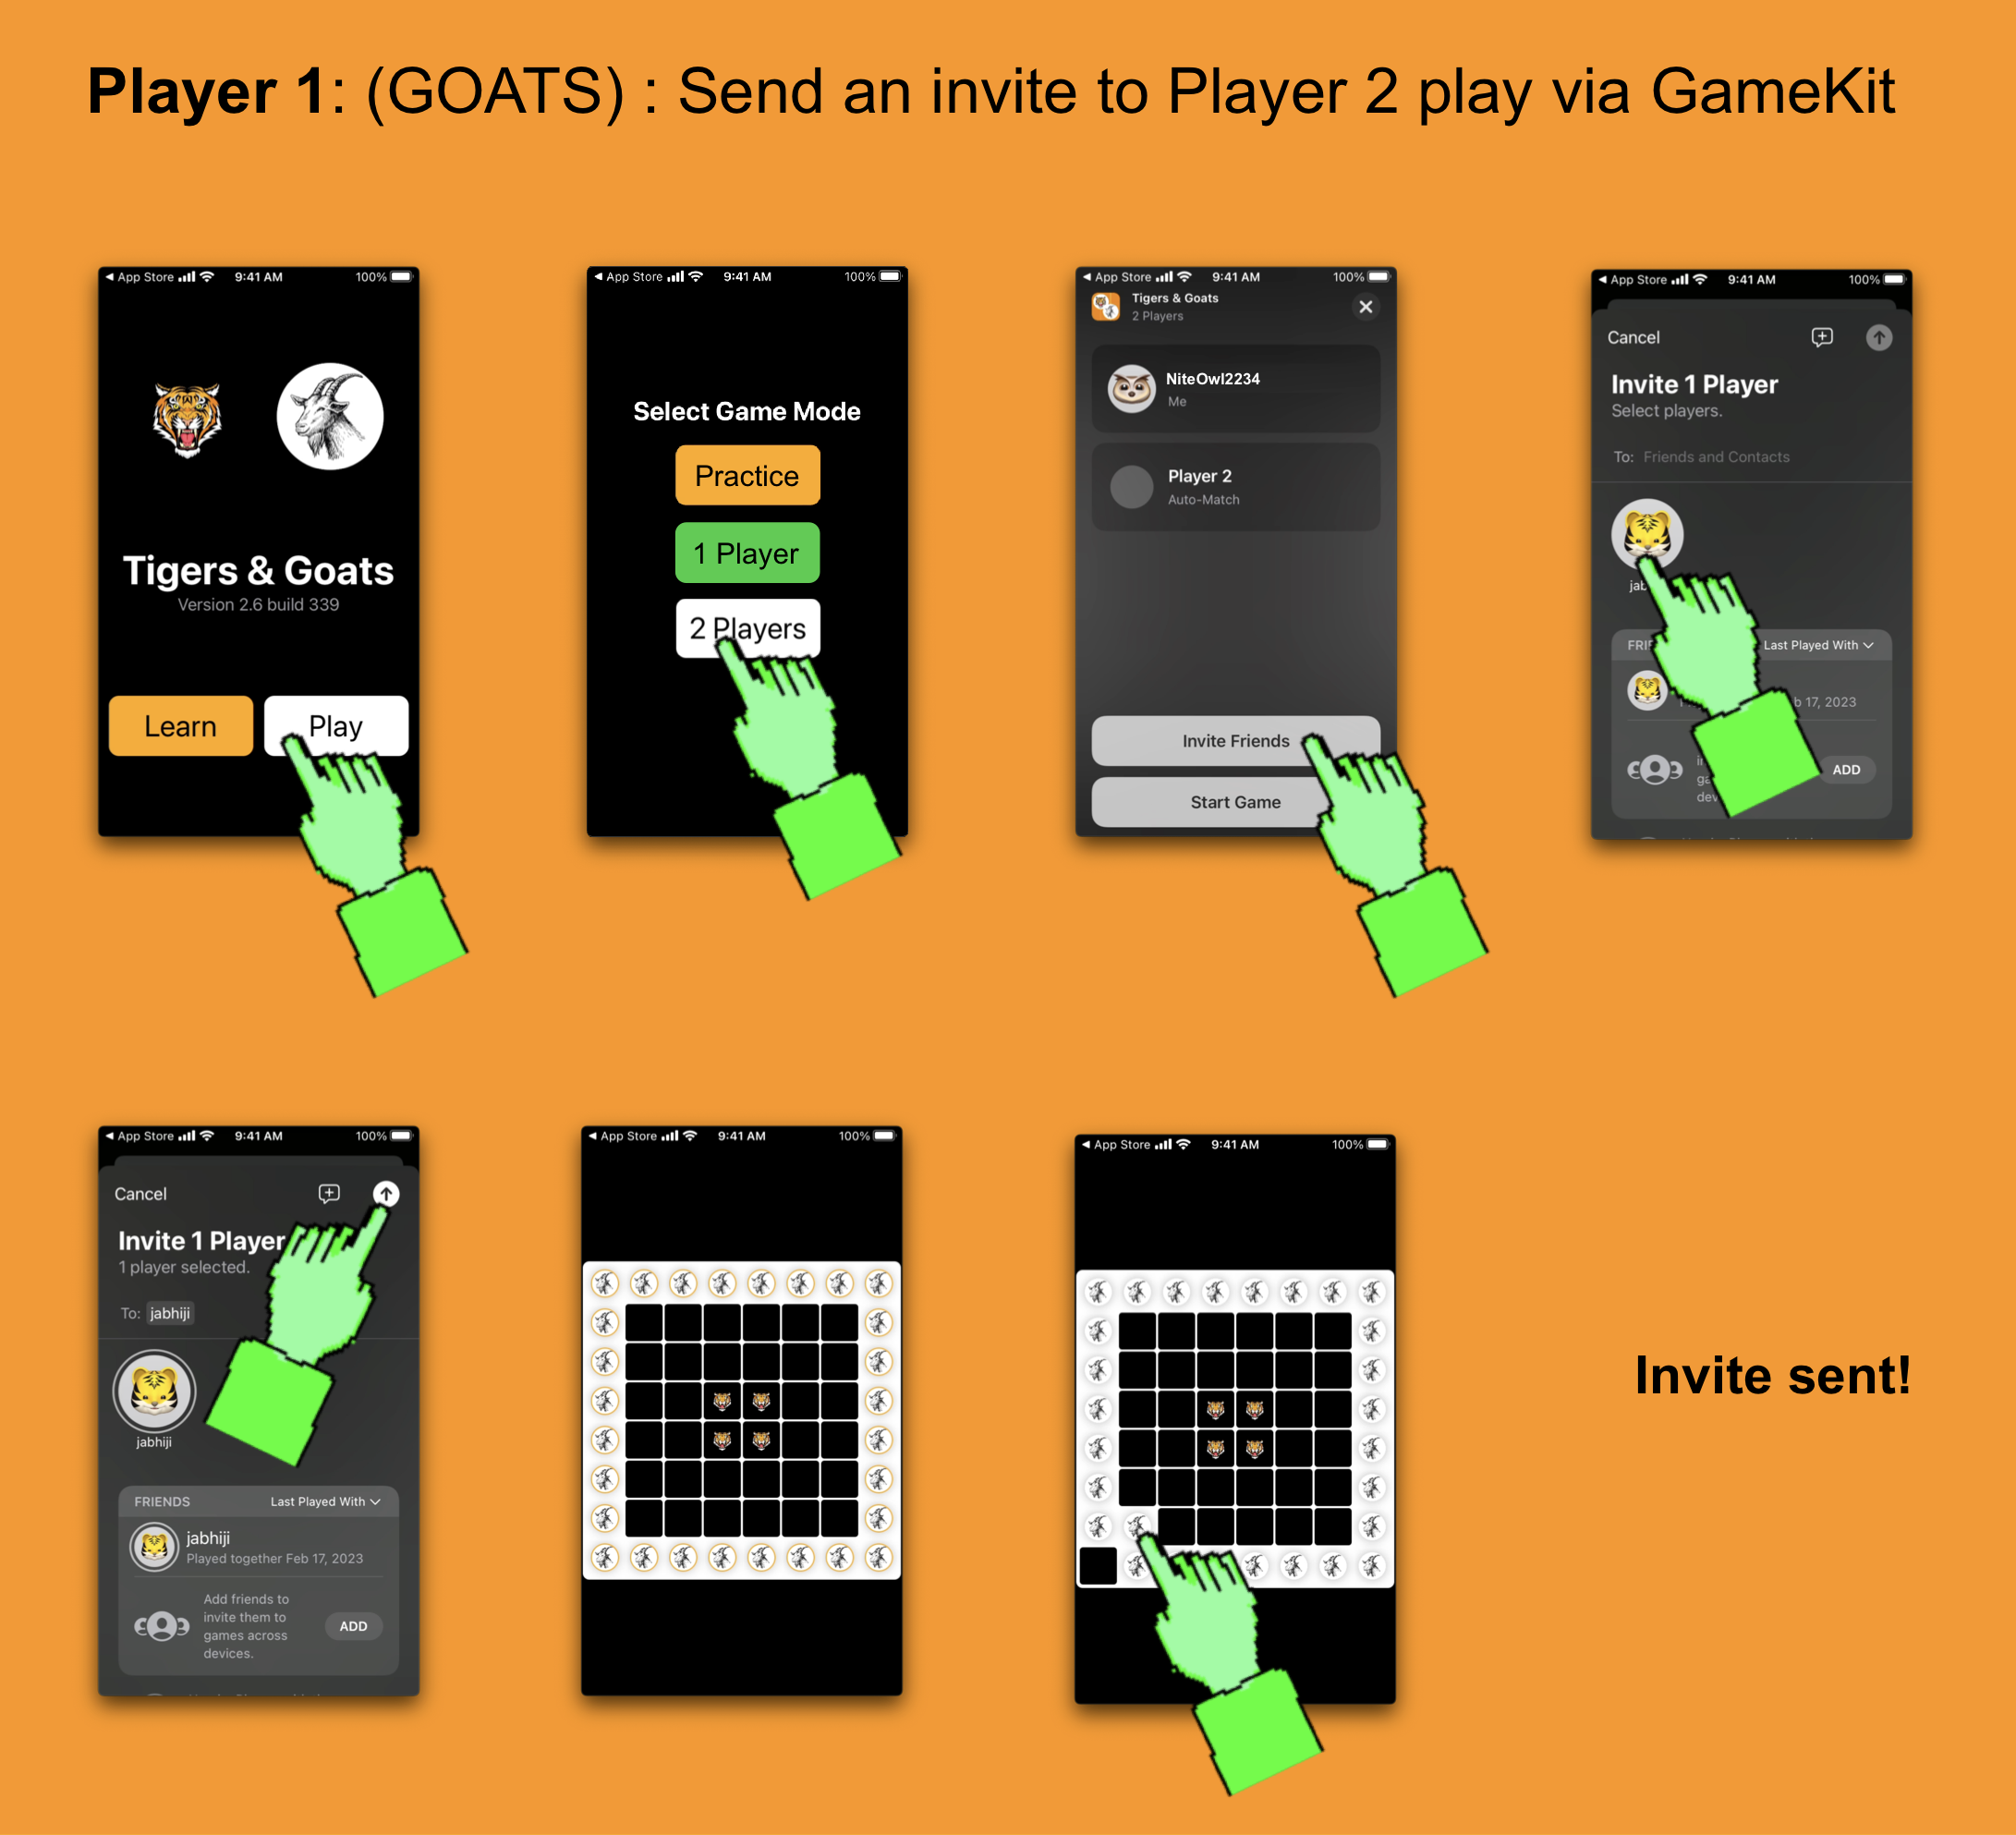
To play this game with your friends, simply follow the steps below to invite them via Apple’s GameKit UI. Note that you will need to be logged in to Game Center to invite friends and will also need to add them as a friend before you can invite them. All of this is managed by Game Center. In the steps below, Player 1 initiates the invite and this player plays goats. The other person who gets invited plays tigers. You can then interchange the process to switch roles.
As soon as Player 1 moves a goat piece, the invite gets sent to Player 2 and the game begins! GameKit also sends notifications when a move is made by your opponent so you can get back to the game if you are doing something else on your device.
Communication between the two devices happens via GameKit and is handled by Apple. The video below shows the first several moves as Player 1 (on an iPhone) and Player 2 (on a Mac) take turns in moving the pieces. The game continues until one of the player wins or forfeits the game. You can have multiple games with different opponents going on at the same time. GameKit keeps track of the status of each game – and you can also stop and pick up your game at a later time.
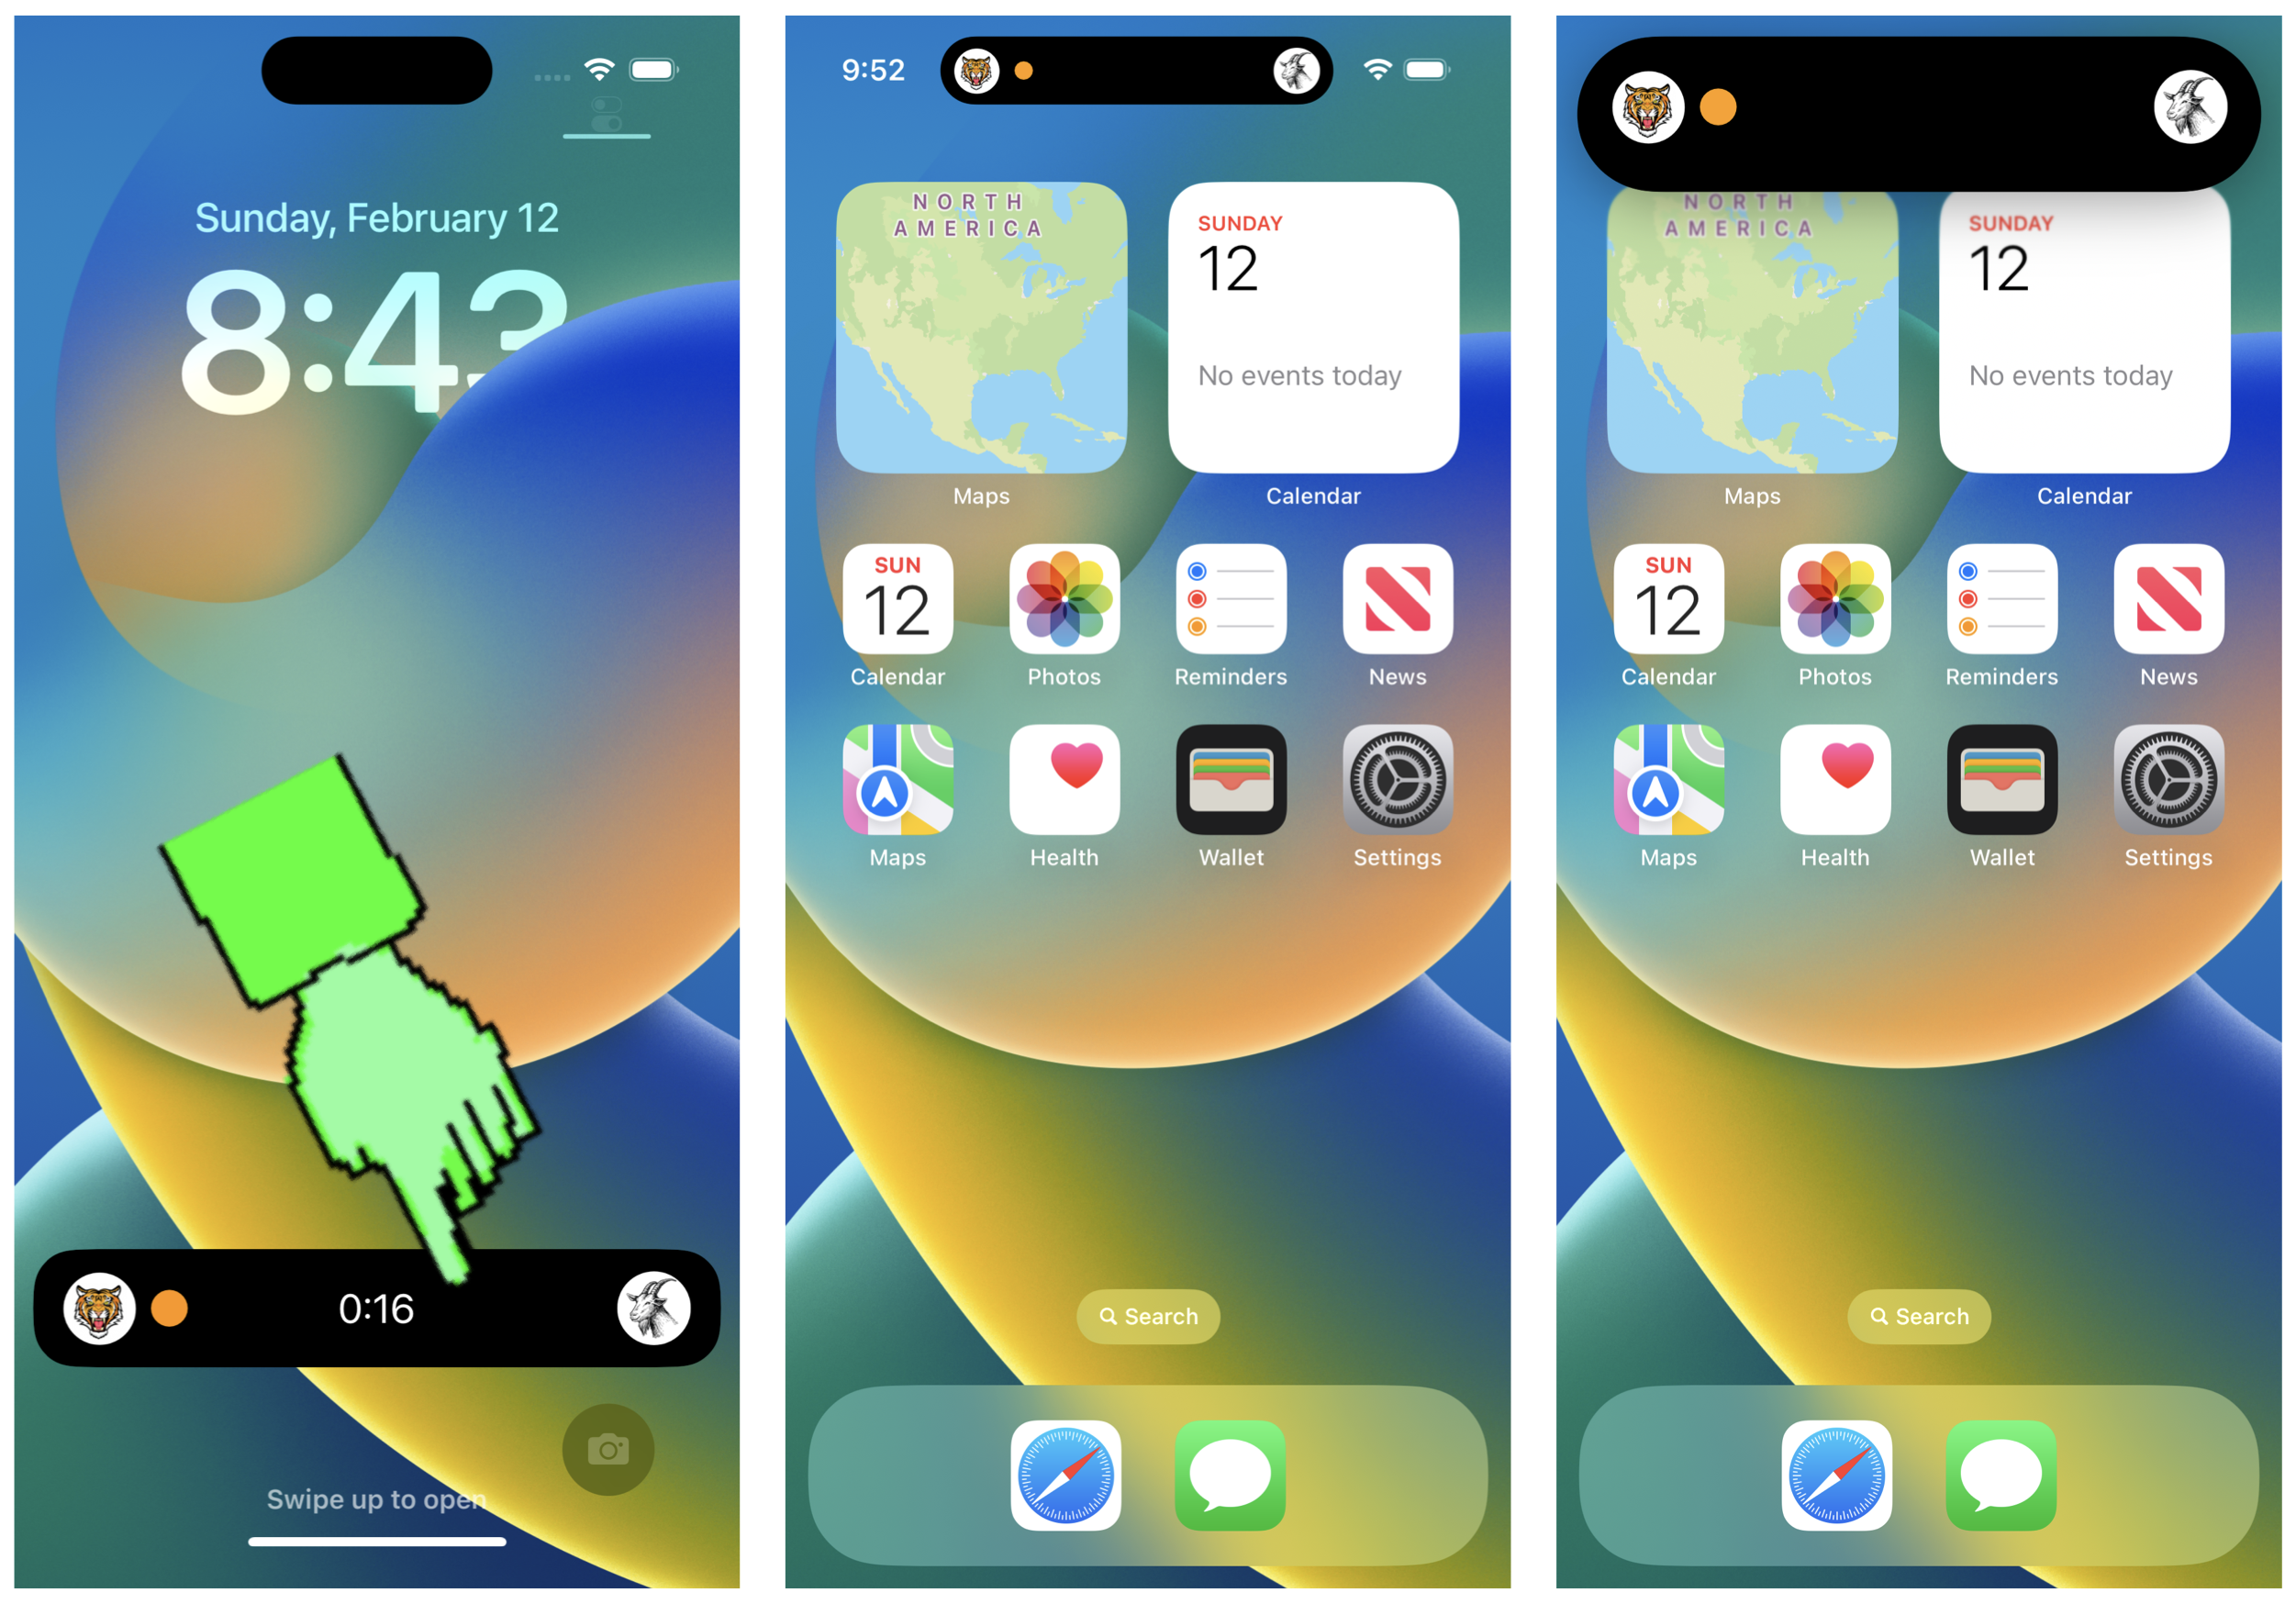
The game is best played on large screens – such as iPads, Macs and Apple TV but also works on iPhones. On the more recent iPhones, it supports a new feature called Live Activities. This allows you to see at a glance whose turn it is to play and how long it has been since the turn started. You will need to be on iOS 16.1 or higher in order to see Live Activities.
On newer phone models such as the iPhone 14 Pro and the iPhone 14 Pro Max, you will also see Live Activity information in Apple’s beautifully designed Dynamic Island – a shape-shifting elongated capsule that lives near the front camera. Tapping on this Live Activity immediately takes you to your game – from whatever app you happen to be in.
Board games have changed and evolved over the ages and we have learned to use modern technology to play them. The internet now allows players who are separated by thousands of miles to play them as if they are sitting in the same room. And with rapid advancements and improvements in AI, machines will soon come up with interesting strategies that we may not think of right now – and be unbeatable at these games.
But at the core, games such as these retain their charm and simplicity and will continue to exist in some form or another and entertain us for generations to come.
Ask anyone who grew up in Pune or Mumbai as a kid about their favorite train and more likely than not you will hear them answer without any hesitation – the Deccan Queen. Of all the trains that connected these two cities, the Deccan Queen was by far my favorite. Not only did it have a really cool blue color (I used to call it Deccan Queen Blue) – but it was (and probably still is) one of the fastest ways to travel to Mumbai and back.
Named after the city of Pune – called the Queen of the Deccan – this iconic train celebrated its 90th birthday today with a cake-cutting ceremony at Pune Station and a band performance by the railway police. The Deccan Queen was ready to roll on 1 June 1929 but had to wait another year before the entire route could be electrified. The train was started by the British mainly to ferry rich and famous Britons from Mumbai who used to come to Pune to watch and bet on horse races. Both the train and India have come a long way since its first journey on 1 June 1930.
Close your eyes and remember those crisp and cool early Pune mornings as you hurry to the station in a rickshaw. You cannot afford to be late – the Deccan Queen leaves Pune Station at 7:15 am sharp. Once on board you heave a sigh of relief and settle down in your seat. Try to remember the crowds waving goodbye and the hawkers and newspaper sellers peddling their wares. Finally, after what seemed like an infinitely long time for a kid, the train begins to move. Woohoo – the journey has begun!
Slowly and steadily, the train starts to pick up speed. Shivaji Nagar station zips by – no stops now until Lonavala. You watch transfixed through the window at the world rolling by outside. Cars and scooters and cycles and motorbikes, school children hurrying to school – all the controlled chaos of life will slowly disappear as the train leaves the city behind and thunders on towards Mumbai. Soon it will mostly be fields and meadows – an occasional house here and there – kids playing cricket on open grounds.
You slowly realize that there are other people in the train besides you but most adults around you have their noses stuck inside newspapers. And you also realize that you are hungry – most likely you skipped breakfast in your mad rush to reach the station in time. Fear not! Awesome food awaits you on the train. Garam cheese toast, vada pav, vegetable cutlets, omelettes, tea and coffee. And we haven’t even reached Lonavala yet to sample the delicious chikki. After Lonavala and Khandala, the train weaves through a beautiful stretch called the “ghat” – lush green landscapes, waterfalls and yes – lots of monkeys. If memory serves me right, I do believe the train has an official stop (maybe for technical reasons) near “Monkey Hill”. And we get to look at monkeys going about their monkey-business looking back at us wondering where all these humans are off to in their blue train.
Because it is one of the busiest commuter corridors in the entire world, new technologies like Hyperloop are being seriously looked into as more high-tech alternatives to rail and road travel – supposedly cutting down travel time between Pune and Mumbai to 20-30 mins instead of the 3-4 hours it takes by train. But no matter what new technological marvels make their debut in the future, I have no doubt that “Deccan Queen Blue” will keep on running. Do you seriously believe that the Hyperloop will give you enough time to enjoy a hot vada-pav and stretch your legs looking for the perfect Chikki?
From us Punekars and Mumbaikars – both in India and scattered all over the globe – gratitude and best wishes to all the engineers and technicians and drivers and other railway employees who work hard every day to keep this train running like clockwork and make the journey so enjoyable. Ninety years is not that old at all. May the Deccan Queen run forever!
This is a review of the standalone VR for the masses – after about a week of playing around with it. Specifically, this is the 32 GB version that currently retails for $199. Unless you plan to load up your device with lots of movies and games I wouldn’t bother with the slightly more expensive 64 GB version.
The Oculus Go works independently of the Apple ecosystem – although you do need to install the free Oculus app on your iPhone to set up the oculus device. But once set up, you rarely need the app – except for adding in a payment method to fund your Oculus purchases and to set up a PIN for the same reason.
Oculus has an app to view photos in your iPhone photo library – but this feature is buggy and only worked for me once or twice, after which it has stopped working entirely. If or when it does work, check out some of your panoramic photos – they look really nice in the VR world. Regular photos look nice as well but a bit pixelated. Don’t expect the display quality to be like the retina display on your iPhone or Mac. There is lots of room for improvement here – but given the price tag, the image and video quality is reasonably good. No doubt this will improve over time as the hardware and display resolution gets better.
Next, we come to the Oculus apps or “experiences” as they like to call them. There are lots of freebies here to get you exploring – Discovery VR and Gala360 are fantastic! This is definitely a great boost for armchair tourism – but it is definitely a better idea to stand (on the same spot) or use a rotating stool so you can see all around you. The Go is only capable of 360 degrees views from the same location and you cannot physically walk around in the VR landscape. Stephen King fans might want to check out the IT video experience – currently part of the Oculus Video app.
You can watch your favorite movies in a movie-theatre-like VR environment – but at the moment, only NetFlix, Hulu and a few other streaming services are supported. You are out of luck if you wish to see movies in your iTunes library – for that, we will need to wait until Apple decides to hop on to the VR bandwagon. If streaming is not your thing, movies can be purchased or rented from the Oculus ecosystem instead. Overall, the VR movie experience is incredible – it is almost like sitting in a movie theatre. Again, with increased resolution and graphics fidelity, this will only get better with time.
Finally, we come to VR games. Shooting zombies is not exactly my cup of tea but rest assured there are lots of those games and videos. If you have never played VR games before, you should definitely check out a beautiful game called “Lands End”. This game has been crafted by the same developers who created Monument Valley and the entire landscape and music is just fantastic. You won’t need your controller to play this one – all the action is controlled just by moving your head. A truly hands-free gaming experience. You will almost feel like you have Jedi powers at times when moving heavy rocks around to solve the connect-the-dots puzzles.
I don’t know who once said these words, but they apply without question to this blog post.
Make everything as simple as possible – but not simpler.
Anyways, if you have nothing better to do with your day, you might as well learn how to program using Apple’s shiny new language called Swift. Granted it is not so shiny because it has been a while since it was born. But it is still somewhat of a toddler and lots of fun to play with – although this toddler is a lot smarter than what you might think.
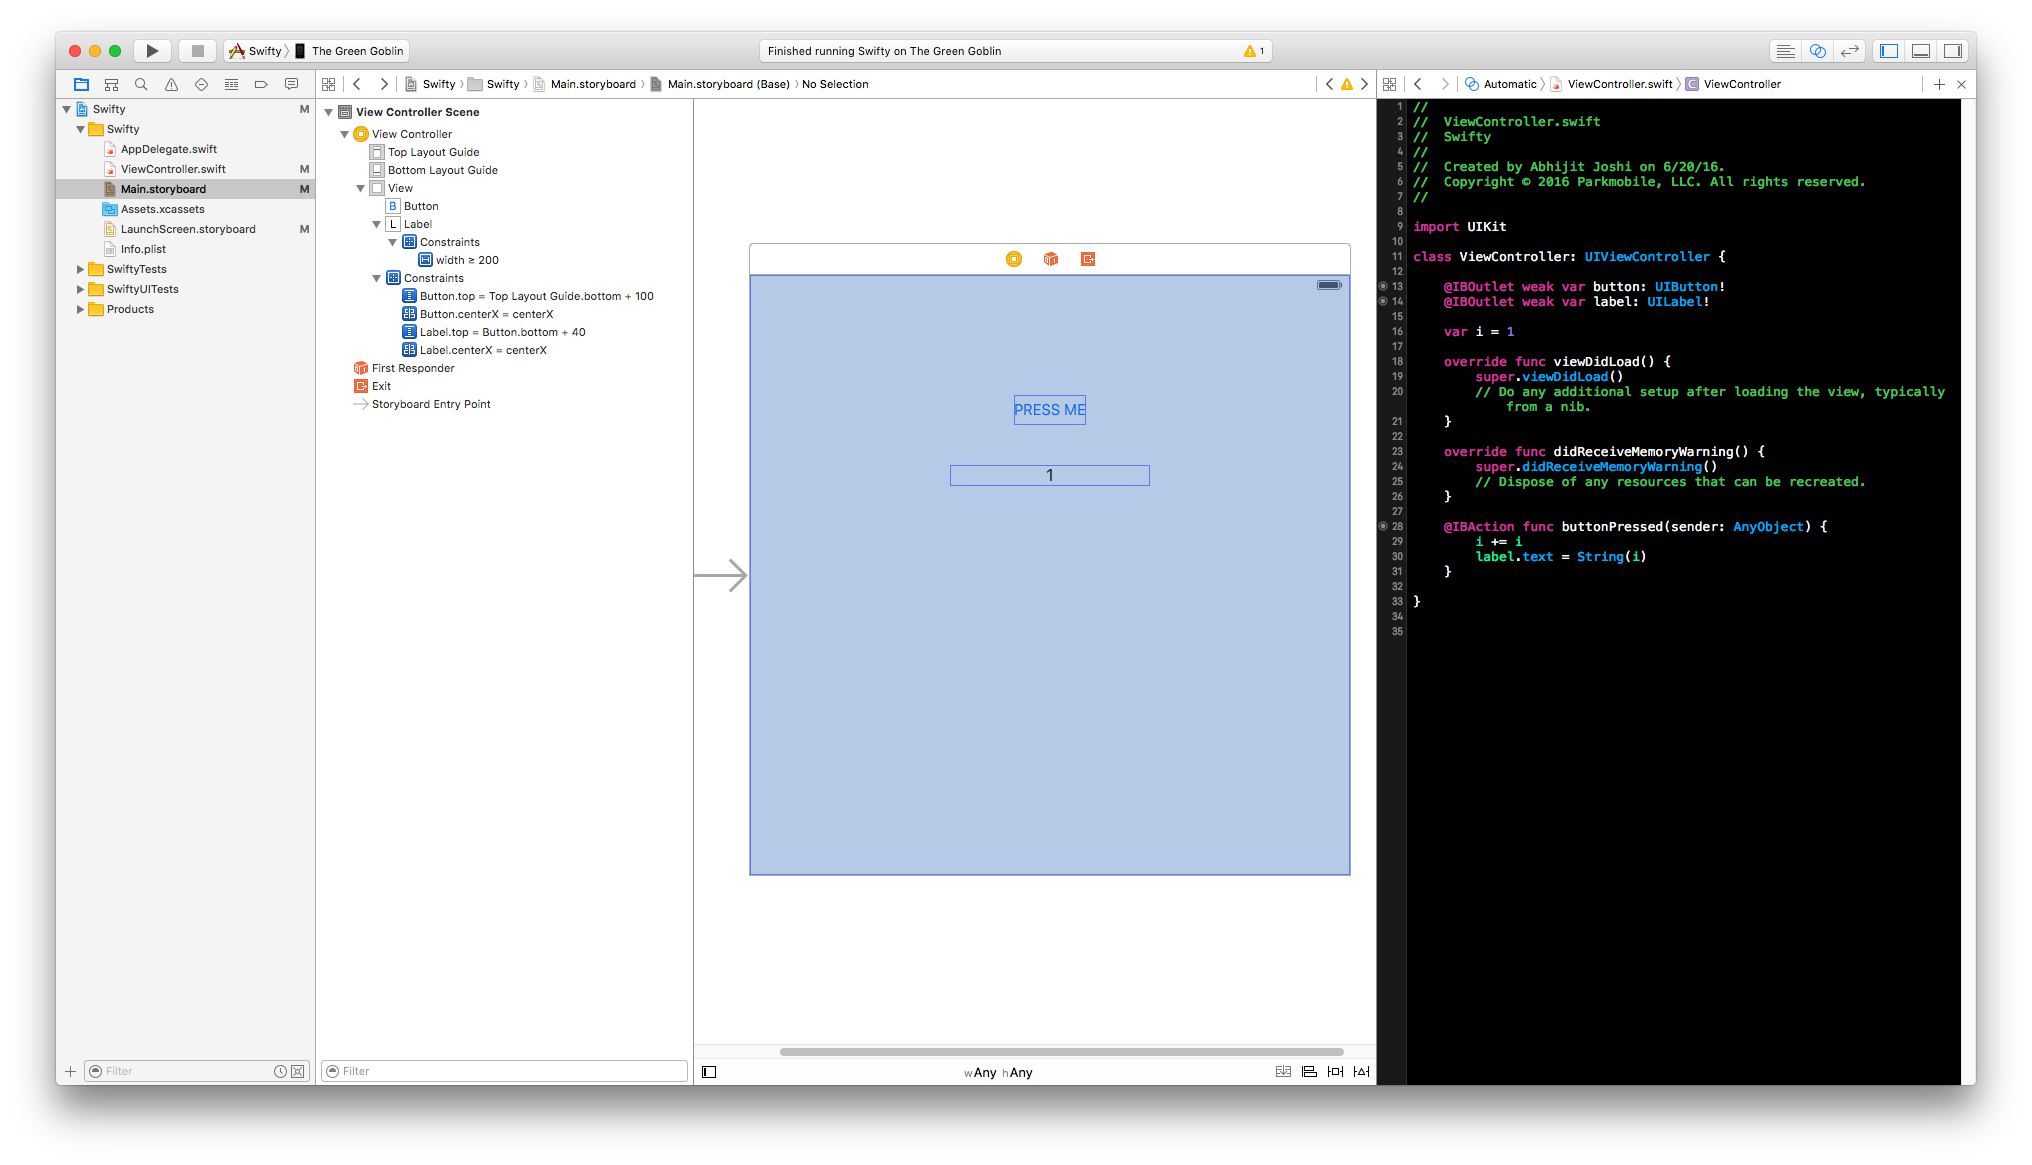
Ok – so this post is not about to teach you how to program – or about how to write apps for iOS. It is more of a visual inspiration to start coding in Swift for those still reluctant to make the leap from good old Objective-C. Yes, I am one of those who fell in love with and still love Objective-C. I was particularly shocked when I just found out what Swift is going to do to the increment operator ( i ++ ). But you can read about that elsewhere if you don’t already know.
Enough chit chat – let’s get to the point. Here we go:
The project here has a single button and a label. The label begins life with the number 1. Pressing the button doubles the value of the label and this keeps happening forever. I have not checked what happens if you keep doing this for a long time. Your finger may not like it much.
1…2…4…8…16…32…you get the idea.
import UIKit

class ViewController: UIViewController {

    @IBOutlet weak var button: UIButton!
    @IBOutlet weak var label: UILabel!

    var i = 1

    override func viewDidLoad() {
        super.viewDidLoad()
        // Do any additional setup after loading the view, typically from a nib.
    }

    override func didReceiveMemoryWarning() {
        super.didReceiveMemoryWarning()
        // Dispose of any resources that can be recreated.
    }

    @IBAction func buttonPressed(sender: AnyObject) {
        i += i
        label.text = String(i)
    }
}
Granted, this is a really simple app – but hey, we got to start somewhere and this is as good a place as any.
Google has always been somewhat ahead of the game in map search – for example in suggesting “search completion” strings when we start typing in places, points of interests or partial addresses in Maps. But Apple is catching up – and catching up fast.
In iOS 9.3, Apple introduced a very useful class for developers called MKLocalSearchCompleter – one that is sure to swing several iOS dev teams to lean towards using Apple Maps in lieu of Google Maps for implementing the search completion functionality in their apps.
The basic idea of search completion is to be able to type in a partial string in a search box and get several suggestions in real time as we are typing in. The user can then tap on one of the suggested options – and be taken to that location on the map view.
Here is an example of what is now possible using the MKLocalSearchCompleter class :
To implement this functionality in your apps, just follow these simple steps:
Add these delegate methods and use the results returned in your app:
- (void) completerDidUpdateResults:(MKLocalSearchCompleter *)completer {
    for (MKLocalSearchCompletion *completion in completer.results) {
        NSLog(@"------ %@",completion.description);
    }
}

- (void) completer:(MKLocalSearchCompleter *)completer didFailWithError:(NSError *)error {
    NSLog(@"Completer failed with error: %@",error.description);

}
In the above code, I am printing out the results returned in the array – we can use these to update a table below the search box in real time.
I was quite impressed with how responsive and relevant this search functionality is in a real app. For additional details, check out the official Apple Docs.
This post will talk briefly about setting up a bare-bones iOS app to illustrate what unit testing is all about and how to utilize the XCTest Framework for writing your own tests.
Imagine that you are writing a method to validate US and Canadian ZIP codes (or postal codes, as they’re called in Canada). In the US, ZIP codes are 5-digits long. Things like 77335, 06226, 29631 and so on.
In Canada, postal codes are typically written using 6 characters, with a space after the first three characters, like so:
LNL NLN
In the above code, L is a letter from the alphabet and N is a number or digit from 0-9. So Canadian postal codes can look like A2K 4L8, K7G 5T9, M2N 6P8 and so on. To make things more interesting, there are some additional rules about what letters are allowed (or rather not allowed) at various positions:
The first letter cannot be W or Z.
The letters D F I O Q U are not allowed at any location.
There might be more rules, but we’ll stop here. You get the idea where this is going. We’ll need to write a method that receives a user input string and then parses the string to make sure all these rules are met (for both US and Canada). Let’s assume you cook up the following class method somewhere in your model:
If the user enters the correct ZIP code, this method should return YES, otherwise it should return NO.
Once you finish developing this method, you simply go to the test section of your project and start adding in various test cases to check your method. There are some who maintain that these test cases should be written even before you create the above method – we will not argue about what approach is best – do whatever works for you.
For simplicity, this post only talks about the following testing methods, which suffice for our purpose here:
XCTAssertTrue( something_that_should_be_true, @”optional message displayed when that something is false” )
XCTAssertFalse (something_that_should_be_false, @”optional message displayed when that something is true” )
This is how you use them in the code (all you need is to include the header file of your model class in the test case file):
#import <UIKit/UIKit.h>
#import <XCTest/XCTest.h>
#import "ZipCodeValidation.h"

@interface ZipCheckTests : XCTestCase

@end

@implementation ZipCheckTests

- (void)setUp {
    [super setUp];
    // Put setup code here. This method is called before the invocation of each test method in the class.
}

- (void)tearDown {
    // Put teardown code here. This method is called after the invocation of each test method in the class.
    [super tearDown];
}

// Invalid ZIP or Canadian Postal codes

- (void)test_empty_zip_not_allowed {
    XCTAssertFalse([ZipCodeValidation validateZip:@""],
                   @"blank entry is invalid");
}

- (void)test_just_spaces_not_allowed {
    XCTAssertFalse([ZipCodeValidation validateZip:@"      "],
                   @"lots of spaces is not a valid entry");
}

- (void)test_random_names_not_allowed {
    XCTAssertFalse([ZipCodeValidation validateZip:@"Ludwig Van Beethoven"],
                   @"random names should fail");
}

- (void)test_strange_characters_not_allowed {
    XCTAssertFalse([ZipCodeValidation validateZip:@"$[]&@!"],
                   @"special characters are not allowed");
}

// USA

- (void)test_USA_01 {
    XCTAssertTrue([ZipCodeValidation validateZip:@"23324"],
              @"23324 should be valid");
}

- (void)test_USA_02 {
    XCTAssertTrue([ZipCodeValidation validateZip:@"  06 226   "],
              @"spaces should not matter");
}

- (void)test_USA_03 {
    XCTAssertTrue([ZipCodeValidation validateZip:@"12345"],
              @"any 5-digit code is valid for the US");
}

- (void)test_USA_04 {
    XCTAssertFalse([ZipCodeValidation validateZip:@"1234"],
                   @"4 digits not allowed");
}

- (void)test_USA_05 {
    XCTAssertFalse([ZipCodeValidation validateZip:@"123456"],
                   @"6 digits not allowed");
}

- (void)test_USA_06 {
    XCTAssertFalse([ZipCodeValidation validateZip:@"12w45"],
                   @"letters not allowed for the US");
}

// Canada

- (void)test_CANADA_01 {
    XCTAssertTrue([ZipCodeValidation validateZip:@"a2a 2a2"],
              @"a2a 2a2 should be fine");
}

- (void)test_CANADA_02 {
    XCTAssertTrue([ZipCodeValidation validateZip:@"a2a2a2"],
              @"a2a2a2 should also work");
}

- (void)test_CANADA_03 {
    XCTAssertTrue([ZipCodeValidation validateZip:@"A2A 2A2"],
              @"A2A 2A2 should be valid");
}

- (void)test_CANADA_04 {
    XCTAssertFalse([ZipCodeValidation validateZip:@"W2A 2A2"],
                   @"W cannot be the first letter");
}

- (void)test_CANADA_05 {
    XCTAssertFalse([ZipCodeValidation validateZip:@"Z2A 2A2"],
                   @"Z cannot be the first letter");
}

- (void)test_CANADA_06 {
    XCTAssertTrue([ZipCodeValidation validateZip:@"S2W 2Z2"],
              @"W and Z elsewhere is fine");
}

- (void)test_CANADA_07 {
    XCTAssertFalse([ZipCodeValidation validateZip:@"S2D 2Z2"],
                   @"D is not allowed");
}

- (void)test_CANADA_08 {
    XCTAssertFalse([ZipCodeValidation validateZip:@"S2F 2Z2"],
                   @"F is not allowed");
}

- (void)test_CANADA_09 {
    XCTAssertFalse([ZipCodeValidation validateZip:@"I2A 2Z2"],
                   @"I is not allowed");
}

- (void)test_CANADA_10 {
    XCTAssertFalse([ZipCodeValidation validateZip:@"B2A 2O2"],
                   @"O is not allowed");
}

- (void)test_CANADA_11 {
    XCTAssertFalse([ZipCodeValidation validateZip:@"B2Q 2A2"],
                   @"Q is not allowed");
}

- (void)test_CANADA_12 {
    XCTAssertFalse([ZipCodeValidation validateZip:@"U2A 2A5"],
                   @"U is not allowed");
}

@end
You can add as many tests you like in this file. To run these tests, use
Product —> Test (or the keyboard shortcut Command + U)
Xcode will run all your tests and place cute little check signs next to each test to let you know which tests pass and which tests fail.
That’s it! Isn’t unit testing cool? Now that I’ve wrapped my head around the basics, I will start adding unit tests to several of my iOS projects.
Trains of thoughts are triggered by strange things. Our memory is amazing but fragile so I’m going to record some thoughts in cyberspace. It’s always wise to wait a few days before recording thoughts – so only the important bits remain and one can wait and see if there are any other connections and memories that are linked to what we were thinking of at that time.
Here is the “train of thought trigger”, last seen on an American Airlines flight from DFW to ATL. I took a photo of it so I could use it later for this blog.
The most important thought I had after staring at this image for a long time is that I need to look for a globe (preferably located in the real world) that will have the ability to change the sea level. How would the world look like if the oceans rise by 10 feet? Would our home become a beach-front property?
What would earth look like if all the oceans were drained completely? Anyone for a hike down the Mariana trench? So I want a globe whose surface is 3D relief – you know what I mean. That would be one cool toy! I know it is a bit late to be asking this but Santa, you listening up there? I’ve mostly been good this year.
Santa to his elves: Hey, have we got anything like that, guys?
Elves: Nope. Is this guy crazy or what?
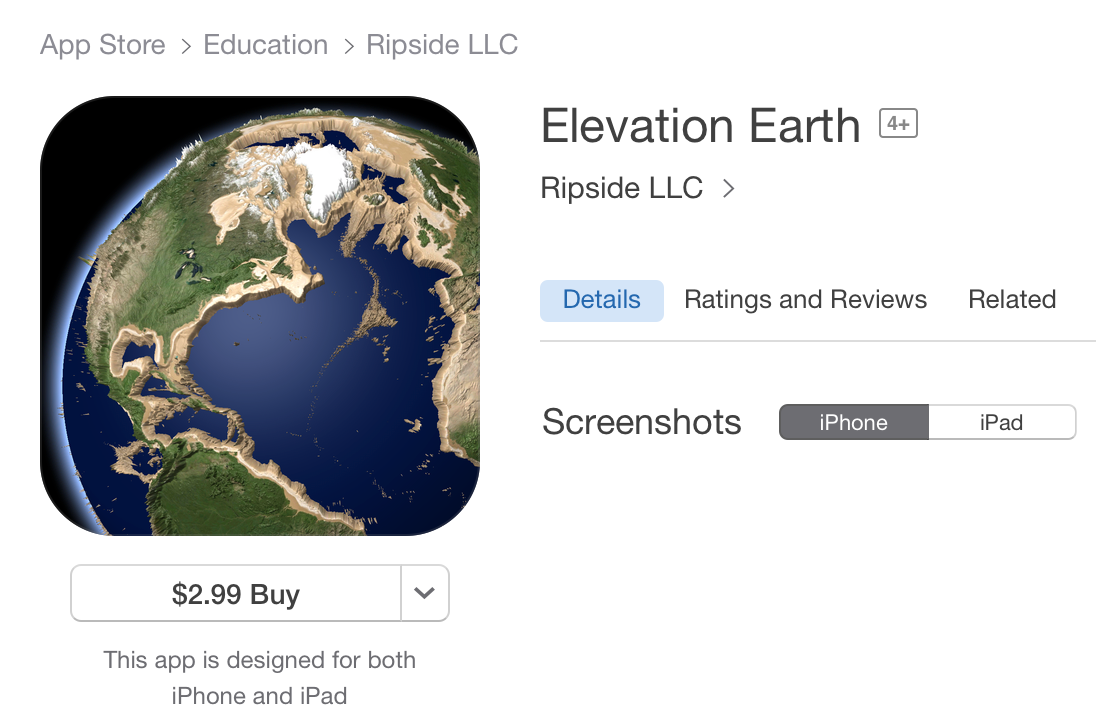
So guess I’m not getting it from you-know-whom. Too bad. The next option is to search for it, or “google it” as it is called these days. Actually, I imagine the preferred practice is to first google it and then resort to Santa – but that is neither here nor there. Just to be totally clear, I googled the phrase “3d globe with sea level changer”. There were quite a few hits. But I’m not really interested in computer simulations of this by NASA or Rutgers University. I changed my search phrase to “toy 3d globe with sea level changer” and then hit the jackpot. Almost. There is an app sold on Amazon called “Elevation Earth” – which seems to simulate this exact experience. A few clicks later I found the iOS version – who really cares about Amazon or Android apps anyway?
I looked carefully to check if my better half was around and then clicked on “Buy”. The app is good and easy to use. Here are some snapshots of how the world looks like when sea-levels rise by +476m. The Appalachian mountains now become islands on the former US east coast. Most of Europe is underwater except the mountain ranges of course. If you have a swiss-bank account, your money is safe. Further to the east, the mighty Himalayas are now facing the ocean as most of India is overwhelmed.
For now, I am content to play with this app – but if anyone out there knows of a real 3D globe that can simulate stuff like this, I would love to get in touch with you.
If you’ve read Orwell’s 1984, you should be aware that this story has nothing to do with a dystopian future where Big Brother is watching your every move. It is, in fact, a tale where the lead characters wander off into an alternate timeline or parallel universe. Not everybody seems to notice that the world around them has inexplicably changed in subtle and then increasingly perplexing ways.
The book begins with what might be the best opening chapter I’ve read in a long time. A young woman is stuck in rush-hour traffic in a taxi. She is traveling on a highway in Japan and the music playing inside the taxi is Janacek’s Sinfonietta. This, by the way, is a beautifully crafted piece of music. I would probably have never heard of it if not for this book. This music alone is worth the price of admission.
We learn later that the woman’s name is Aomame. She has an important appointment and is getting late because of the traffic jam. The taxi driver suggests that if it is really that important, she could get out of the taxi and climb down an emergency stairway that will take her to the city streets below. Once there, she could catch a train to go to her destination. However, he also warns her that the world might change in subtle ways if she chooses to do this. His parting words to her are that there is only one reality and she would do well to remember this.
She does climb down the emergency stairway and the world does begin to change. But only for her, it seems. Have you ever wondered what you might feel like if you saw two moons in the sky and realized that everyone else is probably seeing only one moon? This is one of the many changes Aomame must learn to live with.
The second primary character in the book is a young man called Tengo. He is an aspiring writer who is hired by an editor to help ghost-write a fictional book by a beautiful but dyslexic girl. The book goes on to becomes a best-seller and wins a prestigious literary prize but Tengo is troubled by the story the girl has written and is not completely happy that he played a secret role in getting the story to a wider audience. Tengo’s world also begins to wander off in the strange reality that Aomame is experiencing.
The book alternates between Aomame and Tengo until we realize that they are on a collision course. Apart from these two lead characters, there are several memorable characters including an old, soft-spoken dowager who hides a terrible secret, a gay bodyguard who thinks of himself as the ultimate professional in his field and of course, the mysterious teenage girl who wrote the original story that Tengo later modified and polished. All characters are beautifully developed and you actually will care about what happens to each of them as they play out their parts. Add to this a weird religious cult called “Sakigake” and last but not least, the so-called “little people” who seem to be pulling all the strings.
The entire story takes place in what you and me would refer to as the year 1984. The title 1Q84 refers to the alternate universe in which Aomame thinks she has been drawn into. Within the book, there is a fantastic, somewhat creepy and almost dream-like tale about a town full of cats. I have never been able to visit this town in my dreams. But if I do wander there on some night, I hope I return in one piece to the world of the waking.
Long story short, go get this book and read it through to the end. You will not be disappointed. Or even better, get the audio CD version and listen to it. The one common thing about all great stories is that they stay inside your mind forever. I will remember this story for a long time to come. And so will you.


 Ask anyone who grew up in Pune or Mumbai as a kid about their favorite train and more likely than not you will hear them answer without any hesitation – the Deccan Queen. Of all the trains that connected these two cities, the Deccan Queen was by far my favorite. Not only did it have a really cool blue color (I used to call it Deccan Queen Blue) – but it was (and probably still is) one of the fastest ways to travel to Mumbai and back.