Category Archives: iOS

iOS – SpaceBalls

In this post, I will introduce the Model-View-Controller design paradigm and use NSTimer-based animation to make the iPhone app shown in the video below.

The basic idea here is to simulate the motion of two circular balls enclosed inside a rectangular box in 2D space. The balls can collide with each other and with the walls of the rectangular box. To keep things simple, all collisions are perfectly elastic. The user can start and stop the animation using the two buttons in the UI.

Model View Controller (MVC)

MVC is an elegant way to organize the classes within your project based on their function. Here is an attempt at a quick summary using the present app as an example:

  • MODEL – this is where we store abstract information about our model, which in this case is the radius of the two balls, their position (x and y coordinates) and their velocity (x and y components). In addition, this can also contain the logic needed to detect collisions with the walls and between each other and to advance the position of the balls in time.
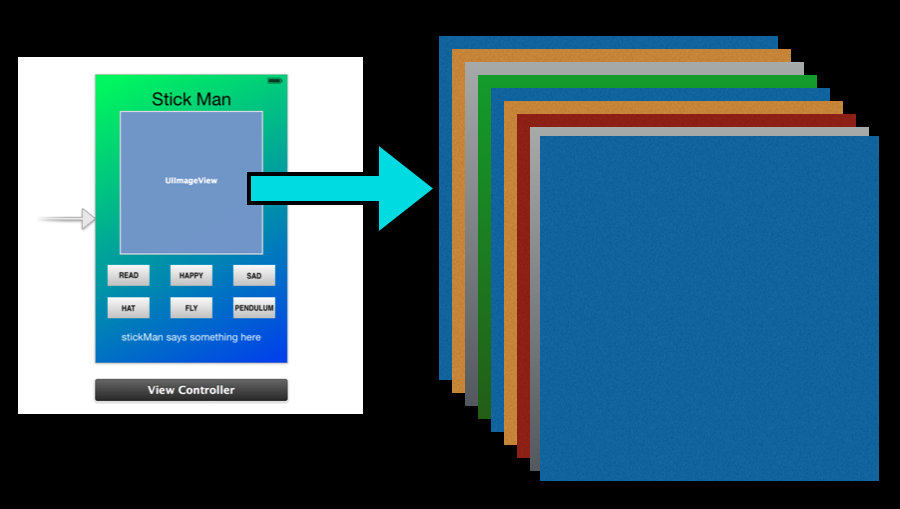
  • VIEW – The View class (inherits from UIView) is mainly concerned with drawing the two balls on the sub-view or drawing canvas or graphics context or whatever you may wish to call it. We provide the controller with an instance of this class by creating an IBOutlet property.
  • CONTROLLER – this class reads in information from the model, properly interprets this information and sends it to the view for drawing. It also deals with user input (button clicks in this case) from the view.

The whole MVC idea is to promote better object-oriented coding habits and help make the code easier to understand, maintain and expand in the future.

For example, this code started with just one ball. To add the second ball, I simply went into the Model class and added the necessary information about the second ball. Then I had to go to the ViewController class and add the model properties for drawing the second ball. Here is a snapshot of the Model class interface:

#import <Foundation/Foundation.h>

@interface Model : NSObject

@property float x1;
@property float x2;
@property float y1;
@property float y2;
@property float R;

@property float speedX1;
@property float speedY1;
@property float speedX2;
@property float speedY2;

@property float WIDTH;
@property float HEIGHT;

- (void) updateBallPositions;

@end

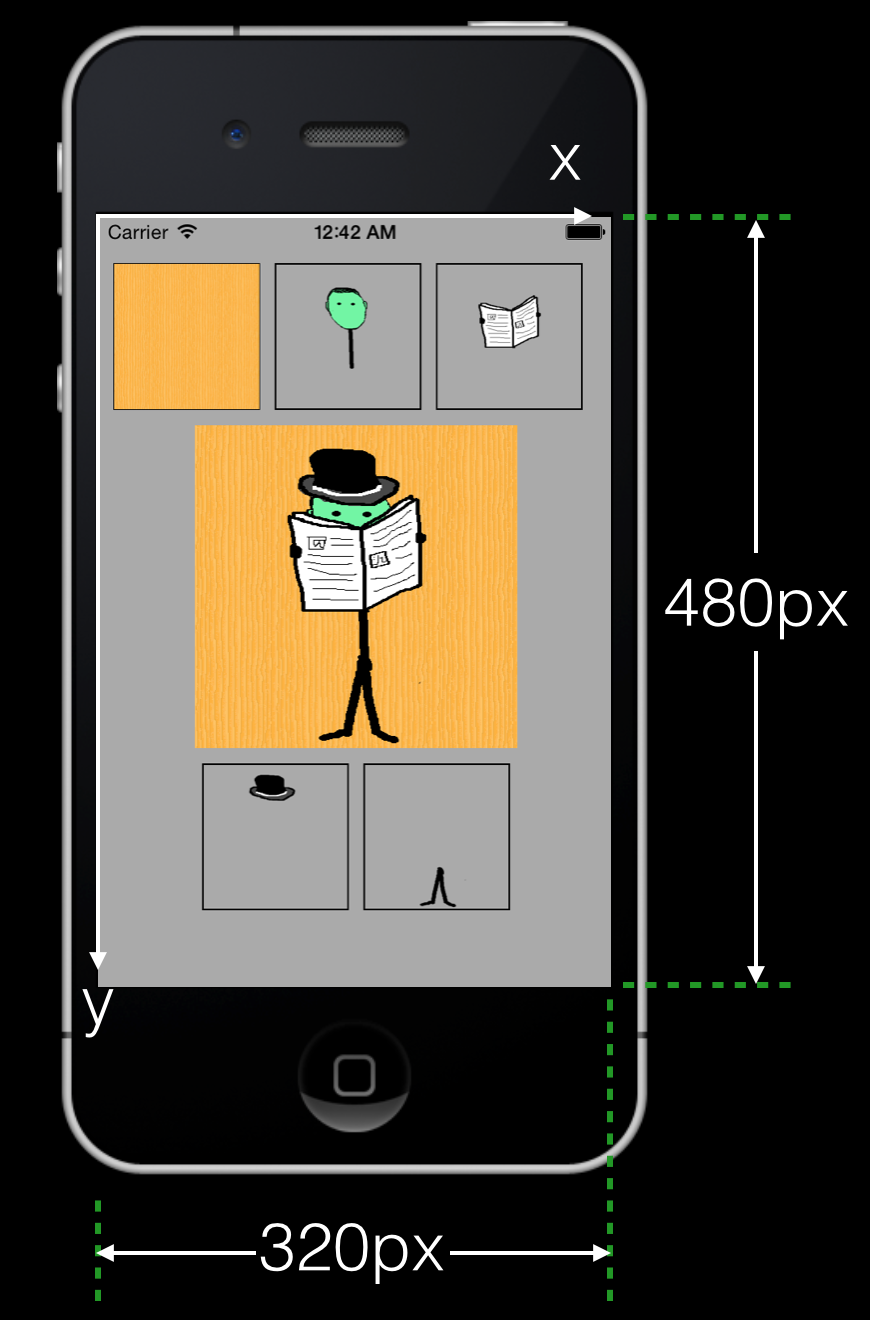
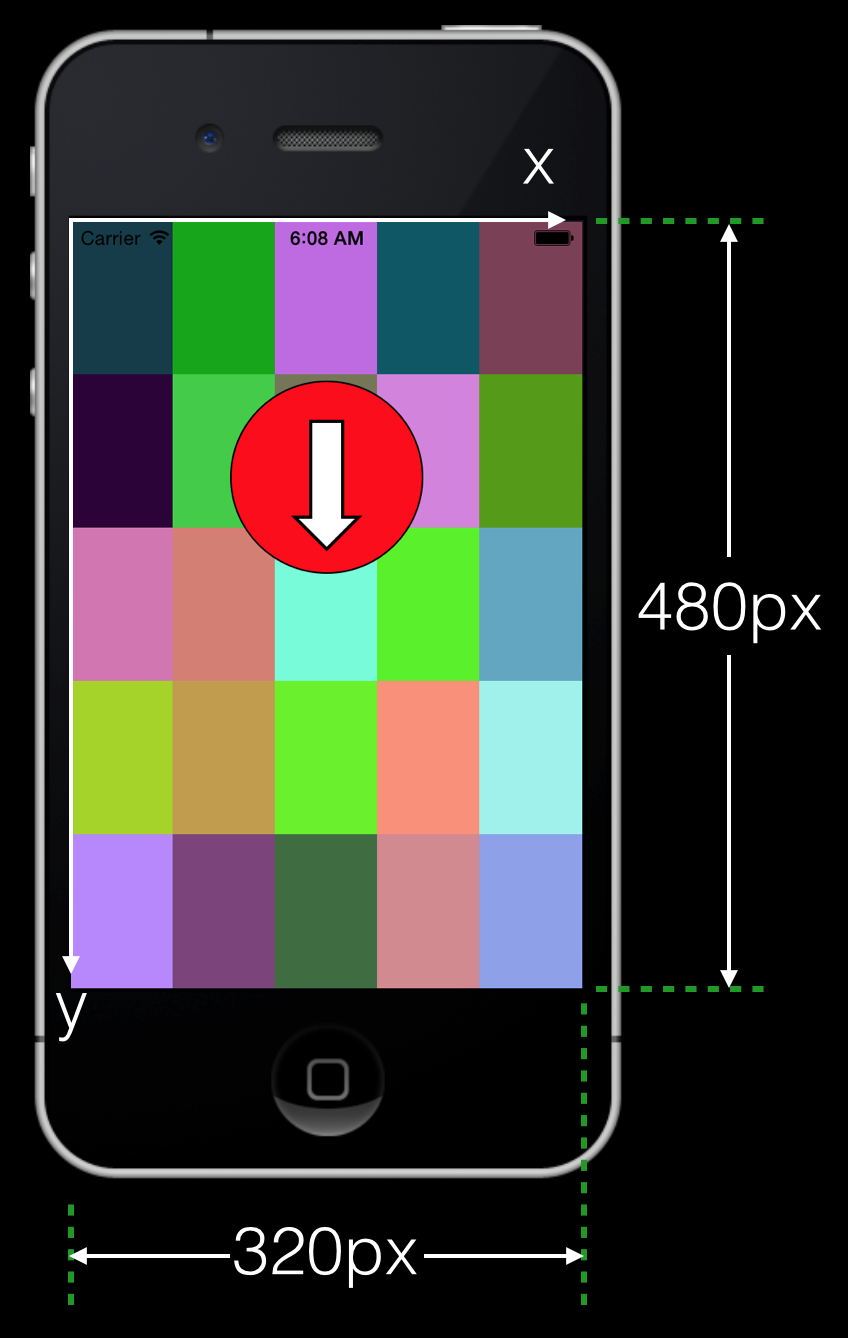
Coordinates and velocity components for the two balls are identified using “1” and “2” respectively. The WIDTH and HEIGHT property refers to the size of the box inside which the balls are moving around. Setting the values for WIDTH and HEIGHT is an example where the controller serves as a liaison between the view and the model. The code snippet below is from ViewController.m and illustrates how the initial condition is set up (before the animation begins).

// ball is drawn at a random location on screen (based on the model)
- (void)viewDidLoad
{
    [super viewDidLoad];
	// Do any additional setup after loading the view, typically from a nib.
    ball1 = [UIImage imageNamed:@"yellowBall.png"];
    ball2 = [UIImage imageNamed:@"whiteBall.png"];

    // instantiate model variables
    model = [[Model alloc] init];
    model.WIDTH  = self.blackView.frame.size.width;
    model.HEIGHT = self.blackView.frame.size.height;
    [model setInitialBallPositions];

    // display initial condition before animation starts
    [self showBalls];
}

We can see that the Controller obtains the size of the “blackView” object (of class UI View) and passes this information along to the “model” object (of class Model).

That the controller can talk with both the model and the view is immediately clear if you look at the ViewController interface, which includes the model and view header files.

#import <UIKit/UIKit.h>

// Controller talks with the Model and the View

#import "Model.h"
#import "View.h"

@interface ViewController : UIViewController

@property (nonatomic, strong) Model* model;
@property (nonatomic, strong) UIImage* ball1;
@property (nonatomic, strong) UIImage* ball2;
@property (nonatomic, strong) IBOutlet View *blackView;
@property (nonatomic, strong) UIImageView* ballView1;
@property (nonatomic, strong) UIImageView* ballView2;
@property (nonatomic, strong) NSTimer* timer;

- (IBAction)startTimer:(id)sender;
- (IBAction)stopTimer:(id)sender;
- (void) update;

@end

For those new to object oriented programming, notice that we instantiate a Model class called model and make it a property. All of the machinery for the class we designed will be available to this instance variable.

Animation using NSTimer

This app introduces one of the commonly used way to do animations in iOS. This technique is quite similar to the setInterval-based animation technique used in HTML5/JavaScript animations, where the code calls a function or method continuously at preset time intervals. Here is a code snapshot of the startTimer method, which is triggered when the user presses the START button on the UI:

// pressing the START button begins the animation
- (IBAction)startTimer:(id)sender {
    
    // remove previously active instances (if any)
    [timer invalidate];
    timer = nil;
    
    // create a new timer based loop
    timer = [NSTimer timerWithTimeInterval:1.0/60.0
                                     target:self
                                   selector:@selector(update)
                                   userInfo:nil
                                    repeats:YES];
    
    [[NSRunLoop mainRunLoop] addTimer:timer forMode:NSDefaultRunLoopMode];
}

In this case, the update method is called repeatedly at a frequency of 60 frames per second. To stop the animation, simply destroy the timer as shown below.

// pressing the STOP button stops the animation
- (IBAction)stopTimer:(id)sender {
    [timer invalidate];
    timer = nil;
}

This approach appears to work quite well for the animation needs of this app.

Future Work

Be aware that the ball-ball collision model used here is rather simplistic and based on a “momentum exchange upon impact” approach. This is applicable only for collisions where the velocities before impact are collinear. In the future, I plan to use a more sophisticated model that accounts for oblique impacts.

I hope this post clears up some of the mystery surrounding the MVC design paradigm. You can clone the entire project from my GitHub link:

https://github.com/jabhiji/ios-bouncing-ball.git

Happy Xcoding!

IOS – Stick Man

Now that we have some basic knowledge about how to design simple apps, it is time to start having some fun. This post is about an app I developed mainly to play with the idea of using several UI Image View “layers” for doing graphics. We’ll also learn how to create a simple animation by using a series of image files.

The title refers to a simple cartoon-like character I ended up naming as the “Stick Man”. You’ve met him before if you’ve read my earlier post about adding images. He’s also the lead character in an earlier HTML5 adventure. Anyhow, here are some screenshots of the iPhone app in action:

Screen Shot 2014-05-02 at 1.12.00 AM

The user can click on any of the six buttons to control what the Stick Man can do. Here is a quick summary of the buttons:

  • READ – reads the newspaper looking for news about iPhone 6.
  • HAPPY – put a smile on his face.
  • SAD – not so happy anymore.
  • HAT – toggle the hat (wear it or remove it).
  • FLY – mimic flying with his hands.
  • PENDULUM – shows an oscillating pendulum.

As before, the images for the buttons were created in Keynote and pressing each button triggered a class method for doing that specific task. And there were the usual property declarations in the interface, with the corresponding @synthesize statements in the implementation. The source code for this app is available at

https://github.com/jabhiji/ios-stickman.git

Using several layers for graphics

Like I mentioned before, my idea here was to use several UI Image View objects on top of each other for displaying different sections of the Stick Man.

Screen Shot 2014-05-02 at 1.30.33 AM

Each layer is transparent and can load and display its own image and all layers work together to display the final image the user sees. Also note that each layer can simultaneously run its own animation using a series of images (animation frames). For example, the pendulum animation involves displaying two images of the pendulum on the “pendulum layer”, while the rest of the image (face, hands etc) remain static on other layers.

Creating animation from a series of images

If you have a series of image files that show the motion of something in time, you can create a simple animation that can display these images one after another in a specified amount of time on any given UI Image View layer. The code to animate the pendulum is copied below for reference.

- (IBAction)usePendulum:(id)sender {
    [layer3 stopAnimating];
    [layer4 stopAnimating];
    [eyeLayer stopAnimating];

    [eyeLayer     setImage:[UIImage imageNamed: @"eyes.png"]];
    [layer1       setImage:[UIImage imageNamed: @"happy.png"]];
    [layer3       setImage:[UIImage imageNamed: @"leftHandHorizontal.png"]];
    [layer4       setImage:[UIImage imageNamed: @"rightHandUp.png"]];
    [newsLayer    setImage:[UIImage imageNamed: @"empty.png"]];
    
    stickManSays.text = [NSString stringWithFormat:@"Check out my pendulum.."];

    // Load image sequence for pendulum motion
    NSArray *imagesPendulum = @[@"pendulum1.png", @"pendulum2.png"];
    
    NSMutableArray *imageSeqPendulum = [[NSMutableArray alloc] init];
    for (int i = 0; i < imagesPendulum.count; i++) {
        [imageSeqPendulum addObject:[UIImage imageNamed:[imagesPendulum objectAtIndex:i]]];
    }
    
    // start animation in the pendulum layer
    pendulumLayer.animationImages = imageSeqPendulum;
    pendulumLayer.animationDuration = 0.75;
    [pendulumLayer startAnimating];
}

Note how the static Stick Man image is assembled in several layers. Also, previously running animations in other layers (if any) are stopped before beginning this particular animation.

This app introduced the idea of using several layers and animating images within a given layer. In future posts, we will continue to explore other ways to create animations in iOS.


iOS – Fahrenheit to Celcius

As the name of this post suggests, I am going to talk about a simple app I designed to convert an user-specified temperature value from °F to °C or the other way round. Although simple, there were a lot of new things for me to learn while writing this app and I’ll share some of them here.

First off, let’s see some screenshots of the app in action to motivate the discussion to follow.

Screen Shot 2014-04-30 at 12.56.15 AM

The user is initially presented with the screen in the leftmost image. He or she then picks one of the windows (°F or °C) to type in a temperature value. This brings up the keyboard. Once you are done entering the value, you hit the appropriate arrow button to convert the value to a different scale. The keyboard disappears as soon as you hit one of the buttons.

In the above picture, I typed in 36 °F and this got converted to 2.2°C. The app also displays a custom message (one line) and a custom image depending on the temperature value.


You can obtain the entire source code for this app from my GitHub page:

https://github.com/jabhiji/ios-ftoc.git

Feel free to clone and test drive this app on the simulator or on your iOS device, but keep in mind that I designed this for the iPhone 4.


Compared to the graphics apps discussed earlier, the new things I learned while writing this app were the following:

Xcode Source control

This was the first time I used source control within Xcode and I must say I was impressed. I had used Git for several years from the linux/mac command line, but this was the first time I used it from within an IDE. It is quite straightforward to make commits locally on your computer and if you have a repo on GitHub, you can just as easily push to and pull from the remote server.

User interaction

The user enters temperature values using the keyboard on the touchscreen and also presses buttons to convert values from one scale to another. Really useful apps are generally about two-way traffic between the user and the computer and this certainly got me started in that direction.

To enable user interaction, we learn how to connect user interface elements on the storyboard (such as buttons, labels and UI Image View objects) to properties within the code and then accessing and using these properties in the ViewController class to get information from the user and send results back to the screen.

The Xcode style of making connections is quite cool. You simply Ctrl-click the element inside the storyboard you wish to connect and drag it with the mouse to the code (use the assistant editor in the right panel to bring up the code next to the storyboard). You can then decide if the UI element is a property or an action for triggering a method. For example, the value you enter inside the text field window is stored as a class property, while the buttons trigger appropriate class methods.

Adding App Icons, Launch Image and a Background Images

All images were created using GIMP. Because I only developed for iPhone 4, I did not include the mandatory image sizes for R4 (retina, 4-inch screen for iPhone 5). This makes Xcode unhappy and it complains about the missing image size. For now, you can ignore this.

In general, creating beautiful images and icons for your app is not something that you should take lightly. The appearance of your app icon should be simple yet immediately convey what the app stands for. The launch image is used while your app is initially loading and one idea is to use your company name here.

In this app, I used the “UI Image View” object both for displaying the background image and for displaying the custom image based on the temperature range.

Images for the two buttons were made using Keynote.

Using images from the internet inside your app

As you see in the screenshot above, I have a set of custom images I use for making the UI more interesting. The “brain” of the app, if I may use the term, is a rather trivial arithmetic equation. But adding an image contributes greatly to the overall user experience of the app and adds a “heart”.

Using random images from google search inside your app is a very bad idea because you don’t know whether or not you have permission from the copyright holder to use the image. But there are lots of amazing, high-quality images on sites such as flickr. And the people who upload these images may, in some cases, allow you to use the images provided you properly acknowledge that they own the original copyright. Make sure you read the terms and conditions for using the images and contact the copyright holder if you have any doubts about what is permitted and what is not.

I hope this post shed some light on some of the factors that are involved in making a simple but workable app for the iPhone.

Happy Xcoding!

iOS Graphics – Adding Images

In my last post, we learned how to use the UIKit framework for drawing simple shapes on the iPhone/iPad screen. In this post, we find out how to load and display external image files in the same view, using the UIImage class.

Quoting again from the relevant portion of the Apple developer website:

UIImage object is a high-level way to display image data. You can create images from files, from Quartz image objects, or from raw image data you receive. The UIImage class also offers several options for drawing images to the current graphics context using different blend modes and opacity values.

This is what the application will look like after we’re done loading and displaying all the images:

Screen Shot 2014-04-24 at 12.44.56 AM

For the purpose of this app, I used the exact same set of images I used for my HTML5 cartoon. Each individual image was created using GIMP and was 400 pixels by 400 pixels. In this case, each individual image  (except the background) is on a transparent layer. Thus, the individual images can be assembled (in the right order) to create the final picture shown in the center.

Here is a step-by-step guide about how to create the view seen in the screenshot above:

STEP 1: Create a Single View Application

Like the previous post, we create a single view application for iOS in Xcode and then create a subclass of UIView called drawShapes. Make sure that the DrawShapes class is associated with the Main Storyboard.

STEP 2: Copy image files to your project

In the “Project Navigator”, click on the “Supporting Files” folder and then click on

Files —-> Add Files to “Your Project Name”

Select the image files and make sure your tick the box below.

Screen Shot 2014-04-24 at 12.56.10 AM

On a retina display, we can automatically display each image in a screen size of 200 pixels by 200 pixels, provided we append the “@2x” qualifier to the image name . However, in this application, we explicitly specify the location and size of the bounding rectangle inside which we want to place each image, so whether or not you use the “@2x” qualifier is irrelevant.

STEP 3: Customize the drawRect method

The APIs to load and draw images will be inside the drawRect method, like before. The complete implementation file for loading and displaying the images is provided below.

@implementation drawShapes

- (void)drawRect:(CGRect)rect
{
    CGRect quad;
    UIBezierPath *path;
    UIColor* strokeColor = [UIColor colorWithRed:0.0 green:0.0 blue:0.0 alpha:1.0];
    [strokeColor setStroke];
    [path stroke];

    // draw individual images in these squares
    quad = CGRectMake(10, 30, 90, 90);
    path = [UIBezierPath bezierPathWithRect:quad];
    [path stroke];
    
    quad = CGRectMake(110, 30, 90, 90);
    path = [UIBezierPath bezierPathWithRect:quad];
    [path stroke];
    
    quad = CGRectMake(210, 30, 90, 90);
    path = [UIBezierPath bezierPathWithRect:quad];
    [path stroke];
    
    quad = CGRectMake(65, 340, 90, 90);
    path = [UIBezierPath bezierPathWithRect:quad];
    [path stroke];
    
    quad = CGRectMake(165, 340, 90, 90);
    path = [UIBezierPath bezierPathWithRect:quad];
    [path stroke];
    
    // load external image files
    UIImage* background   = [UIImage imageNamed:@"background@2x.png"];
    UIImage* baseline     = [UIImage imageNamed:@"baseline@2x.png"];
    UIImage* readThePaper = [UIImage imageNamed:@"readThePaper@2x.png"];
    UIImage* hat          = [UIImage imageNamed:@"hat@2x.png"];
    UIImage* legs         = [UIImage imageNamed:@"legs@2x.png"];

    // drawing individual images
    [background   drawInRect:CGRectMake(10, 30, 90, 90)];
    [baseline     drawInRect:CGRectMake(110, 30, 90, 90)];
    [readThePaper drawInRect:CGRectMake(210, 30, 90, 90)];
    [hat          drawInRect:CGRectMake(65, 340, 90, 90)];
    [legs         drawInRect:CGRectMake(165, 340, 90, 90)];
    
    // drawing them together (in the right order)
    [background   drawInRect:CGRectMake(60, 130, 200, 200)];
    [baseline     drawInRect:CGRectMake(60, 130, 200, 200)];
    [readThePaper drawInRect:CGRectMake(60, 130, 200, 200)];
    [hat          drawInRect:CGRectMake(60, 130, 200, 200)];
    [legs         drawInRect:CGRectMake(60, 130, 200, 200)];
    
    CGSize imageSize = [baseline size];
    NSLog(@"Image height = %f width = %f",imageSize.height, imageSize.width);
}

@end

You can query the size of the images using the size method. In this case, the NSLog at the end prints out values of 400 each for the height and width.

STEP 3: Think about what you can do with images in your app

That’s all there is to the basic task of loading and displaying images in the current graphics context using the UIKit framework. In future posts, I’ll explore additional things we can do with image objects, including coordinate transformations and animation.

iOS Graphics – Introduction

In this post, we will learn how to create an iPhone application that creates the graphic shown below, using the UIKit framework.

Quoting from the Apple Developer website:

The UIKit framework provides the classes needed to construct and manage an application’s user interface for iOS. It provides an application object, event handling, drawing model, windows, views, and controls specifically designed for a touch screen interface.

Example of UIView Graphics

It is assumed that you have some degree of familiarity with the Xcode IDE. In particular, you should know how to create and run projects, add files to existing projects and use the Attribute Inspector and the Identity Inspector (located in the right hand-side panel).

Now simply follow these steps.

STEP 1

Open a new project in Xcode (iOS application – Single View Application).In the Deployment Info, select iPhone in the Devices menu and portrait in the Device Orientation.

STEP 2

Create a new file (Cocoa Touch — Objective-C class) called drawShapes. Xcode will create the header and implementation files automatically:

  • drawShapes.h
  • drawShapes.m

Copy the contents below in these files:

#import <UIKit/UIKit.h>

@interface drawShapes : UIView
@end

All we have done above is to declare our own little class called “drawShapes” and specified that this class inherits from the UIView class. All of the graphics commands used in this example are part of the drawRect method. The drawRect method is defined in the UIView class and overridden here by our custom graphics commands, as detailed below in the implementation file for our class.

#import "drawShapes.h"

@implementation drawShapes

- (void)drawRect:(CGRect)rect
{
    CGRect quad;
    UIBezierPath *path;
    UIColor* fillColor;
    UIColor* strokeColor;
    
    // rectangular tiling of the iPhone screen
    for (int i = 0; i < 5; i++)
    {
        for (int j = 0; j < 5; j++)
        {
            float x = 64*i;
            float y = 96*j;
            float width = 64;
            float height = 96;

            quad = CGRectMake(x, y, width, height);
            path = [UIBezierPath bezierPathWithRect:quad];
        
            float R = (arc4random() % 255)/255.;
            float G = (arc4random() % 255)/255.;
            float B = (arc4random() % 255)/255.;
        
            fillColor = [UIColor colorWithRed:R green:G blue:B alpha:1.0];
            [fillColor setFill];
            [path fill];

            strokeColor = [UIColor colorWithRed:R green:G blue:B alpha:1.0];
            [strokeColor setStroke];
            [path stroke];
        }
    }
    
    // draw a red circle with a black perimeter
    quad = CGRectMake(100, 100, 120, 120);
    path = [UIBezierPath bezierPathWithOvalInRect:quad];

    fillColor = [UIColor colorWithRed:1.0 green:0.0 blue:0.0 alpha:1.0];
    [fillColor setFill];
    [path fill];
    
    strokeColor = [UIColor colorWithRed:0.0 green:0.0 blue:0.0 alpha:1.0];
    [strokeColor setStroke];
    [path stroke];
    
    // custom drawing: a white arrow with a black outline
    {
        UIBezierPath* arrowPath = [UIBezierPath bezierPath];
        
        // define the path
        [arrowPath moveToPoint:CGPointMake(0.0, 0.0)];
        [arrowPath addLineToPoint:CGPointMake(30.0, 0.0)];
        [arrowPath addLineToPoint:CGPointMake(30.0, -5.0)];
        [arrowPath addLineToPoint:CGPointMake(40.0, 5.0)];
        [arrowPath addLineToPoint:CGPointMake(30.0, 15.0)];
        [arrowPath addLineToPoint:CGPointMake(30.0, 10.0)];
        [arrowPath addLineToPoint:CGPointMake(0.0, 10.0)];
        [arrowPath closePath];
        
        // coordinate transformation using the current context
        {
            CGContextRef context =  UIGraphicsGetCurrentContext ();
            float PI = 3.1415;
            CGContextTranslateCTM(context, 170, 125);
            CGContextScaleCTM(context, 2, 2);
            CGContextRotateCTM(context, PI/2.0);
        }
        
        // set the fill color to white
        fillColor = [UIColor whiteColor];
        [fillColor setFill];
        [arrowPath fill];
        
        // set the outline to black
        strokeColor = [UIColor blackColor];
        [strokeColor setStroke];
        [arrowPath stroke];
    }
}

@end

Most of the code is self-explanatory and you can see that we specify a random color for filling and stroking (drawing the border on) each rectangle .

For drawing the circle, we specify the bounding box inside which it is inscribed.

Finally, we define a custom shape (the arrow) using the following coordinates for the individual points (the seven points are traversed in clock-wise order starting from the origin).

Screen Shot 2014-04-22 at 5.55.06 AM

To move the arrow to the location shown in the iPhone screenshot above, coordinate transformations are applied, in the following order:

  • rotate clockwise by 90 degrees (π/2 radians) about the origin
  • scale by a factor of 2 along X and Y
  • translate by 170px along X and 125px along Y

Note that these transformations need to be listed in reverse order in the code:

CGContextTranslateCTM(context, 170, 125);
CGContextScaleCTM(context, 2, 2);
CGContextRotateCTM(context, PI/2.0);

As an aside, the “CG” stands for Core Graphics and “CTM” stands for current transformation matrix. Unlike C++, Objective-C does not have namespaces. Thus, one needs to be careful to avoid name collisions between different functions. Hence the ubiquitous prefixes all over the place like CG, NS (NextStep legacy) and UI (user interface).

STEP 3

Click on “Main_iPhone.storyboard”. If you wish, you can change the background color by using the appropriate selections in the Attribute Inspector panel. But more importantly, open the Identity Inspector and select the class you just created (drawShapes) in the very first drop-down menu.

STEP 4

That’s it! Build and run your application and you should see the iPhone screen fill up with the graphic shown in the screenshot above.

As you can see, it does not take much to create and display simple graphics for iOS. In later posts, we will explore other graphics frameworks in detail, including Core Graphics and OpenGL-ES. In my next post, I will show you how to add images to your view.


HOLES: My first game for ios using PhoneGap

Introduction

My idea was to use the accelerometer and control the motion of a circular ball on a 2D game board. The goal of this game is to guide the yellow ball to the flag without falling into the black holes. Here are a few screenshots of the game in action on an iPad:

Screen Shot 2014-04-11 at 1.44.43 AM

You start with the ball in the lower right corner. Each successful journey to the flag earns you one point and you lose a life each time the ball falls into a hole. To make things difficult, the pattern of holes rotates about the center of the central hole. Each point scored increases the rotational speed.

Building the project

If you have been following my previous PhoneGap posts, there is nothing new about building and running the project once you have all the source code (HTML/CSS/JavaScript) and image files in your www folder. Once you are inside your PhoneGap project directory, you can get rid of the www folder created by PhoneGap and  clone the source code for this project from GitHub using

$ git clone https://github.com/jabhiji/ios-ballgame-phonegap.git www

Note that you will also need to download the plugin for using the accelerometer.

Locking the screen in Portrait mode

The design of this game requires that the screen on your iPhone or iPad always remain locked in portrait mode. PhoneGap provides a “config.xml” file inside the www folder where you can configure various settings, one of which is the orientation. However, I had a hard time getting this to prevent the screen rotating when I changed the orientation of the iPad (it worked fine on an iPhone!). I had to use Xcode and change the following function inside “AppDelegate.m” to prevent this from happening:

Screen Shot 2014-04-11 at 2.05.24 AM

I just changed all the 1s to 0s on the last three lines, keeping the 1 for the portrait mode. I am not an expert in Xcode and objective-C, so any suggestions or comments about this hack are most welcome. So far, this seems to work for both iPhone and iPad.

One code for iPhone and iPad

Because the iPhone and iPad have different screen sizes and I did not wish to go and change the canvas size each time I changed a device, I ended up using the screen.width call inside JavaScript to resize the canvas when necessary, as shown below:

    
    // change canvas size if running on iPad
    if(screen.width > 400)
    {
        canvas.width = 750;
        canvas.height = 750;
        xmax = 750;
        ymax = 750;
    }

The canvas size is thus adjusted during run-time for iPad. All the game elements like the ball size, hole size and velocity are scaled with respect to the canvas size.

Creating an icon for your app

You typically want to design a simple and unique icon for your game. This icon will be displayed on the iPad screen with all of your other apps. I had heard good things about Gimp and decided to give it a try. Apart from being free, this is a very intuitive and easy image editing tool for beginners, once you get the hang of it.

Screen Shot 2014-04-11 at 1.32.47 AM

After playing with GIMP for a while, I was able to design a simple image for the game icon. Note the convention Apple uses to name the image files. For example, the ‘@2x’ is a hint to iOS that we are supplying a high-resolution version of the icon, for use with Retina displays.

Physics

The part where the ball bounces off the walls is easy to implement. I added in a factor that reduced the speed of the ball after each impact.

Next, I tried to make the game more realistic, especially the  part where the ball falls in one of the holes. Apart from the force acting on the ball because we tilt the device, I added in a “force-field” once the center of the ball falls inside the circumference of the hole. My idea was to add an “inverse-square-law” force (similar to gravitation) on the ball acting towards the center of the hole and also slow down the velocity of the ball.

While this simplistic approach works and does not make things go horribly wrong, I am sure with some more tinkering, I will be able to make things better than they are now.

I had an absolute blast making this game and I hope you have fun playing it!