Category Archives: PhoneGap

HOLES: My first game for ios using PhoneGap

Introduction

My idea was to use the accelerometer and control the motion of a circular ball on a 2D game board. The goal of this game is to guide the yellow ball to the flag without falling into the black holes. Here are a few screenshots of the game in action on an iPad:

Screen Shot 2014-04-11 at 1.44.43 AM

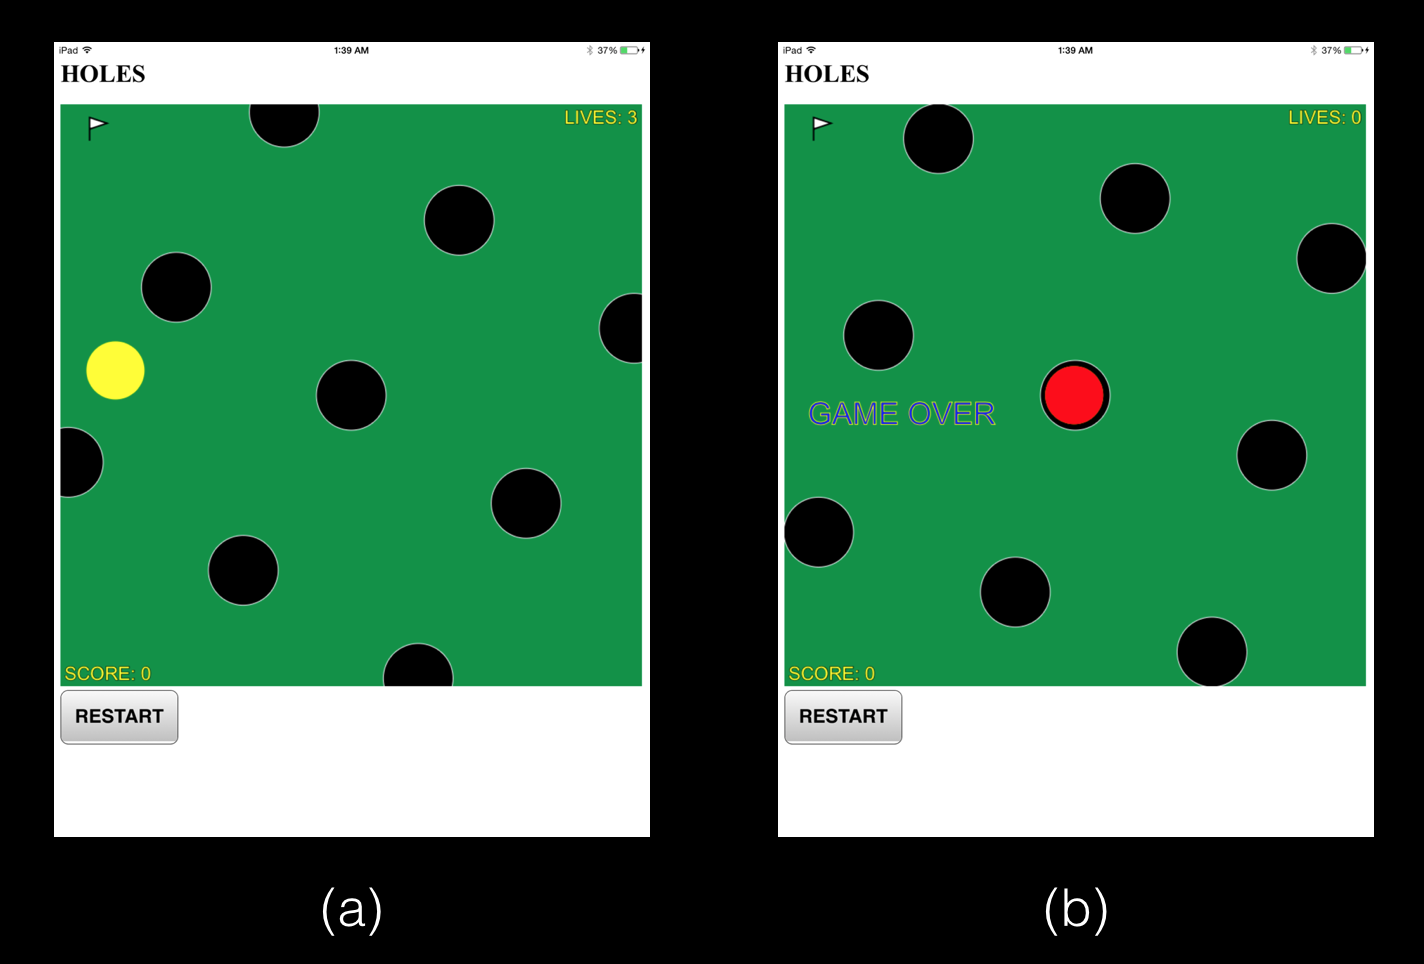
You start with the ball in the lower right corner. Each successful journey to the flag earns you one point and you lose a life each time the ball falls into a hole. To make things difficult, the pattern of holes rotates about the center of the central hole. Each point scored increases the rotational speed.

Building the project

If you have been following my previous PhoneGap posts, there is nothing new about building and running the project once you have all the source code (HTML/CSS/JavaScript) and image files in your www folder. Once you are inside your PhoneGap project directory, you can get rid of the www folder created by PhoneGap and  clone the source code for this project from GitHub using

$ git clone https://github.com/jabhiji/ios-ballgame-phonegap.git www

Note that you will also need to download the plugin for using the accelerometer.

Locking the screen in Portrait mode

The design of this game requires that the screen on your iPhone or iPad always remain locked in portrait mode. PhoneGap provides a “config.xml” file inside the www folder where you can configure various settings, one of which is the orientation. However, I had a hard time getting this to prevent the screen rotating when I changed the orientation of the iPad (it worked fine on an iPhone!). I had to use Xcode and change the following function inside “AppDelegate.m” to prevent this from happening:

Screen Shot 2014-04-11 at 2.05.24 AM

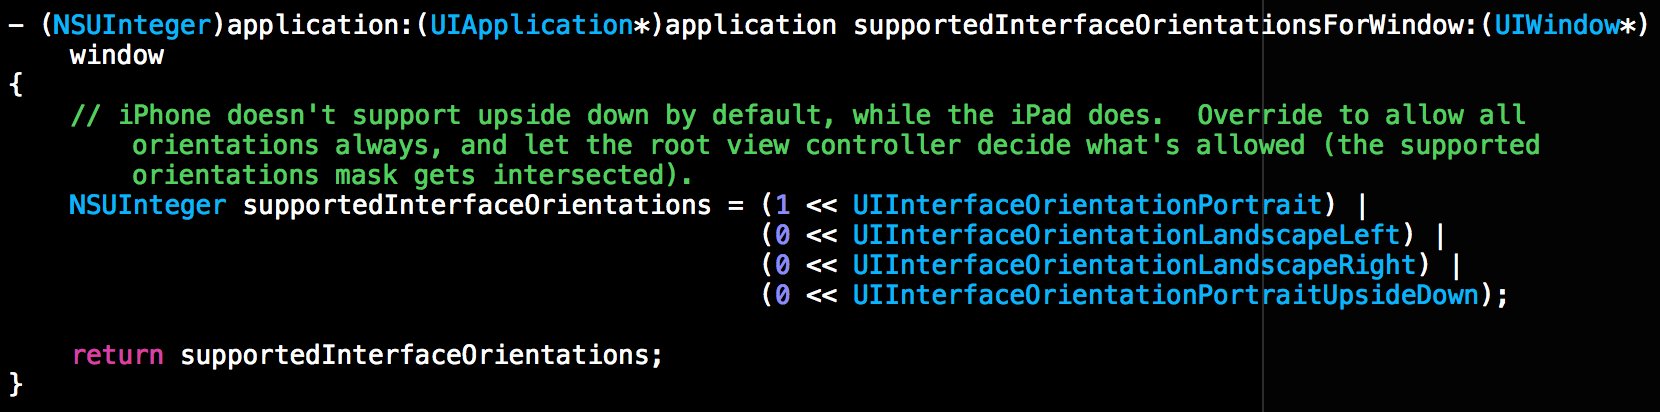
I just changed all the 1s to 0s on the last three lines, keeping the 1 for the portrait mode. I am not an expert in Xcode and objective-C, so any suggestions or comments about this hack are most welcome. So far, this seems to work for both iPhone and iPad.

One code for iPhone and iPad

Because the iPhone and iPad have different screen sizes and I did not wish to go and change the canvas size each time I changed a device, I ended up using the screen.width call inside JavaScript to resize the canvas when necessary, as shown below:

    
    // change canvas size if running on iPad
    if(screen.width > 400)
    {
        canvas.width = 750;
        canvas.height = 750;
        xmax = 750;
        ymax = 750;
    }

The canvas size is thus adjusted during run-time for iPad. All the game elements like the ball size, hole size and velocity are scaled with respect to the canvas size.

Creating an icon for your app

You typically want to design a simple and unique icon for your game. This icon will be displayed on the iPad screen with all of your other apps. I had heard good things about Gimp and decided to give it a try. Apart from being free, this is a very intuitive and easy image editing tool for beginners, once you get the hang of it.

Screen Shot 2014-04-11 at 1.32.47 AM

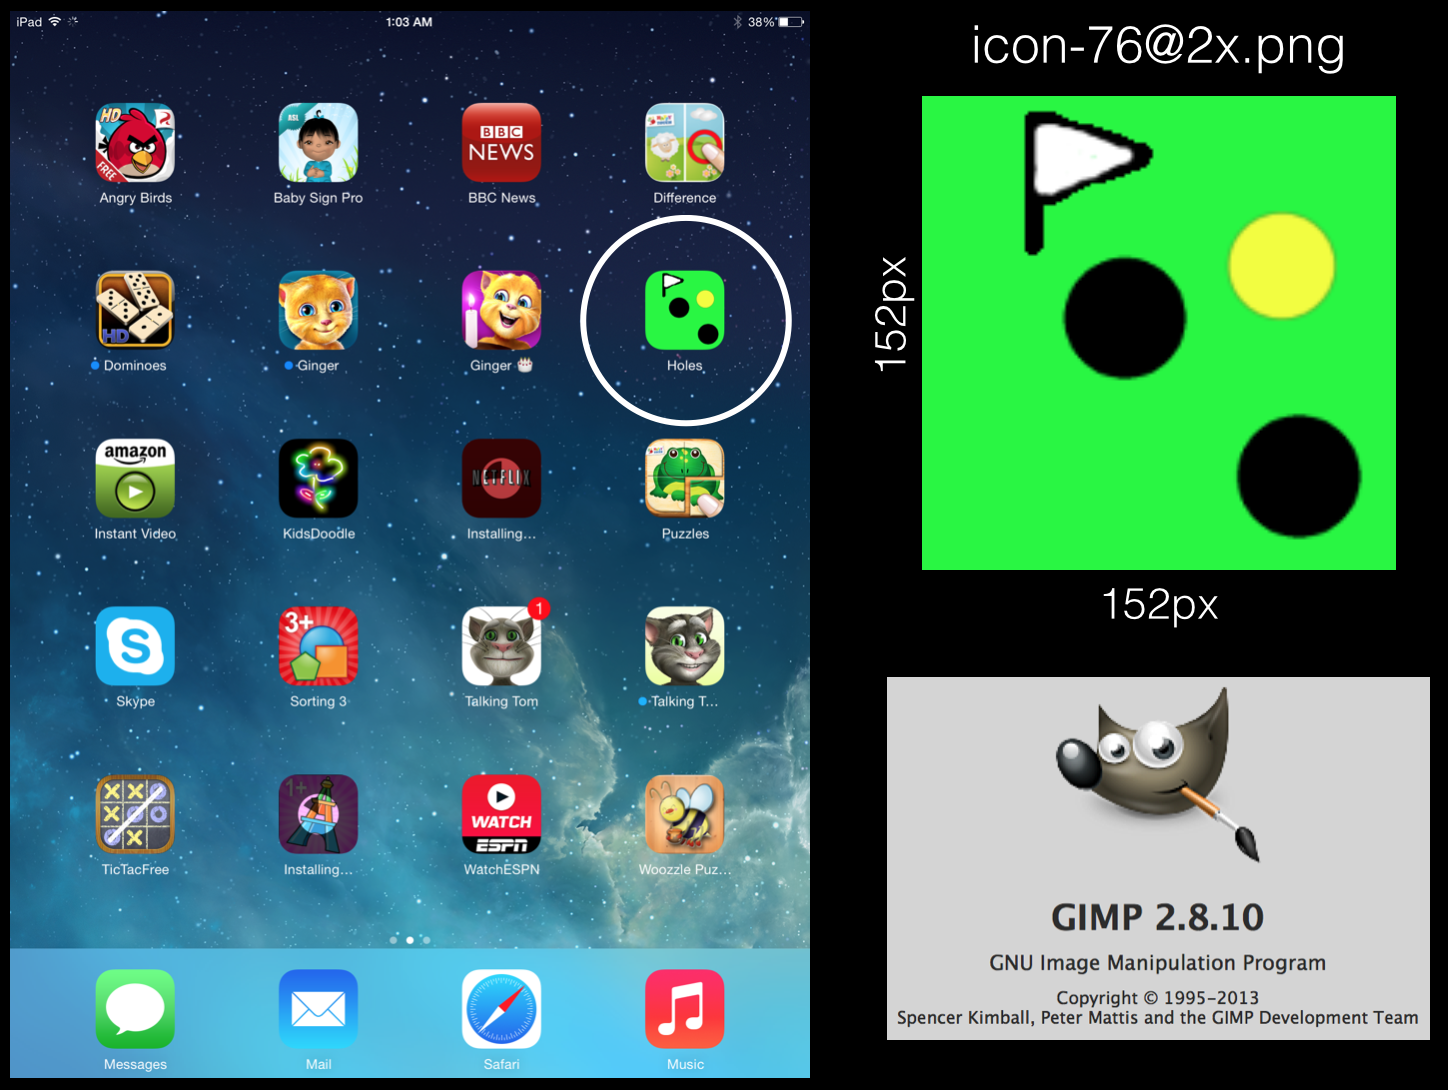
After playing with GIMP for a while, I was able to design a simple image for the game icon. Note the convention Apple uses to name the image files. For example, the ‘@2x’ is a hint to iOS that we are supplying a high-resolution version of the icon, for use with Retina displays.

Physics

The part where the ball bounces off the walls is easy to implement. I added in a factor that reduced the speed of the ball after each impact.

Next, I tried to make the game more realistic, especially the  part where the ball falls in one of the holes. Apart from the force acting on the ball because we tilt the device, I added in a “force-field” once the center of the ball falls inside the circumference of the hole. My idea was to add an “inverse-square-law” force (similar to gravitation) on the ball acting towards the center of the hole and also slow down the velocity of the ball.

While this simplistic approach works and does not make things go horribly wrong, I am sure with some more tinkering, I will be able to make things better than they are now.

I had an absolute blast making this game and I hope you have fun playing it!

Mobile accelerometer “app” using PhoneGap

In my previous post, I explained how to install PhoneGap on a Macbook Pro and test a “Hello World” application on an iOS simulator as well as an actual device. In this post, you will see how easy it is to build a simple mobile application for the iPhone using the PhoneGap framework. Specifically, you will learn how to use the accelerometer and build a simple “app” that will display the instantaneous acceleration of the iPhone in both graphical and text format.

Let’s take a look at the final product. Shown below are a couple of snapshots of the app in action, with the iPhone held in three different orientations. I developed and tested the app for an iPhone 4 (from late 2010). The app should work fine on newer iPhone models as well, although I have not tested this myself. Note that this app will not work on an iOS simulator. You will need an actual iOS device (either iPhone or iPad).

Screen Shot 2014-04-04 at 7.23.56 PM

Observe how the X and Y axes are oriented with respect to the phone. The Z-axis (not shown) points out of the page towards the reader. The coordinate system represented by X-Y-Z always remains fixed with respect to the phone.

The yellow line from the origin can be thought of as an arrow that begins at the origin and points along the direction in which the device is being accelerated. If the phone is stationary, this direction is exactly opposite to what most people understand as the direction of gravitational force (pointing towards the ground). For some more background on the physics of gravity and acceleration, please refer to this article.

Finally, the actual acceleration values along X, Y and Z are printed below the graphics window (yes, the graphics is based on HTML5 canvas) and these numbers are all in units of [m/s2]. You may recall from high school physics that the acceleration due to gravity on the Earth’s surface is approximately 9.8 [m/s2].

Look at the different orientations (a), (b) and (c) in the above picture and make sure you understand what the results mean for each one of them.

Now that we understand everything from the physics point-of-view, let’s get back to the software side of things. The following steps are necessary to build this application:

STEP 1: Install and test PhoneGap (see my previous post)

STEP 2: Create a new project

$ phonegap create accel --name Accelerometer --id com.company.accel

All subsequent PhoneGap commands should be run inside the accel folder.

STEP 3: Add the accelerometer plugin

$ phonegap local plugin add https://git-wip-us.apache.org/repos/asf/cordova-plugin-device-motion.git

STEP 4: Add the HTML5 and JavaScript code

Pull the source code from my GitHub repo using

$ git clone https://github.com/jabhiji/ios-accelerometer-phonegap.git

Move the file “index.html” from the repo folder to the “www” folder of your PhoneGap project.

The basic idea is to get acceleration data from the device every 100 milliseconds and use this data to update the drawing inside the canvas element. The code above is based on some minor modifications to the example code provided on the PhoneGap API documentation. Specifically, it adds the graphical display component using HTML5 canvas.

STEP 5: Build, deploy and run

Like before, all you need to do is:

$ phonegap build ios

followed by

$ phonegap run --device ios

This will compile the code and deploy the application on your device and the run it.

STEP 6: Enjoy your accelerometer!

While all of this can be polished further depending on your individual taste, you are  now all set to test drive this app in any location you can imagine. Drop me a line if you find any bugs or think the results are not accurate or don’t make physical sense.

In summary, we have written a HTML/CSS/JS application and deployed it to an iOS device using PhoneGap.

Getting started with PhoneGap

PhoneGap is a mobile development framework, which enables developers to build applications using HTML5, CSS3 and JavaScript and then deploy them to mobile platforms like iOS and Android. For example, we can develop a browser-based game using HTML5 canvas and then port the game to an iPhone without coding in Objective-C. In addition, mobile-specific features such as touch inputs and accelerometers can also be accessed with the PhoneGap API.

In this first post about PhoneGap, I simply illustrate how to

  1. Install PhoneGap on a late 2013 Macbook Pro running OSX Mavericks.
  2. Run a simple “Hello World” application on an iOS device simulator from the command line.

I assume that you have downloaded the Xcode IDE but have never downloaded or installed PhoneGap before.

Lets get started!

STEP 1: Installing Node.js

This step is quick and easy. Simply go to the node website and click on the green INSTALL button below to get things going.

node

Once you have node installed, you may want to check where it is installed. Typically, this will be in

$ which node
/usr/local/bin/node

STEP 2: Install PhoneGap

To install PhoneGap from the command-line, simply use

$ sudo npm install -g phonegap

Yep, that’s all there is to it. I’m not kidding. For reference, I have listed the PhoneGap version number below.

$ phonegap --version
3.4.0-0.19.8

STEP 3: Create a iOS application using PhoneGap

Once you have PhoneGap installed, you are ready to test drive a simple Hello World application. In case you do not have an actual iPhone or iPad (or are reluctant to pay the annual $99 developer fee), you can use what’s called an iOS simulator to run your application. But testing on an actual iOS device is highly recommended (especially for games).

To enable running the application from the command-line on an iOS simulator, use

$ sudo npm install -g ios-sim

If you wish to run your application from the command-line on a connected iOS device (iPhone, iPad) use

$ sudo npm install -g ios-deploy

The latest versions of PhoneGap enable us to develop and run applications from the command-line-interface (CLI). This is very convenient as we do not need to use the Xcode IDE at all (although we can use Xcode if we really want to).

To keep things organized, I first made a directory called PHONEGAP where I will create the application.  Once inside this directory, use the following command to create a simple bare-bones iOS application:

$ phonegap create hello com.companyname.hello HelloWorld

This creates a sub-directory called “hello” where the application will live. Go inside this directory using

$ cd hello

and then build the iOS application using

$ phonegap build ios

This creates the executable file that you can run in the iOS simulator with

$ phonegap run ios

If all goes well, you will see the following application open on the iOS simulator (assuming you don’t have an actual device connected):

PhoneGap-HelloWorld

The source code (HTML, CSS, JS) and other resource files (like the image “icon.png” displayed above) used for the display above are located inside the “www” folder:

~/PHONEGAP/hello/www

In the next post, we will learn more about PhoneGap and about porting existing browser-based applications to iOS.

In particular, I am interested in porting the three browser-based games I wrote on to an iOS device. I anticipate that there will be some changes in the games to account for the absence of a keyboard. For example, the accelerometer can be used to move the paddle or the space-ship by tilting the phone. Releasing bombs might be implemented by using a “tap” on the touch-screen instead of pressing the arrow key.

Have you used PhoneGap for porting existing HTML5 games? If so, I would love to hear about your experience.