As the name of this post suggests, I am going to talk about a simple app I designed to convert an user-specified temperature value from °F to °C or the other way round. Although simple, there were a lot of new things for me to learn while writing this app and I’ll share some of them here.
First off, let’s see some screenshots of the app in action to motivate the discussion to follow.
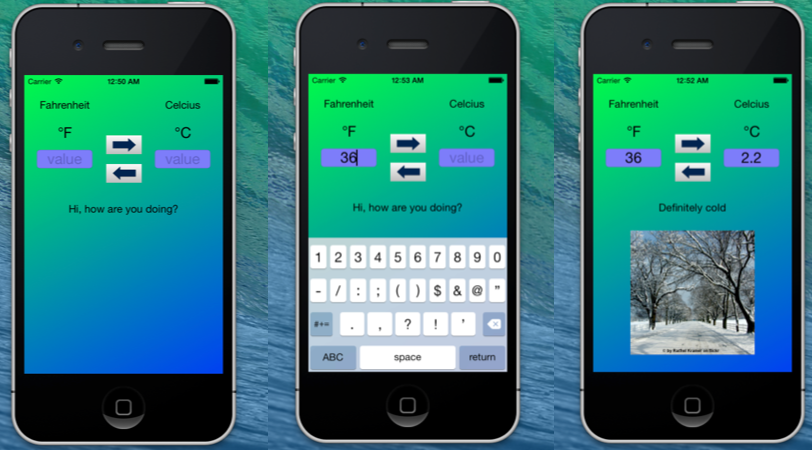
The user is initially presented with the screen in the leftmost image. He or she then picks one of the windows (°F or °C) to type in a temperature value. This brings up the keyboard. Once you are done entering the value, you hit the appropriate arrow button to convert the value to a different scale. The keyboard disappears as soon as you hit one of the buttons.
In the above picture, I typed in 36 °F and this got converted to 2.2°C. The app also displays a custom message (one line) and a custom image depending on the temperature value.
You can obtain the entire source code for this app from my GitHub page:
https://github.com/jabhiji/ios-ftoc.git
Feel free to clone and test drive this app on the simulator or on your iOS device, but keep in mind that I designed this for the iPhone 4.
Compared to the graphics apps discussed earlier, the new things I learned while writing this app were the following:
Xcode Source control
This was the first time I used source control within Xcode and I must say I was impressed. I had used Git for several years from the linux/mac command line, but this was the first time I used it from within an IDE. It is quite straightforward to make commits locally on your computer and if you have a repo on GitHub, you can just as easily push to and pull from the remote server.
User interaction
The user enters temperature values using the keyboard on the touchscreen and also presses buttons to convert values from one scale to another. Really useful apps are generally about two-way traffic between the user and the computer and this certainly got me started in that direction.
To enable user interaction, we learn how to connect user interface elements on the storyboard (such as buttons, labels and UI Image View objects) to properties within the code and then accessing and using these properties in the ViewController class to get information from the user and send results back to the screen.
The Xcode style of making connections is quite cool. You simply Ctrl-click the element inside the storyboard you wish to connect and drag it with the mouse to the code (use the assistant editor in the right panel to bring up the code next to the storyboard). You can then decide if the UI element is a property or an action for triggering a method. For example, the value you enter inside the text field window is stored as a class property, while the buttons trigger appropriate class methods.
Adding App Icons, Launch Image and a Background Images
All images were created using GIMP. Because I only developed for iPhone 4, I did not include the mandatory image sizes for R4 (retina, 4-inch screen for iPhone 5). This makes Xcode unhappy and it complains about the missing image size. For now, you can ignore this.
In general, creating beautiful images and icons for your app is not something that you should take lightly. The appearance of your app icon should be simple yet immediately convey what the app stands for. The launch image is used while your app is initially loading and one idea is to use your company name here.
In this app, I used the “UI Image View” object both for displaying the background image and for displaying the custom image based on the temperature range.
Images for the two buttons were made using Keynote.
Using images from the internet inside your app
As you see in the screenshot above, I have a set of custom images I use for making the UI more interesting. The “brain” of the app, if I may use the term, is a rather trivial arithmetic equation. But adding an image contributes greatly to the overall user experience of the app and adds a “heart”.
Using random images from google search inside your app is a very bad idea because you don’t know whether or not you have permission from the copyright holder to use the image. But there are lots of amazing, high-quality images on sites such as flickr. And the people who upload these images may, in some cases, allow you to use the images provided you properly acknowledge that they own the original copyright. Make sure you read the terms and conditions for using the images and contact the copyright holder if you have any doubts about what is permitted and what is not.
—
I hope this post shed some light on some of the factors that are involved in making a simple but workable app for the iPhone.
Happy Xcoding!