All posts by Abhijit Joshi

iOS Graphics – Introduction

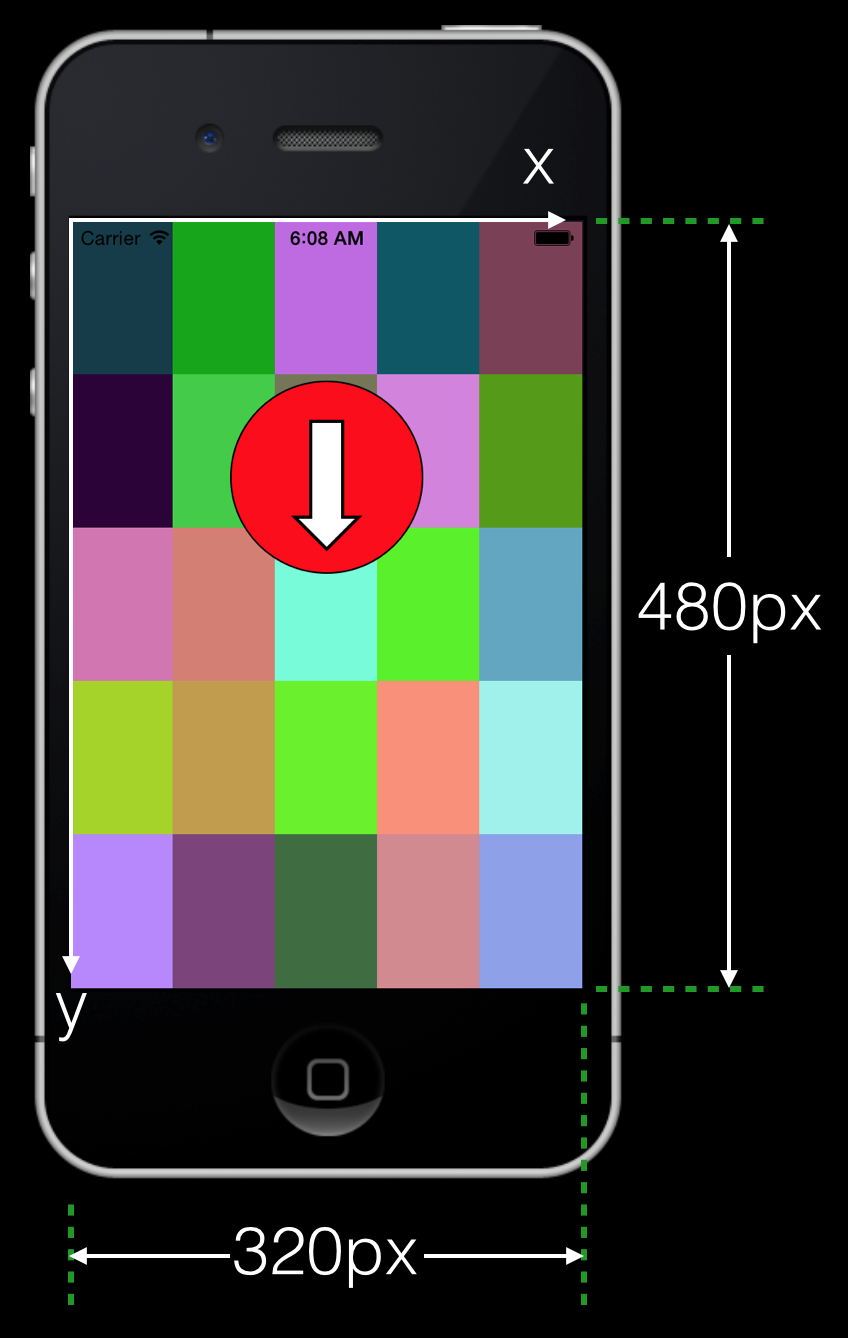
In this post, we will learn how to create an iPhone application that creates the graphic shown below, using the UIKit framework.

Quoting from the Apple Developer website:

The UIKit framework provides the classes needed to construct and manage an application’s user interface for iOS. It provides an application object, event handling, drawing model, windows, views, and controls specifically designed for a touch screen interface.

Example of UIView Graphics

It is assumed that you have some degree of familiarity with the Xcode IDE. In particular, you should know how to create and run projects, add files to existing projects and use the Attribute Inspector and the Identity Inspector (located in the right hand-side panel).

Now simply follow these steps.

STEP 1

Open a new project in Xcode (iOS application – Single View Application).In the Deployment Info, select iPhone in the Devices menu and portrait in the Device Orientation.

STEP 2

Create a new file (Cocoa Touch — Objective-C class) called drawShapes. Xcode will create the header and implementation files automatically:

  • drawShapes.h
  • drawShapes.m

Copy the contents below in these files:

#import <UIKit/UIKit.h>

@interface drawShapes : UIView
@end

All we have done above is to declare our own little class called “drawShapes” and specified that this class inherits from the UIView class. All of the graphics commands used in this example are part of the drawRect method. The drawRect method is defined in the UIView class and overridden here by our custom graphics commands, as detailed below in the implementation file for our class.

#import "drawShapes.h"

@implementation drawShapes

- (void)drawRect:(CGRect)rect
{
    CGRect quad;
    UIBezierPath *path;
    UIColor* fillColor;
    UIColor* strokeColor;
    
    // rectangular tiling of the iPhone screen
    for (int i = 0; i < 5; i++)
    {
        for (int j = 0; j < 5; j++)
        {
            float x = 64*i;
            float y = 96*j;
            float width = 64;
            float height = 96;

            quad = CGRectMake(x, y, width, height);
            path = [UIBezierPath bezierPathWithRect:quad];
        
            float R = (arc4random() % 255)/255.;
            float G = (arc4random() % 255)/255.;
            float B = (arc4random() % 255)/255.;
        
            fillColor = [UIColor colorWithRed:R green:G blue:B alpha:1.0];
            [fillColor setFill];
            [path fill];

            strokeColor = [UIColor colorWithRed:R green:G blue:B alpha:1.0];
            [strokeColor setStroke];
            [path stroke];
        }
    }
    
    // draw a red circle with a black perimeter
    quad = CGRectMake(100, 100, 120, 120);
    path = [UIBezierPath bezierPathWithOvalInRect:quad];

    fillColor = [UIColor colorWithRed:1.0 green:0.0 blue:0.0 alpha:1.0];
    [fillColor setFill];
    [path fill];
    
    strokeColor = [UIColor colorWithRed:0.0 green:0.0 blue:0.0 alpha:1.0];
    [strokeColor setStroke];
    [path stroke];
    
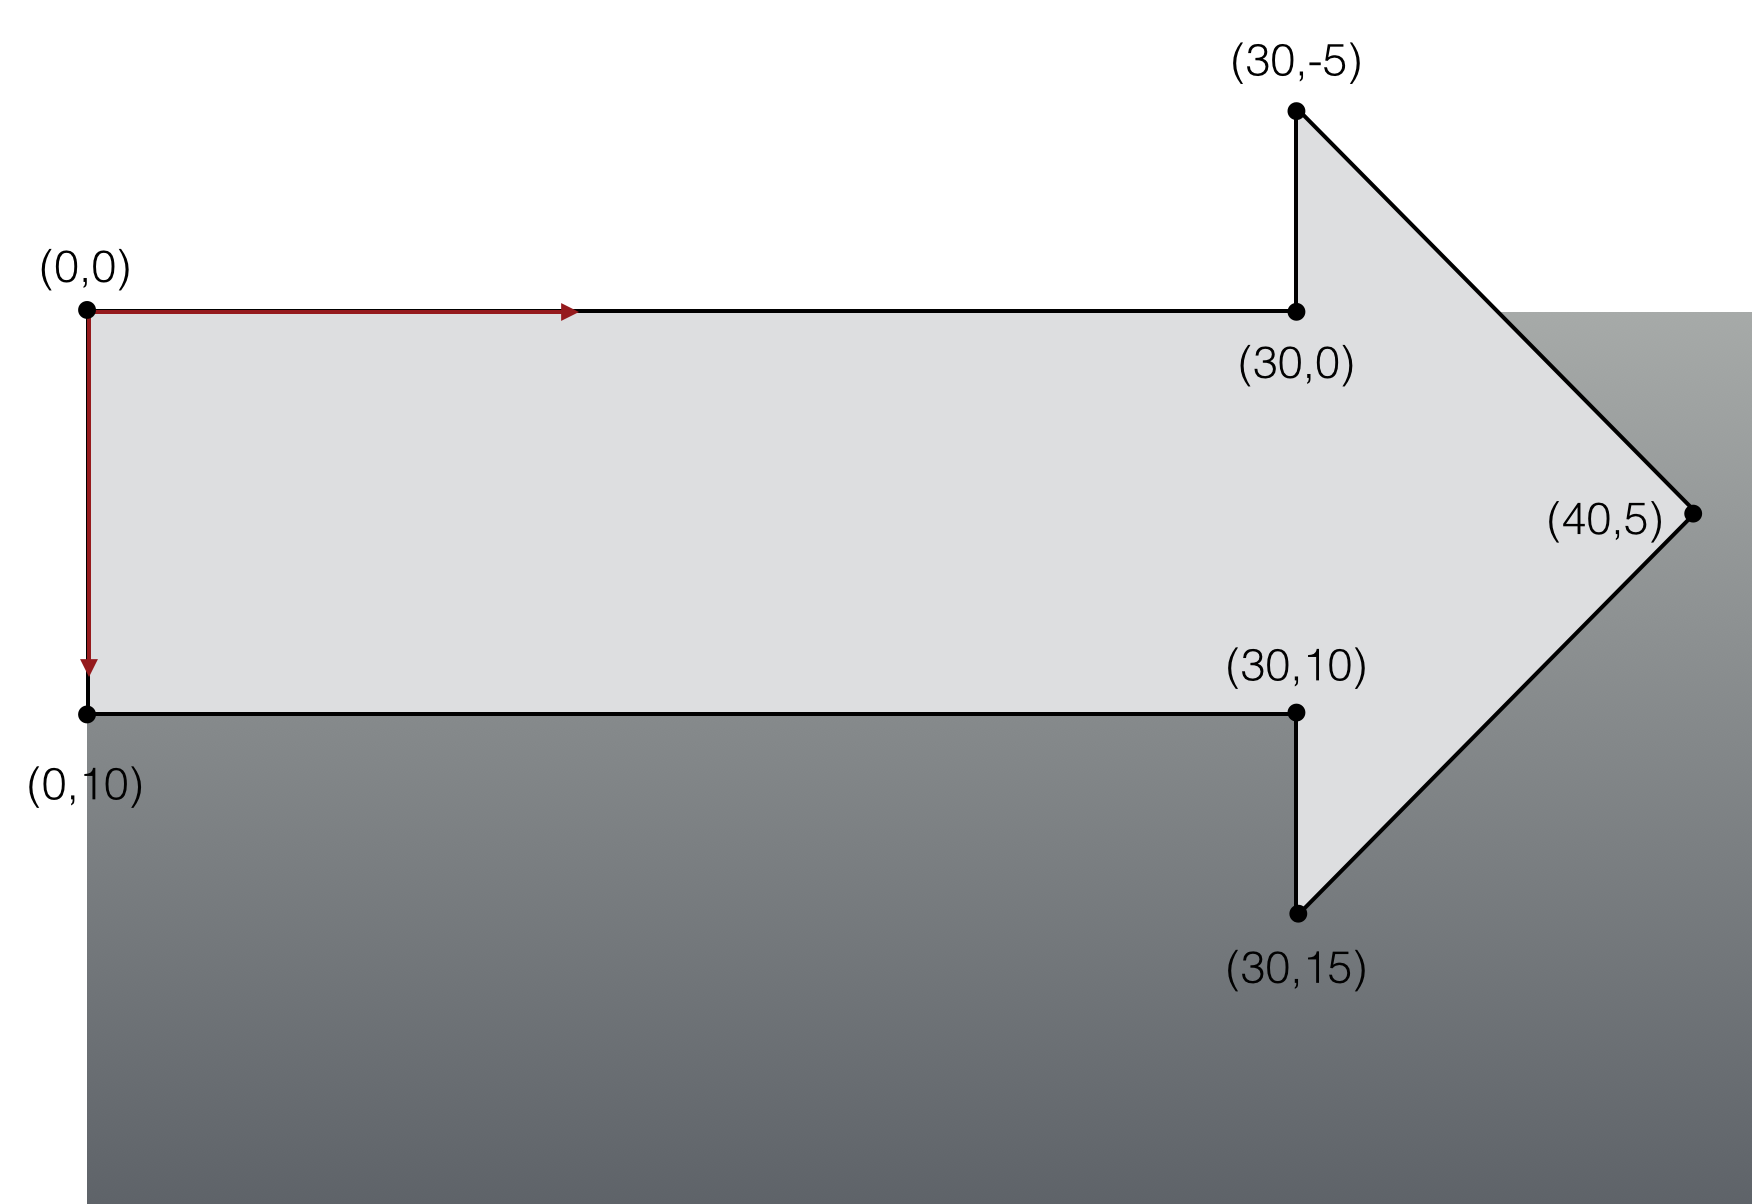
    // custom drawing: a white arrow with a black outline
    {
        UIBezierPath* arrowPath = [UIBezierPath bezierPath];
        
        // define the path
        [arrowPath moveToPoint:CGPointMake(0.0, 0.0)];
        [arrowPath addLineToPoint:CGPointMake(30.0, 0.0)];
        [arrowPath addLineToPoint:CGPointMake(30.0, -5.0)];
        [arrowPath addLineToPoint:CGPointMake(40.0, 5.0)];
        [arrowPath addLineToPoint:CGPointMake(30.0, 15.0)];
        [arrowPath addLineToPoint:CGPointMake(30.0, 10.0)];
        [arrowPath addLineToPoint:CGPointMake(0.0, 10.0)];
        [arrowPath closePath];
        
        // coordinate transformation using the current context
        {
            CGContextRef context =  UIGraphicsGetCurrentContext ();
            float PI = 3.1415;
            CGContextTranslateCTM(context, 170, 125);
            CGContextScaleCTM(context, 2, 2);
            CGContextRotateCTM(context, PI/2.0);
        }
        
        // set the fill color to white
        fillColor = [UIColor whiteColor];
        [fillColor setFill];
        [arrowPath fill];
        
        // set the outline to black
        strokeColor = [UIColor blackColor];
        [strokeColor setStroke];
        [arrowPath stroke];
    }
}

@end

Most of the code is self-explanatory and you can see that we specify a random color for filling and stroking (drawing the border on) each rectangle .

For drawing the circle, we specify the bounding box inside which it is inscribed.

Finally, we define a custom shape (the arrow) using the following coordinates for the individual points (the seven points are traversed in clock-wise order starting from the origin).

Screen Shot 2014-04-22 at 5.55.06 AM

To move the arrow to the location shown in the iPhone screenshot above, coordinate transformations are applied, in the following order:

  • rotate clockwise by 90 degrees (π/2 radians) about the origin
  • scale by a factor of 2 along X and Y
  • translate by 170px along X and 125px along Y

Note that these transformations need to be listed in reverse order in the code:

CGContextTranslateCTM(context, 170, 125);
CGContextScaleCTM(context, 2, 2);
CGContextRotateCTM(context, PI/2.0);

As an aside, the “CG” stands for Core Graphics and “CTM” stands for current transformation matrix. Unlike C++, Objective-C does not have namespaces. Thus, one needs to be careful to avoid name collisions between different functions. Hence the ubiquitous prefixes all over the place like CG, NS (NextStep legacy) and UI (user interface).

STEP 3

Click on “Main_iPhone.storyboard”. If you wish, you can change the background color by using the appropriate selections in the Attribute Inspector panel. But more importantly, open the Identity Inspector and select the class you just created (drawShapes) in the very first drop-down menu.

STEP 4

That’s it! Build and run your application and you should see the iPhone screen fill up with the graphic shown in the screenshot above.

As you can see, it does not take much to create and display simple graphics for iOS. In later posts, we will explore other graphics frameworks in detail, including Core Graphics and OpenGL-ES. In my next post, I will show you how to add images to your view.


HOLES: My first game for ios using PhoneGap

Introduction

My idea was to use the accelerometer and control the motion of a circular ball on a 2D game board. The goal of this game is to guide the yellow ball to the flag without falling into the black holes. Here are a few screenshots of the game in action on an iPad:

Screen Shot 2014-04-11 at 1.44.43 AM

You start with the ball in the lower right corner. Each successful journey to the flag earns you one point and you lose a life each time the ball falls into a hole. To make things difficult, the pattern of holes rotates about the center of the central hole. Each point scored increases the rotational speed.

Building the project

If you have been following my previous PhoneGap posts, there is nothing new about building and running the project once you have all the source code (HTML/CSS/JavaScript) and image files in your www folder. Once you are inside your PhoneGap project directory, you can get rid of the www folder created by PhoneGap and  clone the source code for this project from GitHub using

$ git clone https://github.com/jabhiji/ios-ballgame-phonegap.git www

Note that you will also need to download the plugin for using the accelerometer.

Locking the screen in Portrait mode

The design of this game requires that the screen on your iPhone or iPad always remain locked in portrait mode. PhoneGap provides a “config.xml” file inside the www folder where you can configure various settings, one of which is the orientation. However, I had a hard time getting this to prevent the screen rotating when I changed the orientation of the iPad (it worked fine on an iPhone!). I had to use Xcode and change the following function inside “AppDelegate.m” to prevent this from happening:

Screen Shot 2014-04-11 at 2.05.24 AM

I just changed all the 1s to 0s on the last three lines, keeping the 1 for the portrait mode. I am not an expert in Xcode and objective-C, so any suggestions or comments about this hack are most welcome. So far, this seems to work for both iPhone and iPad.

One code for iPhone and iPad

Because the iPhone and iPad have different screen sizes and I did not wish to go and change the canvas size each time I changed a device, I ended up using the screen.width call inside JavaScript to resize the canvas when necessary, as shown below:

    
    // change canvas size if running on iPad
    if(screen.width > 400)
    {
        canvas.width = 750;
        canvas.height = 750;
        xmax = 750;
        ymax = 750;
    }

The canvas size is thus adjusted during run-time for iPad. All the game elements like the ball size, hole size and velocity are scaled with respect to the canvas size.

Creating an icon for your app

You typically want to design a simple and unique icon for your game. This icon will be displayed on the iPad screen with all of your other apps. I had heard good things about Gimp and decided to give it a try. Apart from being free, this is a very intuitive and easy image editing tool for beginners, once you get the hang of it.

Screen Shot 2014-04-11 at 1.32.47 AM

After playing with GIMP for a while, I was able to design a simple image for the game icon. Note the convention Apple uses to name the image files. For example, the ‘@2x’ is a hint to iOS that we are supplying a high-resolution version of the icon, for use with Retina displays.

Physics

The part where the ball bounces off the walls is easy to implement. I added in a factor that reduced the speed of the ball after each impact.

Next, I tried to make the game more realistic, especially the  part where the ball falls in one of the holes. Apart from the force acting on the ball because we tilt the device, I added in a “force-field” once the center of the ball falls inside the circumference of the hole. My idea was to add an “inverse-square-law” force (similar to gravitation) on the ball acting towards the center of the hole and also slow down the velocity of the ball.

While this simplistic approach works and does not make things go horribly wrong, I am sure with some more tinkering, I will be able to make things better than they are now.

I had an absolute blast making this game and I hope you have fun playing it!

Mobile accelerometer “app” using PhoneGap

In my previous post, I explained how to install PhoneGap on a Macbook Pro and test a “Hello World” application on an iOS simulator as well as an actual device. In this post, you will see how easy it is to build a simple mobile application for the iPhone using the PhoneGap framework. Specifically, you will learn how to use the accelerometer and build a simple “app” that will display the instantaneous acceleration of the iPhone in both graphical and text format.

Let’s take a look at the final product. Shown below are a couple of snapshots of the app in action, with the iPhone held in three different orientations. I developed and tested the app for an iPhone 4 (from late 2010). The app should work fine on newer iPhone models as well, although I have not tested this myself. Note that this app will not work on an iOS simulator. You will need an actual iOS device (either iPhone or iPad).

Screen Shot 2014-04-04 at 7.23.56 PM

Observe how the X and Y axes are oriented with respect to the phone. The Z-axis (not shown) points out of the page towards the reader. The coordinate system represented by X-Y-Z always remains fixed with respect to the phone.

The yellow line from the origin can be thought of as an arrow that begins at the origin and points along the direction in which the device is being accelerated. If the phone is stationary, this direction is exactly opposite to what most people understand as the direction of gravitational force (pointing towards the ground). For some more background on the physics of gravity and acceleration, please refer to this article.

Finally, the actual acceleration values along X, Y and Z are printed below the graphics window (yes, the graphics is based on HTML5 canvas) and these numbers are all in units of [m/s2]. You may recall from high school physics that the acceleration due to gravity on the Earth’s surface is approximately 9.8 [m/s2].

Look at the different orientations (a), (b) and (c) in the above picture and make sure you understand what the results mean for each one of them.

Now that we understand everything from the physics point-of-view, let’s get back to the software side of things. The following steps are necessary to build this application:

STEP 1: Install and test PhoneGap (see my previous post)

STEP 2: Create a new project

$ phonegap create accel --name Accelerometer --id com.company.accel

All subsequent PhoneGap commands should be run inside the accel folder.

STEP 3: Add the accelerometer plugin

$ phonegap local plugin add https://git-wip-us.apache.org/repos/asf/cordova-plugin-device-motion.git

STEP 4: Add the HTML5 and JavaScript code

Pull the source code from my GitHub repo using

$ git clone https://github.com/jabhiji/ios-accelerometer-phonegap.git

Move the file “index.html” from the repo folder to the “www” folder of your PhoneGap project.

The basic idea is to get acceleration data from the device every 100 milliseconds and use this data to update the drawing inside the canvas element. The code above is based on some minor modifications to the example code provided on the PhoneGap API documentation. Specifically, it adds the graphical display component using HTML5 canvas.

STEP 5: Build, deploy and run

Like before, all you need to do is:

$ phonegap build ios

followed by

$ phonegap run --device ios

This will compile the code and deploy the application on your device and the run it.

STEP 6: Enjoy your accelerometer!

While all of this can be polished further depending on your individual taste, you are  now all set to test drive this app in any location you can imagine. Drop me a line if you find any bugs or think the results are not accurate or don’t make physical sense.

In summary, we have written a HTML/CSS/JS application and deployed it to an iOS device using PhoneGap.

Getting started with PhoneGap

PhoneGap is a mobile development framework, which enables developers to build applications using HTML5, CSS3 and JavaScript and then deploy them to mobile platforms like iOS and Android. For example, we can develop a browser-based game using HTML5 canvas and then port the game to an iPhone without coding in Objective-C. In addition, mobile-specific features such as touch inputs and accelerometers can also be accessed with the PhoneGap API.

In this first post about PhoneGap, I simply illustrate how to

  1. Install PhoneGap on a late 2013 Macbook Pro running OSX Mavericks.
  2. Run a simple “Hello World” application on an iOS device simulator from the command line.

I assume that you have downloaded the Xcode IDE but have never downloaded or installed PhoneGap before.

Lets get started!

STEP 1: Installing Node.js

This step is quick and easy. Simply go to the node website and click on the green INSTALL button below to get things going.

node

Once you have node installed, you may want to check where it is installed. Typically, this will be in

$ which node
/usr/local/bin/node

STEP 2: Install PhoneGap

To install PhoneGap from the command-line, simply use

$ sudo npm install -g phonegap

Yep, that’s all there is to it. I’m not kidding. For reference, I have listed the PhoneGap version number below.

$ phonegap --version
3.4.0-0.19.8

STEP 3: Create a iOS application using PhoneGap

Once you have PhoneGap installed, you are ready to test drive a simple Hello World application. In case you do not have an actual iPhone or iPad (or are reluctant to pay the annual $99 developer fee), you can use what’s called an iOS simulator to run your application. But testing on an actual iOS device is highly recommended (especially for games).

To enable running the application from the command-line on an iOS simulator, use

$ sudo npm install -g ios-sim

If you wish to run your application from the command-line on a connected iOS device (iPhone, iPad) use

$ sudo npm install -g ios-deploy

The latest versions of PhoneGap enable us to develop and run applications from the command-line-interface (CLI). This is very convenient as we do not need to use the Xcode IDE at all (although we can use Xcode if we really want to).

To keep things organized, I first made a directory called PHONEGAP where I will create the application.  Once inside this directory, use the following command to create a simple bare-bones iOS application:

$ phonegap create hello com.companyname.hello HelloWorld

This creates a sub-directory called “hello” where the application will live. Go inside this directory using

$ cd hello

and then build the iOS application using

$ phonegap build ios

This creates the executable file that you can run in the iOS simulator with

$ phonegap run ios

If all goes well, you will see the following application open on the iOS simulator (assuming you don’t have an actual device connected):

PhoneGap-HelloWorld

The source code (HTML, CSS, JS) and other resource files (like the image “icon.png” displayed above) used for the display above are located inside the “www” folder:

~/PHONEGAP/hello/www

In the next post, we will learn more about PhoneGap and about porting existing browser-based applications to iOS.

In particular, I am interested in porting the three browser-based games I wrote on to an iOS device. I anticipate that there will be some changes in the games to account for the absence of a keyboard. For example, the accelerometer can be used to move the paddle or the space-ship by tilting the phone. Releasing bombs might be implemented by using a “tap” on the touch-screen instead of pressing the arrow key.

Have you used PhoneGap for porting existing HTML5 games? If so, I would love to hear about your experience.

BOTNIK: the benevolent bomber

My most recent HTML5 game is called BOTNIK: The benevolent bomber.

The name is intended to be a mix of robot and Sputnik-I, the first ever satellite launched by the USSR in 1957. Anyway, the idea is to drop snow bombs on snow monsters. The benevolent part is that the bombs don’t kill the monsters but actually supply them with fuel so that they can float up and escape from Earth.

botnik

If you want to play the game, click on the button above. This post summarizes some of the new things I learned while making this game. You will note that this game reuses some code from my earlier SPACE RACE game, especially the background image (starfield) and the cute little space ship.

Adding transparency to part of your image

In this game, I wanted a fixed background image of stars and wanted a second image (buildings in a city) in “front” of it that moved to the left and right depending on which direction the UFO was going.

I made the city buildings using Keynote and then used the Preview application on my Mac to select and crop the “sky” above the buildings. This essentially makes everything above the buildings completely transparent. In the future, this might also come in handy when working with sprites.

Panning background images

A simple way to implement a background that scrolls to the left and right forever is to offset the background image suitably and then draw the same background image (the city buildings in this case) to the right or left respectively.

This idea is sometimes referred to as tiling. You essentially copy the same pattern along the X-direction in this case. Note that you should be careful to make the background image “periodic” so that the player does not detect sharp gradients between the end of one image and the beginning of the next image.

Turning off default key behavior

In this game, hitting the down arrow key on the keyboard causes the UFO to drop a snow-bomb. However, since we are playing the game in a browser, the down arrow key also implements scrolling of the web-page. We can disable this “default behavior” by using the JavaScript preventDefault() method.

    // down arrow - drop a bomb
    if(e.keyCode == 40)
    {  
        e.preventDefault();
        down_arrow_pressed = true;
    }

Adding gravity

This is relevant for the snow-bomb once it has been dropped. If you want to make the trajectory of the bomb realistic, you need to incorporate the right physics here. Essentially, the horizontal velocity of the bomb continues to be identical to what it was when the bomb was dropped. The vertical velocity (pointing downwards) is initially zero (in this case) and then increases linearly with time because of a constant gravitational acceleration. The path of the bomb turns out to be a parabola.

Hope you have fun playing! I’ll be back with more games soon.

Introduction to HTML5 Games

I recently wrote two simple games that can be played using a modern browser and this post summarizes the experience. Screenshots of the two games are provided below and you can go and play the games before reading any further by clicking on the buttons below the screenshots. Note that both games need a keyboard and you need to be on a laptop or desktop to play.

The first game is called PADDLE. In this, you move a rectangular paddle at the bottom of the game screen and prevent a bouncing ball from escaping. Each time you hit the ball with the paddle, you get 10 points and if the ball escapes, you lose a life.

paddleGame

The second game is SPACE RACE. You are an intrepid space explorer looking for a blue star. You drive a flying saucer and catch as many blue stars as you can while dodging a green space monster who wants to eat you. In addition, you need to be careful not to fall into one of the 4 black holes! Here is a screenshot:

spaceRaceKey

In general, the time interval between the original concept or game idea to a basic but working implementation is really small for HTML5. If you are a perfectionist, you may spend a lot of time in getting the details just right. And you will eventually drill down and optimize or improve specific features. For example, in the SPACE RACE game, my flying saucer was originally a circle. Changing it to look like a flying saucer required some work and some changes to the “collision detection” portion in the code.

You can access the complete source code for both games by pointing your browser to the corresponding .js files. Feel free to use this code as a baseline for writing your own games.

The world of R: drawing y = f(x) using “curve”

In this post, we continue learning about the R programming interface. Making simple X-Y plots using a mathematical expression of the type

y = f(x)

is a nice way to learn how functions behave and for finding out the roots of polynomial functions. In R, the curve command can handle almost anything you wish to plot and analyze. Let’s assume that you have a function of the form:

y = (x – 1)(x – 2)(x – 3)

In this case, we already know that the roots of this function [x values where y = f(x) = 0] are x = 1, x = 2 and x = 3. Thus, picking a range of x-values over which this function shows some interesting behavior is easy. Let’s pick the range from x = 0.75 to x = 3.25.

This is how you would plot this function in the X-Y plane using R:

curve((x-1)*(x-2)*(x-3),from=0.75,to=3.25)

functionPlot001

To overlay another plot on the same window, use “add = TRUE” as an additional parameter to the curve command. For example, to insert a blue-colored horizontal line (y = 0) in the above plot, use:

> curve(0*x,from=0.75,to=3.25,col='blue',add=TRUE)

functionPlot002

You can control the number of points “n” used to draw the curve (default n = 101), add custom labels for the axes and draw logarithmic plots. Consult this link  for additional details about all the parameters we can use for the curve command.

Falling in love with R

I had heard about this amazing language for statistical analysis and finally decided to give it a shot after reading a sample first chapter preview from “R in Action” by Robert Kabacoff (this looks like a great book by the way and is on my list of books to buy). The first thing was to download and install the software on my Mac, which was a quick and entirely painless process. You fire up R by clicking on the “R” icon in the Mac applications folder.

The initial window looks pretty much like a unix terminal. To see what R can do, I decided to start with a simple linear regression example. The set of R statements below create a series of (x,y) coordinates and then plot each point on a simple plot.

> x <- c(0,1,2,3,4,5,6,7,8,9,10)
> y <- c(0,1,2,2,4,4,5,6,7,10,11)
> plot(x,y)

Here is the result:

R_y_vs_x

Next, we create a least-squares fit to the data and plot the resulting line on top of the data:

> model <- lm(y~x)
> yfit <- model$fitted.values
> lines(x,yfit)

And this is what we get:

R_least_squares_fit

You want the actual equation of the line? The slope and Y-intercept can be obtained using:

> lm(y~x)

Call:
lm(formula = y ~ x)

Coefficients:
(Intercept)            x  
     -0.500        1.045

Now this was a really simple example, but it was enough to illustrate what R can do. And going by first impressions, it looks like I will be exploring a lot of R in the future.

Tracking file downloads with Google analytics

Google analytics (let’s call it GA) is a commonly used tool for keeping track of visitors to your website. In this article, I will highlight how to use this tool for tracking file downloads. This works for the so-called “Universal analytics” or newer version of the script, typically of the form: UA-XXXXXXXX-X.

The baseline use of GA involves signing up for a free account and then placing a small JavaScript snippet in all pages you wish to track. This enables us to track how many times that page was viewed and from which corner of the Earth your visitors are coming from. But if you have a link to a PDF file in that page, there is no way of knowing whether a user actually downloaded that PDF file or not.

Let’s assume that you have a button set up such that when the user clicks on the button, you send him the PDF file he requests.

<button id = "pdf"> Download PDF </button>

An easy way to actually make this work is to use jQuery. We make an object based on the id of the HTML tag (button in this case) and then fire off an event to GA before sending the requested PDF file to the user. Something like this:

$('#pdf').on('click', function() { 
    ga('send', 'event', 'PDF File', 'Download', 'name of your file'); 
    setTimeout(function(){window.open('./path/to/PDF','_self')}, 1000); 
});
  • You can pick any string you wish to replace ‘PDF File’, ‘Download’ and ‘name of your file’. In general, these provide more and more granularity for the description of whatever it is the user is downloading.
  • The setTimeout() used above is a hack to buy some time for the event to fire off a message to GA. In the above example, I have used a delay of 1000ms between the user clicking the button and the client actually requesting the PDF file from the server.
  • The ‘_self’ parameter is to open the window in the same page and tab.

You can test in real-time if your events are firing by opening GA and navigating to Real-TimeEvents. They will also be available for analysis in BehaviorEvents.

Developing Web Applications using HTML5 canvas

It seems Apple introduced the canvas element almost 10 years ago, in 2004! Alas, I first learned about canvas only recently, while randomly browsing books in the computer programming section at Barnes & Noble. I happened to be browsing books about HTML5, CSS3 and JavaScript for building my website and canvas fit perfectly into my project. After playing with it for a while, it became clear that as far as I was concerned, it was the next QBASIC. Only much better in almost all respects than QBASIC.

The coolest things about canvas is that it can be used to build simple but useful client-side graphics applications that run inside web browsers. These applications can be quite sophisticated, with cross-browser compatibility and a complete point-and-click UI component.

The simple canvas API leads to a quick development cycle. Even if you are completely new to canvas, you will be writing pretty decent graphics apps very quickly. This time will be even shorter if you already know HTML5, CSS3 and JavaScript. Most (if not all) browsers now have dedicated development tools that are useful for debugging and optimizing your (JavaScript) code.

Lastly, canvas apps can be ported to iOS devices using mobile development frameworks like PhoneGap. This means I can create a game using HTML5, CSS3 and JavaScript and play it on my iPhone as if it is a native app. Of course, a better option is to master Objective-C and write a really native app for iPhone and iPad.

On my website, I have some rather simple examples of what canvas can do. These include applications for generating fractals, cellular automata and for a 1D, two-phase lattice Boltzmann method. I plan to spend a lot of time with canvas in the future.