Now that we have some basic knowledge about how to design simple apps, it is time to start having some fun. This post is about an app I developed mainly to play with the idea of using several UI Image View “layers” for doing graphics. We’ll also learn how to create a simple animation by using a series of image files.
The title refers to a simple cartoon-like character I ended up naming as the “Stick Man”. You’ve met him before if you’ve read my earlier post about adding images. He’s also the lead character in an earlier HTML5 adventure. Anyhow, here are some screenshots of the iPhone app in action:
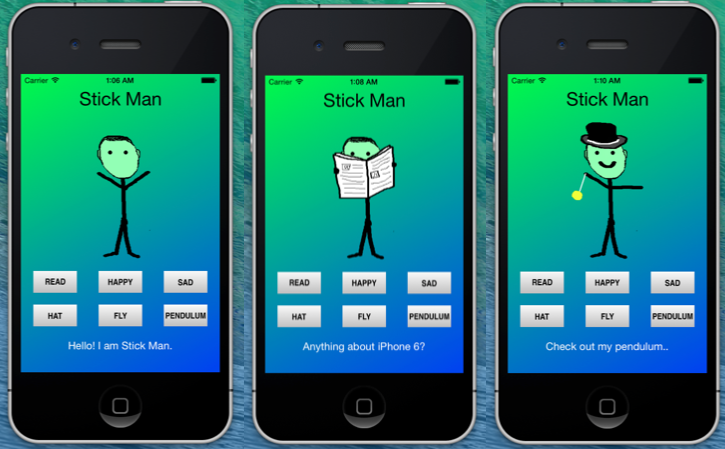
The user can click on any of the six buttons to control what the Stick Man can do. Here is a quick summary of the buttons:
- READ – reads the newspaper looking for news about iPhone 6.
- HAPPY – put a smile on his face.
- SAD – not so happy anymore.
- HAT – toggle the hat (wear it or remove it).
- FLY – mimic flying with his hands.
- PENDULUM – shows an oscillating pendulum.
As before, the images for the buttons were created in Keynote and pressing each button triggered a class method for doing that specific task. And there were the usual property declarations in the interface, with the corresponding @synthesize statements in the implementation. The source code for this app is available at
https://github.com/jabhiji/ios-stickman.git
Using several layers for graphics
Like I mentioned before, my idea here was to use several UI Image View objects on top of each other for displaying different sections of the Stick Man.
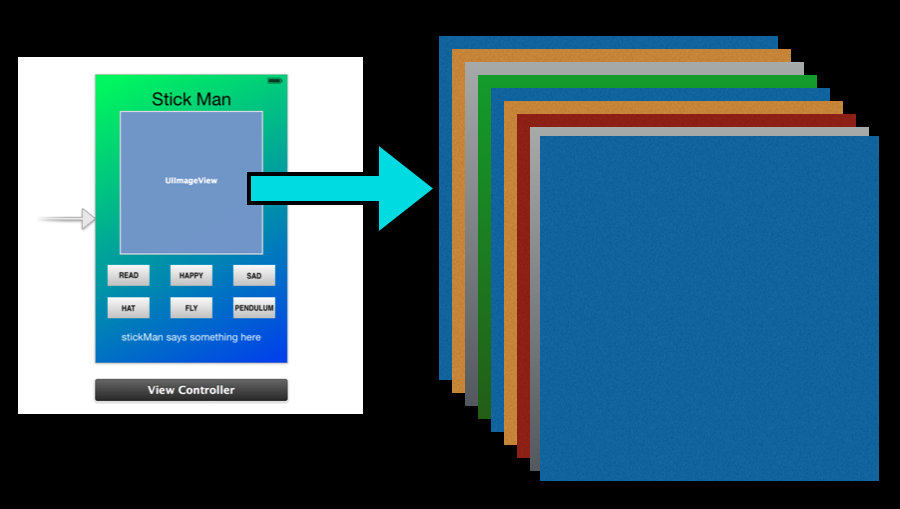
Each layer is transparent and can load and display its own image and all layers work together to display the final image the user sees. Also note that each layer can simultaneously run its own animation using a series of images (animation frames). For example, the pendulum animation involves displaying two images of the pendulum on the “pendulum layer”, while the rest of the image (face, hands etc) remain static on other layers.
Creating animation from a series of images
If you have a series of image files that show the motion of something in time, you can create a simple animation that can display these images one after another in a specified amount of time on any given UI Image View layer. The code to animate the pendulum is copied below for reference.
- (IBAction)usePendulum:(id)sender {
    [layer3 stopAnimating];
    [layer4 stopAnimating];
    [eyeLayer stopAnimating];

    [eyeLayer     setImage:[UIImage imageNamed: @"eyes.png"]];
    [layer1       setImage:[UIImage imageNamed: @"happy.png"]];
    [layer3       setImage:[UIImage imageNamed: @"leftHandHorizontal.png"]];
    [layer4       setImage:[UIImage imageNamed: @"rightHandUp.png"]];
    [newsLayer    setImage:[UIImage imageNamed: @"empty.png"]];

    stickManSays.text = [NSString stringWithFormat:@"Check out my pendulum.."];

    // Load image sequence for pendulum motion
    NSArray *imagesPendulum = @[@"pendulum1.png", @"pendulum2.png"];

    NSMutableArray *imageSeqPendulum = [[NSMutableArray alloc] init];
    for (int i = 0; i < imagesPendulum.count; i++) {
        [imageSeqPendulum addObject:[UIImage imageNamed:[imagesPendulum objectAtIndex:i]]];
    }

    // start animation in the pendulum layer
    pendulumLayer.animationImages = imageSeqPendulum;
    pendulumLayer.animationDuration = 0.75;
    [pendulumLayer startAnimating];
}
Note how the static Stick Man image is assembled in several layers. Also, previously running animations in other layers (if any) are stopped before beginning this particular animation.
—
This app introduced the idea of using several layers and animating images within a given layer. In future posts, we will continue to explore other ways to create animations in iOS.